WHYNTER 11,000 BTU DUAL HOSE PORTABLE AIR CONDITIONER co MODEL# : ARC-110WD Instruction Manual Congratulations on your new WHYNTER product. To ensure proper operation, please read this Instruction Manual carefully before using this product. Keep this manual in a safe place for future reference.
TABLE OF CONTENTS INTRODUCTION 3 SAFETY PRECAUTIONS 4-5 IDENTIFICATION OF ACCESSORIES 6 IDENTIFICATION OF PARTS 7 INSTALLATION INSTRUCTIONS 8-9 AIR FILTERS INSTALLATION 10 REMOTE CONTROL 11 OPERATION INSTRUCTIONS 11-14 WATER DRAINAGE 15 CARE AND MAINTENANCE 16 TECHNICAL DATA 17 TROUBLESHOOTING 18-19 WARRANTY INFORMATION 20 2|Page
Thank you for choosing the Whynter portable air conditioner. Please follow the instructions provided in this user guide to obtain the very best performance from your portable air conditioner and take full advantage of the many features your portable air conditioner offers you. We trust that your Whynter air conditioner will provide the performance and reliability that we stand for. Please keep this user manual in a safe place for future reference.
Your safety and the safety of others are very important to us. To reduce the risk of fire, electrical shock or injury when using your appliance, follow these basic precautions. SAFETY PRECAUTIONS Before the portable air conditioner is used, it must be properly positioned and installed as detailed in this manual. Do not under any circumstances cut or remove the third (ground) prong from the power cord.
Keep fingers out of the air intakes and air outlets. The unit is an electrical appliance. To avoid injury from electrical shock do not operate it with wet hands, while standing on a wet surface or while standing in water. Do not use it in outdoors or in wet conditions. When positioning or moving the unit, ensure it is not turned upside down or greater than 45° or more off level. This unit is designed for household, non-commercial use only. Any other use will void the warranty.
IDENTIFICATION OF ACCESSORIES IMAGE ACCESSORY NAME QUANTITY Exhaust hose (large) 1 piece Intake hose (small) 1 piece Fixture 2 pieces Screws 8 pieces 1 Large Exhaust Hose Connector to Window Kit with tab cut-outs 1 piece 1 Large Slide Locking Exhaust Hose Connector to unit 1 piece 1 Small Slide Locking Intake Hose Connector to unit 1 piece 1 Small Intake Hose Connector to Window Kit with tab cut-outs 1 piece Window Slider Kit 1 set Cover 2 pieces Remote control 1 piece Storage Cover
IDENTIFICATION OF PARTS Front 1. Remote control 2. Front display 3. Air outlet 4. Handle 5. Wheels Rear 6. Air filter 7. Air intake (evaporator) 8. Air exhaust - large hose 9. Air intake (condenser) - small hose 10. Power cord 11. Upper drain port (rubber plug and cover) 12.
INSTALLATION INSTRUCTIONS Location The air conditioner should be placed on a hard and level surface strong enough to support its weight. The unit is equipped with caster wheels for portability. It should only be rolled on smooth, flat surfaces. Use caution when rolling on carpet surfaces. Do not attempt to roll the unit over objects. The air inlet and outlet should be free of any obstructions and be placed with at least 20” of clearance for efficient air-conditioning and circulation.
Window kit Installation Your window kit has been designed to fit most standard vertical and horizontal windows. However, it may be necessary for you to modify the installation procedures for your window. NOTE: If your window opening is smaller than the minimum length of the window slider kit, the window slider kit can be cut to fit the window opening. Never cut into the exhaust and intake hose cutouts on the window slider kit.
AIR FILTERS INSTALLATION Your Whynter portable air conditioner is equipped with a washable Pre-Filter and an activated carbon filter. The washable Pre-Filter removes large particles such as dust, pet hair and dander. The activated carbon filter is designed to remove smoke and other odor. It is recommended to replace the activated carbon filter every 2-3 months. Follow the steps below to install the filters. WARNING: NEVER OPERATE THE AIR CONDITIONER WITHOUT THE PRE-FILTER 1.
OPERATION INSTRUCTIONS Before you begin, thoroughly familiarize yourself with the control panel of the remote control. Follow the symbol for the desired function. The functions of the unit can be controlled by the remote control only. When using the remote control, make sure the reception of the signal is confirmed by a beep. NOTE: Other appliances in the same room controlled by a remote control (TV, radio, stereo, etc.), may cause interferences.
FRONT PANEL SWITCHING ON/OFF THE AIR CONDITIONER on The unit can be switched ON or OFF by pressing the Emergency on/off switch button the front display panel or the remote control. NOTE: The functions of the portable air conditioner can be switched on by the remote control ONLY. Without using the remote control, the unit can only be switched on at the previous setting and turn off the unit. LED LAMPS ON/OFF SWITCH Press the LED lamps on/off switch to turn on and off the LED lamps indicators.
DEHUMIDIFYING MODE In this mode, the air conditioner only dehumidifies the room, the compressor will activate intermittently depending on the ambient temperature. To activate this function mode, press the Mode Control button until the indicator comes on. When the dehumidifying mode is set, the orange light on the front panel comes on. Please note that when switching function mode, there will be an approximately 3 minute transition time. In dehumidifying mode, the exhaust hose does not need to be vented.
SETTING SWITCH OFF TIMER With the air conditioner operating in any function mode, press the Timer Control button . Then the and the two digits timer indicator will come on. Set the desired time delay OFF hours (1 – 24 hours) by pressing the up or down buttons. When the delay time set has elapsed, the air conditioner will switch off. To cancel the switch off timer, press the Timer Control button and set the hour to 00.
WATER DRAINAGE The air conditioner has the capacity to dehumidify up to 81 pints per day. The patented selfevaporating function of the unit fully exhausts all condensation automatically in most environments when humidity is less than 70%. Areas with more than 70% humidity, the self-evaporating function can still exhaust about 98% of the moisture and the remaining 2% of moisture will be collected in the water tank of the air conditioner.
CARE AND MAINTENANCE IMPORTANT: Switch off the air conditioner and disconnect the plug from the power outlet Drain water by removing the drain plug. Always transport the air conditioner in an upright position only. CLEANING THE PRE-FILTER To ensure the air intake is filtered properly and to assure that your air conditioner runs efficiently, it is recommended to clean the Pre-filter at least once every two weeks. Switch off the air conditioner and pull out the filter frame from the unit.
TIPS: 1. Keep the exhaust hose as short and straight as possible The exhaust hose removes heat from the room. It should remain as short and straight as possible without sharp bends or twists to maximize efficiency. If the exhaust hose must be extended, do not exceed 9’. 2. Turn the air conditioner on early Turning the air conditioner on early instead of waiting until the hottest point of the day will allow the unit to be more effective.
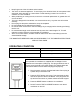
TROUBLESHOOTING Problem The portable air conditioner does not turn on Possible Causes Power failure / outage. Restore the power supply. The automatic switch, line fuse, or breaker has been tripped. Flip the switch / change the fuse / turn the breaker back on. Also note that you may have too many appliances drawing power on one circuit, you may need to move the other appliances to another circuit. The power supply voltage is too low. The power cord is damaged. The L.C.D.I.
The unit has worked for a long time, but the room is not cold enough Windows or doors are open. Close all windows and doors. There are too many people in the room. You may need additional cooling or another air conditioner. There is direct sunshine into the room. Close curtains or blinds and try to minimize the amount of direct sunlight into the room. The room is a kitchen or with many heat-producing appliances There is a server in the room. The room is too large.
ONE YEAR LIMITED WARRANTY & THREE YEAR WARRANTY ON COMPRESSOR This WHYNTER product is warranted to the original owner, purchased from an authorized Whynter dealer within the 48 U.S. continental states, for one year from the original purchase date against defects in material and workmanship under normal residential usage.