Whynter 46 Bottle Dual Temperature Zone Built-In Wine Refrigerator Model # : BWR-462DZ INSTRUCTION MANUAL Congratulations on your new Whynter product. To ensure proper operation, please read this Instruction Manual carefully before using this product. Keep this manual in a safe place for future reference. V16.10.
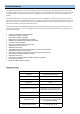
Table of Contents PAGE Safety Precautions 3-4 Parts 5 Product Features 6 Installation 7-9 Operation and Controls 10 - 12 Storage 13 - 14 Care and Maintenance 15 Troubleshooting 16 - 17 Warranty Information 18 2
Safety Precautions APPLIANCE SAFETY Your safety and the safety of others are very important to us. To reduce the risk of fire, electrical shock, or injury when using your appliance, follow these basic precautions This is the Safety Alert Symbol. This symbol alerts you to potential hazards that may result in serious injury. All safety messages will follow the Safety Alert Symbol and either the words” DANGER” or “WARNING”.
Safety Precautions Do not store or use gasoline or other flammable vapors and liquids in the vicinity of the appliance or any other appliance. Before proceeding with cleaning and maintenance operations, make sure to unplug the appliance. Do not connect or disconnect the electric plug with wet hands. Do not attempt to repair or replace any part of your appliance unless it is specifically recommended in this manual. All other servicing should be referred to a qualified technician.
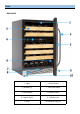
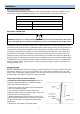
Parts BWR-462DZ 1. Light 6. Door Sensor 2. Shelves (5) 7. Door Lock Latch 3. Door Handle 8. Bottom Grille 4. Control Panel 9. Cylinder Lock 5. Door 10.
Product Features The Whynter Built-in/Undercounter dual temperature zone wine refrigerator offers premium quality and innovative design ideal for your wine collecting needs. Whether for the enthusiast or the connoisseur, the Whynter Built -in/Undercounter dual temperature zone wine refrigerator provides premium and advanced wine storage functionality. This wine storage system can hold up to 46 standard 750ml wine bottles; 16 bottles in the top zone and 30 bottles in the bottom zone.
Installation IMPORTANT SAFETY INSTRUCTIONS WARNING To reduce the risk of fire, electrical shock, or injury when using your appliance, follow these basic precautions: Read all instructions before using the appliance. DANGER or WARNING: An empty wine refrigerator can be a hazardous for children or small pets. If disposing of the wine refrigerator, remove gasket seals, latches, lids or the entire door from your unused appliance, or take other action to ensure the wine refrigerator is harmless.
Installation BUILT-IN CABINET INSTRUCTIONS These appliances are designed for both built-in or free standing installation. For built-in installation, ensure proper service access and ventilation, allow at least ¼” (6.35mm) space on each side and at the top. CABINET OPENING DIMENSIONS (minimum) BWR-462DZ Width 26” Depth 24.5” + 2” handle Height 33” ELECTRICAL CONNECTION WARNING: Improper use of the grounded plug can result in the risk of electrical shock.
Installation REVERSING THE DOOR SWING OF YOUR WINE REFRIGERATOR This appliance has the capability of the door opening from either the left or right side. The appliance is delivered to you with the door opening from the left side. Should you desire to reverse the opening direction, please follow the following reversal instructions. 1. Remove the front ventilation grille (2) and the adjustable ventilation grille (1) by unscrewing the screws (3) & (4). (Figure 1) 2.
Operation and Controls It is recommended you install the appliance in a place where the ambient temperature is between 72º- 78ºF / 23º-26ºC. If the ambient temperature is above or below recommended temperatures, the performance of the wine refrigerator may be affected. For example, placing your appliance in extreme cold or hot conditions may cause interior temperatures to fluctuate.
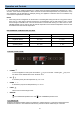
Operation and Controls NOTE: If the appliance is unplugged, encounter power interruption, or turned off, you must wait 3 -5 minutes before restarting the appliance. If attempted to restart before this time delay, the appliance may not start. SETTING THE TEMPERATURE CONTROL • During normal operation, the temperature display on the control panel shows the temperature inside the appliance. • The unit has two separate temperature zones.
Operation and Controls For easy access of the wine bottles, you must pull the shelves approximately ⅓ out of the railing. The shelves are designed with an emergency stop to prevent them being removed too far when loaded. When removing the shelves out of the railing, make sure to remove all items first. To remove the shelves, pull the shelf forward until the notch aligns with the plastic post.
Storage DOOR LOCK The appliance is provided with a lock and key combination. The keys are located inside the plastic bag that holds the User Manual. Insert the key into the lock and turn it counterclockwise to unlock the door. To lock the door do the reverse operation making sure metal pin is engaged completely. Remove the key and place it in a secure place. STORAGE Wine bottles may differ in size and dimensions so the actual number of bottles can be stored may vary.
Storage REMOVING SHELVES To remove any of the shelves from the rail compartment, pull out and extend shelf to expose all screws. Remove all screws under the shelf. (See Figure 1) Remove all screws from the extended shelf railing. (See Figure 2) In order to replace the shelf, repeat steps described above in reverse.
Care and Maintenance CAUTION: Failure to unplug the appliance during service could result in electrical shock or personal injury. CLEANING YOUR APPLIANCE Turn off the power, unplug the appliance, and remove all items including shelves. Wipe the interior with a warm water and baking soda solution. The solution should be about 2 tablespoons of baking soda to one quart of water. Wipe the shelves with a mild detergent solution. Wipe the outside cabinet with warm water and mild liquid detergent.
Troubleshooting Problem The appliance does not operate The appliance is not cold enough The appliance turns itself on and off frequently The appliance makes too much noise Possible Causes There is a power failure The appliance is not plugged in A house fuse has blown or the Replace the broken fuse or reset the breaker The set temperature too high Adjust the set temperature The appliance is placed too close to a heat source Keep the appliance away from sunshine or other he
Troubleshooting Problem Display “E0”, “E1”.
ONE YEAR LIMITED WARRANTY This WHYNTER product is warranted to the original owner, purchased from an authorized Whynter dealer within the 48 U.S. continental states, for one year from the original purchase date against defects in material and workmanship under normal residential usage. Should your WHYNTER product prove defective within one year from the date of purchase, contact Whynter’s Customer Support Team with the serial number and proof of purchase to make a warranty claim.