Whynter 95 Quart Portable Fridge / Freezer Model # : FM-951GW / FM-951YW INSTRUCTION MANUAL Congratulations on your new Whynter product. To ensure proper operation, please read this Instruction Manual carefully before using this product. Keep this manual in a safe place for future reference.
Table of Contents PAGE Safety Precautions 3-4 Parts and Accessories 5 Product Features / Technical Data 6 Installation 7-8 Operation and Controls 9 - 10 Cleaning and Maintenance 11 - 12 Troubleshooting 13 - 14 Warranty Information 15 2
Safety Precautions WARNING TO REDUCE THE RISK OF FIRE, ELECTRICAL SHOCK, OR INJURY WHEN USING YOUR PORTABLE FREEZER, FOLLOW THESE BASIC PRECAUTIONS: Read all instructions before using the appliance. Never clean appliance parts with flammable fluids. The fumes can create a fire hazard. Do not use an excessively wet cloth, industrial solvents, and oil-based products to clean this appliance. To clean the freezer, use only mild detergents. Never use harsh chemicals or solvents.
Safety Precautions WARNING TO REDUCE THE RISK OF FIRE, ELECTRICAL SHOCK, OR INJURY WHEN USING YOUR PORTABLE FREEZER, FOLLOW THESE BASIC PRECAUTIONS: When positioning the portable freezer, ensure that there is at least a 6” clearance at the sides of the portable freezer.
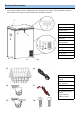
Parts and Accessories Your Whynter portable freezer is supplied with all the accessories you need to enjoy refrigeration almost anywhere. Below is an image of the freezer features and standard accessories. 1 1. Door Hinge 2. Door Handle 7 3. Door Latch 4. Side Handle 2 3 5. Drain Plug 6. Air Vent 4 7. LED light (inside cabinet) 8. AC Inlet 8 9 10 9. DC Inlet 11 10. Control Panel 11. Air Vent 12. Freezer Leg 5 13 6 12 16 13. Basket 14. Wheel castors (2 pieces) 15.
Product Features / Technical Data This Whynter Portable Fridge / Freezer offers premium quality and innovative design to your frozen/refrigerated needs. This freezer is great for RVs, boats, campsites, fishing trips and truly portable so you can take your fridge / freezer anywhere! All you need is either a standard household 110 Volt outlet or a 12 Volt power source, like an automotive battery.
Installation BEFORE USING YOUR APPLIANCE Remove the exterior and interior packing. IMPORTANT: Do not remove any permanent instruction labels or the data label on your freezer To remove any remaining tape or glue, rub the area briskly with your thumb. Tape or glue residue can also be easily removed by rubbing a small amount of liquid dish soap over the adhesive with your fingers. Wipe with warm water and dry.
Installation WHEEL INSTALLATION This portable freezer comes with optional wheel castors for mobility. 1. Carefully place the freezer on its side on a flat surface. 2. Unscrew the 4-ø5x screws from both bottom left side legs of the freezer and remove. The bottom right side legs of the freezer are not required to be removed. (Fig. 1) 3. Install the two wheel castors with plates at the bottom left side of the freezer. Tighten these castors by using the 8-ø5x screws provided. 4.
Operation and Controls CONTROL PANEL GUIDE To obtain the best possible results for your freezer, it is important that you operate it properly. Your portable freezer uses a digital control system for adjusting the thermostat. 1. Set Button Press the Set Button to select desired temperature. Temperature setting cannot be changed unless Set button is pressed. 2 - 3 . Temperature Control Buttons The temperature setting can be set within a range of -6°F to 50°F in 1°F increments.
Operation and Controls NORMAL SOUNDS Your new freezer may make sounds that are not familiar to you. Hard surfaces like the floor, walls can make the sounds seem louder than they actually are. The following describes the kinds of sounds that might be new to you and what may be making them. Ratting noises may come from the flow of the refrigerant or the water line, items stored on top of the freezer can also make noises. The surface temperature of the compressor can reach 158 - 194°F when running.
Cleaning and Maintenance DEFROSTING AND DRAINING WARNING: Before proceeding with cleaning and maintenance operations, make sure the power line of the unit is disconnected. Do not touch the power plug when your hands are wet. Never unplug the unit by pulling on the plug. To avoid damaging the freezing compartment wall, never use a sharp or metallic instrument to scrape off frost or separate the frozen food. Moisture contained in food and air may form a layer of frost inside the unit after a period of use.
Cleaning and Maintenance IN CASE OF EXTENDED POWER FAILURE Keep freezer door/lid closed. Your freezer will keep food frozen for 24 hours provided warm air is not admitted. If freezer is out of operation for 24 hours or more, add dry ice. Leave ice in large pieces. Add more ice as required NOTE: Handling of dry ice can cause freezing of the hands —gloves or other protection is recommended. If dry ice is not available, move food to a frozen food locker temporarily—until power is restored.
Troubleshooting Many common portable freezer problems are easily resolved. Try the troubleshooting suggestions below to see if the problems can be resolved before having to contact the service department.
Troubleshooting Many common portable freezer problems are easily resolved. Try the troubleshooting suggestions below to see if the problems can be resolved before having to contact the service department.
ONE YEAR LIMITED WARRANTY This Whynter Portable Freezer is warranted, to the original owner within the 48 continental states, for one year from the date of purchase against defects in material and workmanship under normal use and service.