
User's Guide


Development Kit User Guide – Rev11.0
10
Initial Hardware Setup
For initial system familiarization, WiBotic highly recommends bench-top testing. This
allows the system to be operated in open air and at various power levels and antenna
positions – demonstrating the unique flexibility of WiBotic’s technology.
Note: WiBotic does not recommend immediate installation of the wireless
power system on robots for testing purposes. Many robots consist of metallic
frames or body parts that can temporarily de-tune wireless power antennas,
resulting in degraded performance. To avoid de-tuning problems and to maximize
system performance, WiBotic offers integration services for customers who are ready to
test the system on their robot. Contact WiBotic for details.
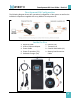
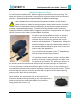
For bench-top testing WiBotic provides an antenna
stand to new customers. Shown at left, the stand
includes mounts for both the transmit and receive
antenna coils as well as a “T” shaped base. Sliding the
antenna brackets on the base allows power transfer to
be tested at different distances (both face-to-face and
side-to-side) and angularities.
First, install the two brackets on the “T” shaped base
with the thumb screws facing outward.
To install the transmit antenna, rotate it until the SMA
antenna connector is facing sideways and slide it into
the pocket on the bracket. The bottom two bosses on
the antenna enclosure should seat firmly into the rounded openings on the bracket.
It is not necessary to screw the antenna in place, but for a more secure mounting you
may substitute the bottom two antenna enclosure screws for longer M5 screws. Thread
them through the antenna enclosure and into M5 nuts placed in the small capturing
pockets on the back side of the bracket.
When finished, the vented back side of the transmit coil
enclosure should be facing outward (on the same side as the
thumb screw) and the embossed WiBotic log should be
facing toward the receiver coil.