USER’S MANUAL IF1911C (PA19ASX) TFT LCD Monitor
Table of Contents Safety Instructions................................................................................................ 2 Explanation of Graphical Symbols.................................................................................... 2 Precautions...................................................................................................................... 3 On Safety....................................................................................................................
Safety Instructions CAUTION RISK OF ELECTRIC SHOCK DO NOT OPEN AVERTISSEMENT RISQUE DE CHOC ELECTRIQUE NE PAS OUVRIR TO REDUCE THE RISK OF ELECTRIC SHOCK, DO NOT REMOVE COVER (OR BACK). NO USER-SERVICEABLE PARTS INSIDE. REFER SERVICING TO QUALIFIED SERVICE PERSONNEL. CAUTION: LCD MONITOR 54IJ E217340 WITH RESPECT TO ELECTRIC SHOCK, FIRE AND MECHANICAL HAZARDS ONLY IN ACCORDANCE WITH UL60601-10 AND CAN/CSA C22.2 NO. 601.
Safety Instructions Precautions On Safety 1. Before connecting the AC power cord to the DC adapter outlet, make sure the voltage designation of the DC adapter corresponds to the local electrical supply. 2. Never insert anything metallic into the cabinet openings of the Liquid Crystal Display (LCD) monitor ; doing so may create the danger of electric shock. 3. To reduce the risk of electric shock, do not remove cover. No user-serviceable parts inside.
Safety Instructions This TFT LCD Monitor is as accessory intended for use with Medical Equipment to display alpha, numerical and graphical data. On Installation 1. Openings in the LCD monitor cabinet are provided for ventilation. To prevent overheating, these openings should not be blocked or covered. Also avoid using the LCD monitor on a bed, sofa rug, or other soft surface. Doing so may block the ventilation openings in the bottom of the cabinet.
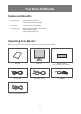
Your New LCD Monitor Feature and Benefits • Dual design - Analog/Digital Interface - Clear, Sharp and Crisp Image • Flexibility - Portrait/Landscape Display • Superior Spec - High Luminance/High Contrast Ratio - Wide Viewing Angle - Large Display Area (19˝) Unpacking Your Monitor When you unpack the LCD monitor, make sure that you have items below.
Regulatory Information FCC Information User Instructions The Federal Communications Commission Radio Frequency Interference Statement includes the following warning: NOTE This equipment has been tested and found to comply with the limits for a Class B digital device, pursuant to Part 15 of the FCC Rules. These limits are designed to provide reasonable protection against harmful interference in a residential installation.
Regulatory Information Declaration of conformity for products Marked with FCC Logo This device complies with Part 15 of the FCC Rules. Operation is subject to the following two conditions: (1) this device may not cause harmful interference, and (2) this device must accept any interference received, including interference that may cause undesired operation. The party responsible for product compliance: Provided with this monitor is a detachable power supply cord with IEC320 style terminations.
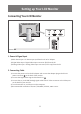
Setting up Your LCD Monitor Connecting Your LCD Monitor 1. Power & Signal Input 1) Main Power Input : DC Power Input Jack from the AC to DC Adapter. 2) Digital Video Input : Digital Video Input connector (DVI) from the PC. 3) Analog Video Input : Analog Video Input connector (D-sub 15p) from the PC. 2. Connecting Cable 1) Connect the power cord to the DC adaptor and connect the adaptor plug to the DC12V power connector 1 on the back of the monitor. 2) Connect the Digital video signal cable from PC to 2 .
Adjusting Your LCD Monitor Warm-up Time All LCD monitors need time become thermally stable whenever you turn on the monitor after the monitor be turned off for a couple of hours. Therefore, to achieve more accurate adjustments for parameters, allow the LCD monitor to warm (be on) for at least 20 minutes before making any screen adjustments.
Adjusting Your LCD Monitor Main User Controls Your LCD monitor allows you to easily adjust the characteristics of the image being displayed. All of these adjustments are made using the control buttons on the monitor. While you use these buttons to controls, an OSD shows you their change. User Controls No Name Description 1 · Turns ON/OFF the monitor. Press key more then 0.5 sec. 2 · Activates the OSD menu or goes to previous menu. · When the OSD menu is off : Performs “DICOM” function.
Adjusting Your LCD Monitor OSD Function Controls Picture Input : Digital DVI, Analog RGB Dim Brightness Adjusts the brightness of backlight. Picture Dim Brightness : 50 Brightness : 80 Contrast : 80 Brightness Adjusts the brightness of PC RGB’s brightness. Contrast Adjusts the contrast of PC RGB’s contrast. : Move : Exit : Enter Analog Setup Input : Analog RGB Auto Adjust “Auto adjustment” allows the monitor to self-adjust to the incoming video signal.
Adjusting Your LCD Monitor Setup Input : Digital DVI, Analog RGB DICOM Mode Changes the DICOM mode. User can select one mode among 5 DICOM modes. (DICOM White, DICOM Blue, TEXT View sRGB, USER) Setup DICOM Mode : DICOM White SBC : 150 Language : English Reset : » : Move SBC Changes the SBC (Stable Brightness Control) mode. SBC mode consists of 100, 150, 200, USER, OFF modes. Language Changes the OSD language. English, German, France, Italian, Spanish.
Appendix Specifications (Monitor Main) Electrical Specifications Panel Specifications Panel Specification Screen Size 19” Viewable Image Size 376.32(H) x 301.
Appendix Mechanical Specification and Regulatory Mechanical Specification Dimension Portrait Landscape 361 x 437 x 77.2 (mm) (with stand) : 361 x 493 x 200 (mm) (with stand) : 437 x 456 x 200 (mm) (w/o stand) : 361 x 437 x 77.2 (mm) Weights (Unpacked) : 8.0kg (Packed) : 13.
Appendix Power Management This system saves energy by switching your monitor into a low-power mode when it has not been used for a certain period of time. Power Management system operates with a VESA DPMS compliant video card installed in your computer. You use a software utility installed on your computer to set up this feature.
Appendix Pin Assignments DVI-D Connector Pin Signal Assignment Pin Signal Assignment 1 T.M.D.S Data 2– 13 No Connection 2 T.M.D.S Data 2+ 14 5V Power 3 T.M.D.S Data 2 Shield 15 Ground (for 5V) 4 No Connection 16 Hot Plug Detect 5 No Connection 17 T.M.D.S Data 0– 6 DDC Clock 18 T.M.D.S Data 0+ 7 DDC Data 19 T.M.D.S Data 0 Shield 8 No Connection 20 No Connection 9 T.M.D.S Data 1– 21 No Connection 10 T.M.D.S Data 1+ 22 T.M.D.S Clock Shield 11 T.M.D.
Appendix Troubleshooting No picture • Make sure that the power cord is completely connected. (See page 8.) • Make sure that the LCD monitor and computer power switch are on. • Check the signal cable connector for bent or pushed-in pins. The display image is too light or too dark. • Adjust the Brightness. (See page 11.) Screen is blank and power indicator light is steady Blue or blinks every 1seconds. • Make sure that the signal cable is completely connected to the display card or computer.
Memo 18
Memo 19
Memo 20
http://www.widecorp.