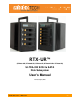
RTX-UR™ (RTX400-UR, RTX400H-UR, RTX600-UR, RTX600H-UR & RTX800-UR) ULTRA-320 SCSI to SATA Disk Subsystem User’s Manual Revised July 29, 2008 RTX-UR User’s Manual -1-
WiebeTech LLC WARRANTY The information in this document is subject to change without notice. We make no warranty of any kind regarding this material, including, but not limited to, the implied warranties or merchantability and fitness for a particular purpose. Furthermore, we shall not be liable for errors contained herein or for incidental or consequential damage in connection with the furnishing, performance, or use of this material.
WiebeTech LLC Table of Contents Chapter 1: Introduction to RAID Chapter 2: Pre-Installation 2.1 RTX accessories 2.2 RTX parts Chapter 3: Hard Drive Installation Chapter 4: Configuration 4.1 Connect the RTX to your network (or computer) for configuration 4.2 Use the LCD to configure the LAN GUI port 4.2.1 Navigating the LCD menu 4.2.2 LCD functions 4.2.3 RTX-UR LCD Menu Diagram 4.2.4 If you are connected to a DHCP-enabled network 4.2.5 If you are connected to a static network 4.2.
WiebeTech LLC 5.7.3 Reset to default 5.7.4 Config Import & Export 5.7.5 Shutdown 5.8 Quick Set-up of RAID 5.9 Connecting to your Computer Chapter 6: Formatting new volume(s) Appendix A. Certification list Appendix B.
WiebeTech LLC Chapter 1: Introduction to RAID A RAID (Redundant Array of Independent Disks) is an array of multiple hard drives that are combined in a way that provides faster performance and/or data safety. Your RTX unit is capable of creating and managing several different varieties of RAID. You may choose your preferred RAID level based on factors such as disk capacity, desired data safety, and desired performance. Summary of RAID Levels The RTX supports RAID Levels 0, 1, (0+1), 3, 5 and 6.
WiebeTech LLC Chapter 2: Pre-Installation 2.1 RTX accessories Check the accessories with your RTX-UR. Please contact WiebeTech if any parts are missing or damaged.
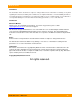
WiebeTech LLC Key lock Hardened Bay Rear Panel Power LED Key lock Access LED Ejection handle 8cm Fan SCSI Ports Standard Bay RS-232 Power LED Access LED Ejection handle Infiniband Expansion Ethernet Port (400 models only) (configuration only) Basic Bay Power LED Power Switch Power Outlet Ejection handle Access LED WARNING: Do not block the ventilation fan during operation. Overheating may damage the device or hard drives.
WiebeTech LLC Chapter 4: Configuration 4.1 Connect the RTX to your network (or computer) for configuration. a. Plug an ethernet cable into the “LAN GUI” port on the rear of the RTX. b. Connect the other end of the ethernet cable to your network. Usually, this means plugging it into a router or hub. In an office environment, you may have a network jack built into your office wall.
WiebeTech LLC 4.2.2 LCD functions: Alarm Mute To turn off the alarm sound when an error occurs Reset/Shutdown To reset or shutdown the controller To use “Quick Install” to set up a volume by three steps. Please refer to section 4.3 Quick Install for configure via the web-based GUI View IP Setting To view current IP address, subnet mask and gateway To set up the IP address, subnet mask and gateway.
WiebeTech LLC 4.2.4 If you are connected to a DHCP-enabled network On DHCP networks, a new IP address is dynamically assigned to the RTX’s LAN GUI port as soon as the network detects it. You can determine this address by checking the LCD interface on the front of the RTX. It will appear in this format: xxx.xxx.xxx.xxx. Simply type this IP address into a web browser on your computer. This will access the RTX’s GUI, which you will use to configure the unit. 4.2.5 If you are connected to a static network a.
WiebeTech LLC Chapter 5: Using the GUI You will use the web browser-based GUI to set up a RAID and create logical volumes on the RTX. After accessing the GUI (see step 5.2), the GUI’s main page should load, displaying a picture of the RTX with several options to the left. When you click on any option, you will be prompted for a user name and password. The user name is "admin" and the default password is "1234." 5.1 GUI indicators The top right hand corner of the GUI window displays several indicators.
WiebeTech LLC 5.
WiebeTech LLC 5.4 System Config The System Config menu gives access to a number of options used to configure the RTX-UR system properties. Click on “System Config” to access the following menu options: System name, IP address, Language, Login config, Password, Date, Mail, SNMP, System Log Server, and Event Log. 5.4.1 System name Clicking on the “System name” option allows you to view and change the system name. The default system name is “RTX-UR-.
WiebeTech LLC 5.4.3 Language The Language option allows you to change the language of the GUI menu. To change the language, click the drop down menu, select your choice, and then click the “Confirm” button. 5.4.4 Login Config The login configuration features are “Auto Logout” and “Login Lock.” Auto Logout allows you to set a time of 5 minutes, 30 minutes, or 1 hour to automatically log the user out of the GUI. Login Lock prevents multiple users from using the GUI simultaneously.
WiebeTech LLC and click confirm. After confirming, a dialog box will appear verifying that changes have been made. Alternatively, an NTP (network time provider) can be used to sync the RTX-UR’s time information with that of a standardized server. To use an NTP, click the NTP check box, then input the server information in the server field. Click confirm to update the time settings. A dialog box will appear to inform you that the changes have been made.
WiebeTech LLC 5.4.7 Mail RTX-UR can be configured to send email to up to 3 addresses when events, warnings, and errors occur. Contact your IT administrator to set up an email address for RTX-UR and to input the proper SMTP settings. 5.4.8 Simple Network Management Protocol (SMNP) SNMP can be configured to send trap messages to up to three different addresses on the network. To add an address, simply enter the IP address of the receiving server or computer, then click confirm.
WiebeTech LLC 5.4.10 Event Log The Event Log allows you to display and download event messages. To configure what type of messages are displayed click the Filter button. By default, errors and warnings will be displayed on both the LCD of the unit itself and in the GUI. Use the checkboxes to configure how the information is displayed. Click the Download button to download the entire event log as a text file. Click the Clear button to clear the entire event log. Click the Mute button to stop system alerts.
WiebeTech LLC The following diagram explains the architecture of RAID using RTX-UR and the relationship between physical disks (PDs), volume groups (VGs), user data volumes (UDVs), and logical unit numbers (LUNs). One VG (Volume Group) consists of a set of UDVs (User Data Volume) and owns one RAID level attribute. Each VG can be divided into several UDVs. The UDVs from one VG share the same RAID level, but may have different volume capacity.
WiebeTech LLC Status: Displays general operational status of the disk. Possible states are Good, Defect, and Fail. • 1: Displays the RAID status of the disk. Possible states are: o RD – RAID Disk. The drive is part of a RAID that is currently online. o FR – Free disk. The drive is available for use in a volume group, or to be marked as a spare. o DS – Dedicated spare. The drive is a dedicated spare of a specific volume group. This option cannot be selected until at least one volume group has been created.
WiebeTech LLC The selected PDs will now be displayed in the VG creation screen. Click next to proceed. This brings you to a confirmation screen. Verify that the RAID level is correct and all of the disks you selected are displayed under “RAID PD slot,” then click confirm to create the VG. The VG will now display on the main VG screen. The VG screen displays the following information: • No: The VG number. Click the button underneath the number of a VG to view more information. • Name: The name of the VG.
WiebeTech LLC • • • • • • • • Name: Enter a name for the UDV VG name: Choose the VG that you wish to add the UDV too. CV no.: Cache Volume number – if you have created multiple caches, you can select between them. Normally the default option is preferred. Capacity: Enter the capacity of the UDV. The default uses the maximum capacity of the associated VG.
WiebeTech LLC • • • • several hours. RAID: The RAID level of the UDV. This was chosen during the VG creation. #LUN: Number of LUNs that the UDV is using. 1 LUN must be attached before use with a computer. See section 6.6.5 for more information on attaching a LUN. VG name: The name of the VG associated with the UDV. CV (MB): The cache volume of the UDV. 5.5.4 Cache Volume The Cache volume screen allows the creation and management of multiple caches.
WiebeTech LLC Click Confirm after selecting your desired settings. The main Logical Unit Screen will now display the LUN you have just created: 5.6 Enclosure Management Enclosure management gives access to the following menu options: SES config, Hardware Monitor and SMART. 5.6.1 SES Config SCSI Enclosure Services, or SES, is a command set that is used to manage and sense the state of the power supplies, cooling devices, displays, indicators, and individual drives of a SCSI device.
WiebeTech LLC the voltages or temperatures displayed stray outside of the minimum or maximum values. Auto shutdown is enabled by default to protect the hardware of the RTX-UR. 5.6.3 S.M.A.R.T. S.M.A.R.T. (Self-Monitoring Analysis and Reporting Technology) is a diagnostic tool for hard drives that gives advanced warning in some cases of hard drive failure. S.M.A.R.T. measures various attributes of a hard drive at all times to detect if certain values have moved outside of a certain range. The S.M.A.R.T.
WiebeTech LLC The Reset to Default option allows you to restore settings to the factory defaults. After clicking Reset to Default, you will need to click Confirm to verify. 5.7.4 Config Import & Export The config import & export function allows you to import or export a firmware config file. DO NOT USE THIS FUNCTION WITHOUT SPECIFIC INSTRUCTION FROM WIEBETECH TECHNICAL SUPPORT. 5.7.5 Shutdown The Shutdown feature allows you to shutdown or reboot the RTX-UR’s RAID controller and LCD controller.
WiebeTech LLC b. Connect the SCSI cable to one of the channels on the back of the RTX. Connect the other end to the host computer. If your computer does not have an available SCSI port, you will need to install a SCSI host bus adapter (HBA). If the SCSI port on your computer is a different type and the cable will not fit, you may need to use an adapter.
WiebeTech LLC the device in this way, always make sure the drives are not being accessed before shutting off the RTXUR. If the unit is turned off in the middle of a data input/output process, data loss may result. Appendix A. Certification list RAM (RAM Spec: 184pins, DDR333(PC2700), Reg.(register) or UB(unbuffer), ECC or Non-ECC.
WiebeTech LLC Appendix B. Event notifications PD/S.M.A.R.T. Events Level Type Disk inserted Disk removed S.M.A.R.T. threshold exceed condition Info Info Warning Description Info: Disk is inserted. Info: Disk is removed. Warning: S.M.A.R.T. threshold condition exceeded.
WiebeTech LLC Info Error Error Error Info Warning Info Warning Info Info Fan restore Fan Fail Fan non-exist AC Loss Mgmt Lan Port Active Mgmt Lan Port Failed RTC Device OK RTC Access Failed Reset Password Reset IP Info: Fan has been restored. Error: Fan has failed. Error: System cooling fan is not installed. Error: AC loss for the system has been detected. Info: Management LAN Port is active. Warning: Failed to manage the system via the LAN Port. Info: RTC device is active.
WiebeTech LLC Warning Warning Warning Warning Info Error Info Info Info Info Info Info Info Info Info Info UDV IO Fault VG Failed UDV Failed Global CV Adjustment Failed Global Cache Global CV Creation Failed UDV Rename VG Rename Set VG Dedicated Spare Disks Set Global Disks UDV Read-Only WRBK Cache Policy WRTHRU Cache Policy High priority UDV Mid Priority UDV Low Priority UDV Error: IO failure for stripe number in UDV . Error: Failed to access VG . Error: Failed to access UDV .
WiebeTech LLC Appendix D: Warnings and Notices • Use only hard drives that are in perfect condition. Avoid using drives that have ever developed bad sectors during previous usage. This could lead to possible device failure or loss of data. • The RTX supports SATA hard drives of various specifications and different capacities. However, we recommend using drives of the same brand and type for optimal performance.
WiebeTech LLC Appendix F: Technical Specifications Product name/code: Raid Levels Supported: Host Interfaces: Data Interface Speeds: Drive Types Supported: TrayFree™ Technology: Online Auto-Rebuild: Shock Absorbing Bays: LED Indicators: Security: Controller Display: Operating System Requirements: Operating Temperature: Operating Humidity: Power Switch: Power Supply: Cooling Fan: Safety Certification: External Material: Shipping Weights: Dimensions: Warranty: RTX400-UR, RTX400H-UR, RTX600-UR, RTX600H-UR