SIMPLIFIED PERGOLA SYSTEM ASSEMBLY INSTRUCTIONS
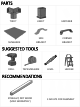
PARTS TRIFIT SUNSHADE UNIFIT FASTENER SIDE BRACKET CORNER BRACKET SUGGESTED TOOLS DRILL TAPE MEASURE LEVEL LADDER RECOMMENDATIONS STRAIGHT, DRY WOOD (SOLD SEPARATELY) 3 ADULTS FOR ASSEMBLY
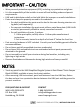
IMPORTANT – CAUTION • Wear personal protective equipment (PPE), including eye protection and gloves. • It is the responsibility of the installer to meet all local building codes and permit requirements. • LINX and its distributors shall not be held liable for improper or unsafe installations. • Posts must always be properly secured to the substrate: • For deck installation the posts must be tied to the main framing structure via lag bolts (sold separately).
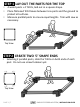
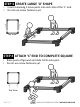
STEP 1 LAY OUT THE PARTS FOR THE TOP • • • 4 wood posts + 4 TriFits, laid out in a square shape. Place flattened TriFit boxes between Linx parts and the ground to protect all surfaces. Measure parallel posts to ensure equal lengths. Trim with saw as necessary. Top View STEP 2 CREATE TWO ‘C’ SHAPE ENDS • Selecting 2 parallel posts, slide the TriFits on both ends of each post. Do not use screw fasteners yet.
STEP 3 CREATE LARGE ‘U’ SHAPE • • Insert remaining 2 loose posts into each side of the ‘C’ end. Do not use screw fasteners yet. Top View STEP 4 ATTACH ‘C’ END TO COMPLETE SQUARE • • Raise posts off ground and slide TriFits onto post. Do not use screw fasteners yet.
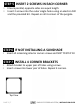
STEP 5 INSERT 2 SCREWS IN EACH CORNER • • Ensure parallel, opposite sides are equal length. Insert 2 screws into the outer single holes using an electric drill and the provided bit. Repeat on all 4 corners of the pergola. STEP 6 IF NOT INSTALLING A SUNSHADE • Insert all remaining interior corner screws and SKIP TO STEP 10 STEP 7 INSTALL 4 CORNER BRACKETS • • Attach bracket to upper pair of holes using screws. Insert screws into lower pair of holes. Repeat 4 corners.
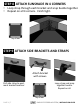
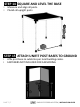
STEP 8 ATTACH SUNSHADE IN 4 CORNERS • Loop strap through each bracket and snap buckle together. • Repeat on all 4 corners. Cinch tight. Top View STEP 9 ATTACH SIDE BRACKETS AND STRAPS Attach bracket with screws. Pull side strap to post, mark bracket location. Loop strap and snap together buckle. Repeat on all.
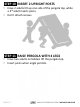
STEP 10 INSERT 2 UPRIGHT POSTS • Have 2 adults tilt up one side of the pergola top, while a 3rd adult inserts posts. • Don’t attach screws. STEP 11 RAISE PERGOLA WITH 4 LEGS • Have two adults on ladders lift the pergola top. • Insert posts when angle permits.
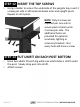
STEP 12 INSERT THE TOP SCREWS • Using a ladder to access the underside of the pergola top, insert 2 screws per side in all horizontal beam arms and upright posts. Repeat on all 4 posts. NOTE: Only 4 screws are required per Linx arm to secure post or beam ends. 2 screws per side. The additional holes are provided for optional sunshade, lighting or accessory brackets. Not every hole will have a screw.
STEP 14 SQUARE AND LEVEL THE BASE • • Measure and align all posts. Plumb all upright posts STEP 15 ATTACH UNIFIT POST BASES TO GROUND • • Affix post base to substrate per local building codes.
SISTEMA DE PÉRGOLA SIMPLIFICADO SYSTÈME DE PERGOLA SIMPLIFIÉ INSTRUCCIONES DE MONTAJE INSTRUCTIONS DE MONTAGE
PARTES / PIECES TRIFIT TRIFIT TORNILLO VIS UNIFIT UNIFIT SOMBRILLA PARASOL SOPORTE LATERAL SUPPORT LATÉRALE SOPORTE DE ESQUINA SUPPORT D'ANGLE HERRAMIENTAS SUGERIDAS / OUTILS PROPOSÉS TALADRO PERCEUSE MEDIDA DE CINTA METRE RUBAN NIVEL NIVEAU ESCALERA ECHELLE RECOMENDACIONES / RECOMMANDATIONS MADERA RECTA Y SECA BOIS DROIT ET SEC 3 ADULTOS PARA EL MONTAJE 3 ADULTES POUR LE RASSEMBLEMENT
IMPORTANTE - PRECAUCIÓN • Use equipo de protección personal (PPE), incluyendo protección ocular y guantes. • Es responsabilidad del instalador cumplir con todos los códigos de construcción locales y los requisitos de los permisos. • LINX y sus distribuidores no serán responsables de las instalaciones inadecuadas o inseguras.
IMPORTANT - AVERTISSEMENT • Porter un équipement de protection individuelle (EPI), notamment des lunettes de protection et des gants. • Il incombe à l'installateur de respecter tous les codes de construction locaux et les exigences en matière de permis. • LINX et ses distributeurs ne peuvent être tenus responsables des installations incorrectes ou dangereuses.
FASE 1 Y COLOCAR LAS PIEZAS PARA LA PARTE SUPERIOR · 4 postes de madera + 4 TriFits, dispuestos en forma cuadrada. · Coloca cajas TriFit aplanadas entre las partes de Linx y el suelo para proteger todas las superficies. · Mida los postes paralelos para asegurar la igualdad de longitudes. Recortar con una sierra si es necesario. ÉTAPE 1 DE DISPOSER LES PARTIES POUR LE SOMMET · 4 poteaux en bois + 4 TriFits, disposés en carré.
FASE 3 CREAR UNA GRAN FORMA DE 'U' · Inserte los 2 postes sueltos restantes en cada lado del extremo 'C'. · No utilice todavía los tornillos de sujeción. ÉTAPE 3 CRÉER UNE FORME EN "U" LARGE · Insérez les deux autres poteaux libres de chaque côté de l'extrémité "C". · N'utilisez pas encore de vis de fixation. VISTA AEREA VUE EN PLAN FASE 4 ADJUNTAR EL EXTREMO "C" PARA COMPLETAR EL CUADRADO · Levantar los postes del suelo y deslizar los TriFits en el poste.
FASE 5 INSERTE 2 ÉTAPE 5 INSÉRER 2 VIS TORNILLOS EN CADA ESQUINA DANS CHAQUE COIN · Asegúrate de que los lados paralelos y opuestos tengan la misma longitud. · Inserte 2 tornillos en los agujeros individuales exteriores usando un taladro eléctrico y la broca suministrada. · Repita en las 4 esquinas de la pérgola. FASE 6 SI NO INSTALANDO UN PARASOL · Inserte todos los tornillos restantes de la esquina interior y PASE AL FASE 10.
FASE 7 INSTALAR 4 SOPORTES DE ESQUINA · Fijar el soporte al par superior de agujeros con tornillos. · Inserte los tornillos en el par de orificios inferiores. Repita las 4 esquinas. ÉTAPE 7 INSTALLER 4 SUPPORTS D'ANGLE · Fixez le support à la paire de trous supérieurs à l'aide de vis. · Insérez les vis dans la paire de trous inférieure. Répétez les 4 coins. VISTA AEREA VUE EN PLAN FASE 8 COLOCAR LA SOMBRILLA EN LAS 4 ESQUINAS · Pasa la correa a través de cada soporte y se ajusta la hebilla.
FASE 9 COLOCAR LOS SOPORTES LATERALES Y LAS CORREAS ÉTAPE 9 FIXER LES SUPPORTS LATÉRAUX ET LES COURROIES · Tire de la correa lateral del poste, marque la ubicación del soporte. · Tirez la sangle latérale vers le poteau, marquez l'emplacement du support · Fijar el soporte con tornillos. · Fixez le support à l'aide de vis. · Lazo de la correa y hebilla a presión. Repita en todos. · Bouclez la sangle et attachez la boucle. Répétez sur tous.
FASE 10 INSERTAR 2 POSTES ÉTAPE 10 INSÉRER 2 VERTICALES · Haz que dos adultos se inclinen hacia arriba por un lado de la parte superior de la pérgola, mientras que un tercer adulto inserta los postes. · No coloquen tornillos. FASE 11 LEVANTAR LA PÉRGOLA CON 4 PATAS · Que dos adultos en las escaleras levanten la parte superior de la pérgola. · Insertar los postes cuando el ángulo lo permita.
FASE 12 INSERTAR LOS ÉTAPE 12 INSÉRER LES VIS TORNILLOS · En utilisant une échelle pour accéder · Usando una escalera para acceder a la à la partie inférieure du toit de la parte inferior de la parte superior de la pergola, insérez 2 vis par côté dans pérgola, inserte 2 tornillos por lado en tous les bras de la poutre horizontale todos los brazos de la viga horizontal y et les poteaux verticaux. Répétez l'opération sur les 4 poteaux. los postes verticales. Repita en los 4 postes.
FASE 14 CUADRAR Y NIVELAR LA BASE ÉTAPE 14 ÉQUERRER ET NIVELER LA BASE · Mida y alinee todos los postes. · Plomar todos los postes verticales · Mesurez et alignez tous les postes. · · · · Aplomb de tous les poteaux verticaux FASE 15 FIJAR LAS BASES ÉTAPE 15 FIXER LES BASES UNIFIT A LA TIERRA · Fijar la base del poste al sustrato según los códigos de construcción locales.