ASSEMBLY INSTRUCTIONS ASSEMBLY TIPS: 1. Remove hardware from box and sort by size, 2. Please check to see that all hardware and parts are present prior to start of assembly. 3. Please follow attached instructions in the same sequence as numbered to assure fast & cays assembly. Warning! 1. Don’t attempt to repair or modify parts that are broken or defective. Please contact the store immediately. 2. This product is for home use only and not intended for commercial establishments.
ASSEMBLY INSTRUCTIONS ASSEMBLY TIPS: 1. Remove hardware from box and sort by size. 2. Please check to see that all hardware and parts are present prior to start of assembly. 3. Please follow attached instructions in the same sequence as numbered to assure fast & cays assembly. Warning! 1. Don’t attempt to repair or modify parts that are broken or defective. Please contact the store immediately. 2. This product is for home use only and not intended for commercial establishments.
ASSEMBLY INSTRUCTIONS ASSEMBLY TIPS: 1. Remove hardware from box and sort by size, 2. Please check to see that all hardware and parts are present prior to start of assembly. 3. Please follow attached instructions in the same sequence as numbered to assure fast & cays assembly. Warning! 1. Don’t attempt to repair or modify parts that are broken or defective. Please contact the store immediately. 2. This product is for home use only and not intended for commercial establishments.
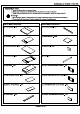
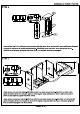
ASSEMBLY INSTRUCTIONS STEP 2 Align cam nut on back rail and top frame with per-drilled holes on divider. Insert cam nut :| into per-drilled holes on divider as shown in the NY diagram and tighten with screw driver (not included) STEP 3 Slide large and small back panel into the groove on back and bottom rail.
ASSEMBLY INSTRUCTIONS STEP 4 Screw in short cam bolt to multi purpose tray bottom panel using screw driver (not included).
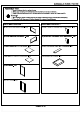
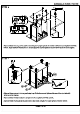
ASSEMBLY INSTRUCTIONS STEP 6 Align and fasten bottom panel to side box and side panel using long bolt, flat washer and barrel nut and tighten with Allen wrench. Align and fasten bottom panel to divider using cam nut and tighten with screw driver as shown in the diagram. STEP 7 Align and fasten castors to bottom panel using long flat head screw and tighten with screw driver (not included) as shown in the diagram. Align and fasten bracket to side box using short bolt and tighten with Allen wrench.
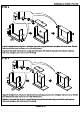
ASSEMBLY INSTRUCTIONS STEP 8 Align left and right drawer side panel to left drawer front panel using pan head screw and tighten with screw driver. Slide the large drawer bottom panel into the groove on side and front panel.
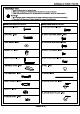
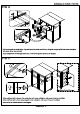
ASSEMBLY INSTRUCTIONS STEP 10 £ &£R Align and fasten magnetic catch to left and right side of divider using short flat head screw and tighten with screw driver (not include) Insert shelf support into per-drilled holes on divider, side panel and side box. STEP 11 Align and fasten doors to side box and side panel using short pan head screw and tighten with screw driver (Not Included).
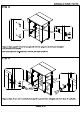
ASSEMBLY INSTRUCTIONS STEP 12 Pull out the trash can holder glide, align and fasten the thrash can holder to the glide using long flat head screw and tighten with screw driver (not included) Align and slide the left and right drawer box to the drawer glide as shown in the diagram. STEP 13 Align and fasten pull to drawer front using short pull screw and tighten with screw driver (not included).