Chapter 1 In This Chapter Selecting commands from the Ribbon Customizing the Quick Access Toolbar Methods for starting Excel 2007 Getting some help with using this program MA Surfing an Excel 2007 worksheet and workbook TE RI Getting familiar with the new Excel 2007 program window AL The Excel 2007 User Experience D Quick start guide for users migrating to Excel 2007 from earlier versions TE T PY RI GH he designers and engineers at Microsoft have really gone and done it this ti
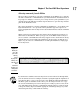
12 Part I: Getting In on the Ground Floor Excel’s Ribbon User Interface When you first launch Excel 2007, the program opens up the first of three new worksheets (named Sheet1) in a new workbook file (named Book1) inside a program window like the one shown in Figure 1-1 and Color Plate 1.
Chapter 1: The Excel 2007 User Experience Formula bar Office button Quick Access toolbar Ribbon Figure 1-1: The Excel 2007 program window that appears immediately after launching the program. Status bar Figure 1-2: Click the Office Button to access the commands on its pulldown menu, open a recent workbook, or change the Excel Options.
14 Part I: Getting In on the Ground Floor Bragging about the Ribbon The Ribbon (shown in Figure 1-3) radically changes the way you work in Excel 2007. Instead of having to memorize (or guess) on which pull-down menu or toolbar Microsoft put the particular command you want to use, their designers and engineers came up with the Ribbon that always shows you all the most commonly used options needed to perform a particular Excel task.
Chapter 1: The Excel 2007 User Experience When you work in Excel with the Ribbon minimized, the Ribbon expands each time you click one of its tabs to show its command buttons but that tab stays open only until you select one of the command buttons. The moment you select a command button, Excel immediately minimizes the Ribbon again to just the display of its tabs.
16 Part I: Getting In on the Ground Floor In addition to these seven standard tabs, Excel has an eighth, optional Developer tab that you can add to the Ribbon if you do a lot of work with macros and XML files — see Chapter 12 for more on the Developer tab. Although these standard tabs are the ones you always see on the Ribbon when it’s displayed in Excel, they aren’t the only things that can appear in this area.
Chapter 1: The Excel 2007 User Experience Selecting commands from the Ribbon The most direct method for selecting commands on the Ribbon is to click the tab that contains the command button you want and then click that button in its group. For example, to insert a piece of Clip Art into your spreadsheet, you click the Insert tab and then click the Clip Art button to open the Clip Art task pane in the Worksheet area.
18 Part I: Getting In on the Ground Floor Adapting the Quick Access toolbar When you first start using Excel 2007, the Quick Access toolbar contains only the following few buttons: Save to save any changes made to the current workbook using the same filename, file format, and location Undo to undo the last editing, formatting, or layout change you made Redo to reapply the previous editing, formatting, or layout change that you just removed with the Undo button The Quick Access toolbar is very custom
Chapter 1: The Excel 2007 User Experience Redo to reapply the last edit that you removed with Undo Sort Ascending to sort the current cell selection or column in A to Z alphabetical, lowest to highest numerical, or oldest to newest date order Sort Descending to sort the current cell selection or column Z to A alphabetical, highest to lowest numerical, or newest to oldest date order When you first open this menu, only the Save, Undo, and Redo options are selected (indicated by the check marks in front
20 Part I: Getting In on the Ground Floor Figure 1-6: Use the buttons on the Customize tab of the Excel Options dialog box to customize the appearance of the Quick Access toolbar. You can add separators to the toolbar to group related buttons. To do this, click the selection in the list box on the left and then click the Add button twice to add two. Then, click the Move Up or Move Down buttons to position one of the two separators at the beginning of the group and the other at the end.
Chapter 1: The Excel 2007 User Experience 3. Click the Add button to add the command button to the bottom of the list box on the right. 4. (Optional) To reposition the newly added command button so that it’s not the last one on the toolbar, click the Move Up button until it’s in the desired position. 5. Click the OK button to close Excel Options dialog box.
22 Part I: Getting In on the Ground Floor How you assign 26 letters to 16,384 columns When it comes to labeling the 16,384 columns of an Excel 2007 worksheet, our alphabet with its measly 26 letters is simply not up to the task.
Chapter 1: The Excel 2007 User Experience Press F5 to open the Go To dialog box, type the address of the desired cell into its Reference text box and then click OK Use the cursor keys as shown in Table 1-1 to move the cell cursor to the desired cell Use the horizontal and vertical scroll bars at the bottom and right edge of the Worksheet area to move the part of the worksheet that contains the desired cell and then click the cell to put the cell cursor in it Keystroke shortcuts for moving the cell cu
24 Part I: Getting In on the Ground Floor Table 1-1 (continued) Keystroke Where the Cell Cursor Moves Ctrl+↑ or End, ↑ First occupied cell above in the same column that is either preceded or followed by a blank cell. If no cell is occupied, the pointer goes to the cell at the very top of the column. Ctrl+↓ or End, ↓ First occupied cell below in the same column that is either preceded or followed by a blank cell. If no cell is occupied, the pointer goes to the cell at the very bottom of the column.
Chapter 1: The Excel 2007 User Experience After engaging Scroll Lock, when you scroll the worksheet with the keyboard, Excel does not select a new cell while it brings a new section of the worksheet into view. To “unfreeze” the cell pointer when scrolling the worksheet via the keyboard, you just press the Scroll Lock key again. Tips on using the scroll bars To understand how scrolling works in Excel, imagine its humongous worksheet as a papyrus scroll attached to rollers on the left and right.
26 Part I: Getting In on the Ground Floor The only disadvantage to using the scroll bars to move around is that the scroll bars bring only new sections of the worksheet into view — they don’t actually change the position of the cell cursor. If you want to start making entries in the cells in a new area of the worksheet, you still have to remember to select the cell (by clicking it) or the group of cells (by dragging through them) where you want the data to appear before you begin entering the data.
Chapter 1: The Excel 2007 User Experience One reason for adding extra sheets to a workbook You may wonder why on earth anyone would ever need more than three worksheets given just how many cells each individual sheet contains. The simple truth is that it’s all about how you choose to structure a particular spreadsheet rather than running out of places to put the data.
28 Part I: Getting In on the Ground Floor AutoCalculate indicator that displays the Average and Sum of all the numerical entries in the current cell selection along with the Count of every cell in selection Layout selector that enables you to select between three layouts for the Worksheet area: Normal, the default view that shows only the worksheet cells with the column and row headings; Page Layout View that adds rulers, page margins, and shows page breaks for the worksheet; and Page Break Preview tha
Chapter 1: The Excel 2007 User Experience Starting and Exiting Excel Excel 2007 runs under both the older Windows XP operating system and the brand new Windows Vista operating system. Because of changes made to the Start menu in Windows Vista, the procedure for starting Excel from this version of Windows is a bit different from Windows XP.
30 Part I: Getting In on the Ground Floor Pinning Excel to the Start menu If you use Excel all the time, you may want to make its program option a permanent part of the Windows Start menu. To do this, you pin the program option to the Start menu (and the steps for doing this are the same in Windows XP as they are in Windows Vista): 1. Start Excel from the Windows Start menu.
Chapter 1: The Excel 2007 User Experience 3. Right-click the file icon for the excel.exe file at the top of the Start menu and then highlight Send To on the pop-up menu and click Desktop (Create Shortcut) on its continuation menu. A shortcut named EXCEL -Shortcut appears to your desktop. You should probably rename the shortcut to something a little more friendly, such as Excel 2007. 4. Right-click the EXCEL - Shortcut icon on the Vista desktop and then click Rename on the pop-up menu. 5.
32 Part I: Getting In on the Ground Floor 7. Click the Close button in the upper-right corner of the Search Results dialog box. After closing the Search Results dialog box, you should see the icon named Shortcut to excel.exe on the desktop. You should probably rename the shortcut to something a little more friendly, such as Excel 2007. 8. Right-click the Shortcut to excel.exe icon and then click Rename on the pop-up menu. 9.
Chapter 1: The Excel 2007 User Experience before exiting, click the Yes command button. (For detailed information on saving documents, see Chapter 2.) If you’ve just been playing around in the worksheet and don’t want to save your changes, you can abandon the document by clicking the No button. Help Is on the Way You can get online help with Excel 2007 anytime that you need it while using the program.
34 Part I: Getting In on the Ground Floor To print the help topic currently displayed in the Excel Help window, click the Print button (with the printer icon) on its toolbar. Excel then opens a Print dialog box where you can select the printer and options to use in printing the information. To display a table of contents with all the main categories and subtopics arranged hierarchically, click the Show Table of Contents button (with the book icon) on the toolbar.
Chapter 1: The Excel 2007 User Experience Cutting the Ribbon down to size First thing to do is to get that busy Ribbon out of your face. At this point, it’s just taking up valuable work space and probably making you crazy. So, please double-click any one of the tabs or press Ctrl+F1 right now to cut the Ribbon display down to only its tabs.
36 Part I: Getting In on the Ground Floor Table 1-2 (continued) Excel 2003 Command Excel 2007 Equivalent Common Shortcut Keys Excel 2007 Shortcut Keys File➪Save As Office Button | Save As F12 Alt+FA File➪Print Office Button | Print Ctrl+P Alt+FP File➪Send To➪ Mail Recipient Office Button| Send|Email Alt+FDE File➪Send To➪ Recipient Using Internet Fax Service Office Button| Send | Internet Fax Alt+FDX File➪Close Office Button | Close Ctrl+W Alt+FC Edit Menu Edit➪Office Clipboard Home |
Chapter 1: The Excel 2007 User Experience Excel 2003 Command Excel 2007 Equivalent Common Shortcut Keys Excel 2007 Shortcut Keys Insert Menu Insert➪Cells Home | Insert | Insert Cells Alt+HII Insert➪Rows Home | Insert | Insert Sheet Rows Alt+HIR Insert➪Columns Home | Insert | Insert Sheet Columns Alt+HIC Insert➪Worksheets Home | Insert | Insert Sheet Alt+HIS Insert➪Symbol Insert | Symbol Alt+NU Insert➪Page Break Page Layout | Page Breaks | Insert Page Break Alt+PBI Insert➪Name➪ Define
38 Part I: Getting In on the Ground Floor Table 1-2 (continued) Excel 2003 Command Excel 2007 Equivalent Common Excel 2007 Shortcut Keys Shortcut Keys Format➪ Column➪Width Home | Format | Column Width Alt+HOW Format➪ Column➪ Hide/Unhide Home | Format | Hide & Unhide | Hide Columns/ Unhide Columns Alt+HOUC/ Alt+HOUL Format➪ Column➪ Standard Width Home | Format | Default Width Alt+HOD Format➪Sheet➪ Home | Format | Rename Rename Sheet Alt+HOR Format➪Sheet➪ Home | Format | Hide & Hide/Unhide Unhi
Chapter 1: The Excel 2007 User Experience Excel 2003 Command Excel 2007 Equivalent Common Shortcut Keys Tools➪Track Changes Review | Track Changes Alt+RG Tools➪ Protection➪ Protect Sheet Review | Protect Sheet Alt+RPS Tools➪ Protection➪ Allow Users to Edit Ranges Review | Allow Users to Edit Ranges Alt+RU Tools➪ Protection➪ Protect Workbook Review | Protect Workbook Alt+RPW Tools➪ Review | Protect Protection➪ Sharing Protect and Share Workbook Excel 2007 Shortcut Keys Alt+RO Tools➪Macro
40 Part I: Getting In on the Ground Floor Table 1-2 (continued) Excel 2003 Command Excel 2007 Equivalent Data➪Subtotals Data | Subtotal Common Shortcut Keys Excel 2007 Shortcut Keys Alt+AB Data➪Validation Data | Data Validation | Data Validation Alt+AVV Data➪Table Data | What-If Analysis | Data Table Alt+AWT Data➪Text to Columns Data | Convert Text to Table Alt+AE Data➪ Consolidate Data | Consolidate Alt+AN Data➪Group and Outline Data | Group/Ungroup Alt+AG/ Alt+AU Data➪PivotTable Inser
Chapter 1: The Excel 2007 User Experience For the most part, the pull-down menu commands listed in Table 1-2 are logically located. The ones that take the most getting used to are the Header and Footer and PivotTable/Chart commands that are located on the Insert tab rather than the View tab and Data tab as might be expected given they inhabited, respectively, the View and Data pull-down menus in earlier Excel versions.
42 Part I: Getting In on the Ground Floor Table 1-3 (continued) Toolbar button Excel 2007 Equivalent Common Shortcut Keys Excel 2007 Shortcut Keys E-mail Office Button | Send | Email Print Quick Print button on Quick Access toolbar Print Preview Office Button | Print | Print Preview Spelling Review | Spelling Research Review | Research Cut Home | Cut (scissors icon in Clipboard group) Ctrl+X Alt+HX Copy Home | Copy (doublesheet icon in Clipboard group) Ctrl+C Alt+HC Paste Home | Past
Chapter 1: The Excel 2007 User Experience Toolbar button Excel 2007 Equivalent Common Shortcut Keys Sort Descending Home | Sort & Filter | Sort Z to A ChartWizard Not available except as specific chart type command buttons in the Charts group on the Insert tab Drawing Not available except as command buttons in the Shapes, Illustrations, and Text groups on the Insert tab and as custom buttons added to Quick Access toolbar Zoom View | Zoom Microsoft Excel Help Microsoft Office Excel Help button to
44 Part I: Getting In on the Ground Floor Ribbon. They’re all easy to identify as they use the same icons as before and are located in the Font, Alignment, or Number group on the Home tab (refer to Figure 1-3).
Chapter 1: The Excel 2007 User Experience Putting the Quick Access toolbar to excellent use Figure 1-10 shows you the Excel 2007 program window with the Ribbon minimized and a completely customized Quick Access toolbar that’s moved down so that it appears under the tabs and immediately above the Formula bar.
46 Part I: Getting In on the Ground Floor To customize your Quick Access toolbar so that it matches the one shown in Figure 1-10 with every button from the Standard and Formatting toolbars except the Permission, Zoom, and Help buttons, follow these steps: 1. Click the Customize Quick Access Toolbar button at the end of the Quick Access toolbar and then click the Show Below the Ribbon option.
Chapter 1: The Excel 2007 User Experience 8. Click the Choose Commands From drop-down button and then click Review Tab in the drop-down list. Excel now displays all the command buttons on the Review tab of the Ribbon in the list box below. 9. Add the Spelling and Research buttons from the Review Tab list box to the Customize Quick Access Toolbar list box and position them so that they appear one after the other following the Print Preview button.
48 Part I: Getting In on the Ground Floor • Underline • Align Text Left • Center • Align Text Right • Merge and Center • Accounting Number Format (corresponding to the Currency Style button) • Percent Style • Comma Style • Increase Decimal • Decrease Decimal • Decrease Indent • Increase Indent • Borders • Fill Color • Font Color. 15. Click the OK button to close the Excel Options dialog box and return to the Excel program window.
Chapter 1: The Excel 2007 User Experience Getting good to go with Excel 2007 The version of the Excel 2007 program window shown in Figure 1-10 with the Ribbon minimized to just tabs and the Quick Access toolbar displayed above the Formula bar with all but a few of the buttons from the Standard and Formatting toolbars is as close as I can get you to any sort of Excel 2003 Classic mode.
50 Part I: Getting In on the Ground Floor If you’re working an office environment where all the workbooks you produce with Excel 2007 must be saved in the old 97-2003 file format for compatibility sake, you can change the program’s default Save setting so that the program always saves all new workbooks in the old file format.