User’s Guide WiLife Video Security System V2.
Copyright © WiLife, Inc. 2007. No part of this document may be reproduced, transmitted, transcribed, stored in a retrieval system, or translated into any language in any form or by any means without the written permission of WiLife, Inc. WiLife, WiLife Command Center, and WiLife Online are registered trademarks or trademarks of WiLife Inc. Microsoft .NET Framework, Microsoft, Windows, Windows Me, Windows XP, Windows Vista are registered trademarks or trademarks of Microsoft Corporation.
WiLife User Guide ii
Table of Contents WELCOME TO WILIFE...................................................................................................................... 1 Introduction..............................................................................................................................................1 WiLife Video Security System Applications ........................................................................................2 Overview of the WiLife Video Security System.......................
WiLife User Guide Protect and Upload Video Segments .............................................................................................. 32 Check Online Storage....................................................................................................................... 33 Print or Save Recorded Video.......................................................................................................... 34 Deleting a Video Clip ...........................................................
WiLife User Guide Find My Cameras.............................................................................................................................. 69 Rediscover Cameras ........................................................................................................................ 72 Set or Change Your Password ......................................................................................................... 72 Set Password System & Feature Locks .................................
WiLife User Guide WiLife Firewall Requirements ........................................................................................................ 109 Microsoft Firewall ............................................................................................................................... 111 Norton Internet Security 2001 - 2005 .............................................................................................. 113 Norton Personal Firewall 2006........................................
1 Introduction Welcome to WiLife Thank you for purchasing the WiLife Video Security System or WiLife Pro System. As you already know, WiLife® is a robust video monitoring system for your home or small business allowing you to view live, streaming video from up to six cameras. State-of-the-art cameras capture digital-streaming, full-color video and transmits the live feed to the Command Center software application, which provides a user interface that is both user-friendly and powerful.
Welcome to WiLife User Guide WiLife Video Security System Applications Overview of the WiLife Video Security System WiLife has three primary components: Intelligent Cameras, Powerful Command Center Software, and WiLife Online Services. At the center of the Command Center are components to view live camera video; search for, and play back recorded video; and tools to configure system options. These components, respectively, are Live Mode, Playback Mode, and Setup. Basic Concepts 1.
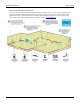
Welcome to WiLife User Guide UNDERSTANDING HOMEPLUG TECHNOLOGY One key to our system is our use of HomePlug technology. HomePlug allows you to turn your existing wiring into a powerful network capable of delivering rich, live video from around your property to your PC and from there anywhere you need it. This illustration best describes how HomePlug works to give you a fast and easy setup and a reliable video security camera network. Click here to view a full-size PDF copy.
Welcome to WiLife User Guide UNDERSTANDING THE WILIFE PRO NETWORK WiLife Pro seamlessly integrates WiLife-engineered components of up to six WiLife IP and/or HomePlug Digital Cameras, WiLife Command Center PC software, and WiLife Online Services, into one turnkey video security system. 2. POWERFUL CAMERAS At the heart of each WiLife Camera is an imbedded computer that actively encodes, adjusts, and manages your video feed – WiLife Cameras are the smartest surveillance cameras available.
Welcome to WiLife User Guide WiLife Power Injector using standard Ethernet cable. On the Ethernet line, the camera both communicates and receives its power, making it easy to set up. Features include all of those present in the standard WiLife Camera, and also include DHCP and fixed IP-addressing and WiLife Powered Ethernet. There are many applicable locations for WiLife Cameras.
Welcome to WiLife User Guide seconds long, while others could last hours. As a Setup option, you specify the maximum amount of disk space allocated to the Command Center for video file storage. Once the WiLife Command Center reaches this limit, it makes space for new video clips by removing the oldest clips. With the default camera settings, a typical home system with four cameras will use approximately 2GB of disk space per week. 4.
Welcome to WiLife User Guide System Components WILIFE RETAIL CAMERAS WiLife Cameras are the smartest cameras on the market. At their core is a 400MHz processor. Using the processor, they automatically adjust the video picture for changing light conditions (auto-brightness), detect motion, and encode video using Windows Media 9 Video file format. When WiLife cameras detect motion, they record the event and save it to the WiLife Video folder. The WiLife Command Center supports up to six cameras.
Welcome to WiLife SPY CAMERA User Guide The Spy Camera delivers the power of professional-grade video security in a package that is easy to set up and affordable. The Spy Camera masquerades as a sleek, fully functioning digital clock, and is perfect for coverage of any area of the home or small business that requires discreet observance. The Spy Camera can be placed anywhere on a flat surface that has an unobstructed field of view.
Welcome to WiLife User Guide CAT 5E CABLE FOR STANDARD WILIFE RETAIL KITS The CAT 5e Cable carries DC power from the Camera Power Supply to the camera and provides the network connection for digital data communications to and from the camera. The cable supplied with the WiLife Indoor Camera packages was specifically selected because it was small, flexible, and unobtrusive, in comparison to a typical CAT 5e cable. Note: You can find longer CAT 5e cable cables in our online store at www.wilife.com.
Welcome to WiLife User Guide WALL MOUNT Component of both the WiLife Retail kits and WiLife Pro kits. Using a few screws, the Wall Mount allows you to hang the camera from a wall, ceiling, or other surface to watch a room from a discrete location. WiLife Kit Accessories NIGHTVISION UPGRADE KITS Component for both the WiLife Retail and WiLife Pro Indoor Camera kits.
Welcome to WiLife User Guide User Guide Chapters We designed this manual to be the ultimate resource for learning, understanding, and using the multi-faceted features within the Command Center application to meet your personal or small business expectations. The content of the User Guide is laid out into five chapters, the first of which you have nearly completed.
2 User Guide Getting Started Overview The WiLife Command Center is very easy to deploy because of an installation process that we designed to be user-friendly. Depending on how comfortable you feel installing the application, you can choose to use the QuickStart instructions (found in the Installation Kit) or the comprehensive installation instructions provided in this chapter.
Getting Started User Guide System Requirements Below you can find the minimum and recommended requirements for systems running cameras using the default QVGA (320 x 240) settings. Running your cameras in the higher VGA (640 x 480) mode requires additional CPU. Requirement CPU Speed* Memory (MB) ** Video Card (MB) Number of Cameras 1 2 3 4 5 6 2.2 GHz 2.4 GHz 2.6 GHz 2.8 GHz 3.0 GHz 3.
Getting Started User Guide Starter Kit Contents Before you begin the installation process, please review the contents of the kit to verify that all of the components necessary for a successful install are inside. If any of these listed items are not in the kit, please contact WiLife Customer Support for assistance. INDOOR STARTER KIT Command Center Installation CD Quick Start Guide USB Receiver USB Cable (6 ft.) WiLife Indoor Camera Camera Power Supply Cat5 Cable (8 ft.
User Guide A. WELCOME TO THE INSTALL WIZARD The Command Center install is ready to start. Simply click the Next> button to begin. A. IF NECESSARY, COMMAND CENTER WILL GUIDE YOU THROUGH THE INSTALLATION OF MICROSOFT .NET FRAMEWORK The Microsoft .NET Framework is a collection of tools used by many software programs. Some computers already have Microsoft's .NET Frame installed as part of other applications. For those that do not yet have .NET installed, we will install it now.
Getting Started User Guide Click Next> to begin the Setup Wizard. SET DISK USAGE OPTIONS SCREEN The Set Disk Usage options window allows you to set two things: 1. Location for video storage. 2. The amount of disk space allocated for Command Center video storage. The screen lists and shows you how much Free and Used space is on your PC. If your PC already has WiLife video files stored on it, the amount saved will display in the “Existing Command Center Video” field.
Getting Started User Guide TELL US ABOUT YOUR SYSTEM This screen allows you to specify the number of cameras you are putting on the system during this install and how they are connected to the computer, i.e. via a WiLife USB Adapter, Other HomePlug Powerline Adapter, or NonPowerline LAN. (Typically, the answer to this last question is the WiLife USB adapter.) Click Next> to continue. PLUG IN YOUR POWERLINE ADAPTER Now, you are ready to plug in the USB Receiver.
Getting Started User Guide NAME YOUR CAMERAS Simply name your cameras by clicking inside the text field under each video panel and entering the desired name. Suggestions for names might be: Garage, Entryway, Foyer, Kitchen, Storage Area, Front Door, Porch, Family Area, etc. Click Next> to continue. Firewall Setup It is very likely that you have one of many Firewall applications running on your computer.
Getting Started User Guide Windows Firewall Auto-Alert McAfee Auto-Alert Message Additional Cameras You can have up to six WiLife Cameras for each WiLife site. Currently, WiLife offers a suite of three intelligent digital video security cameras —Indoor, Outdoor, and Spy. But check our website periodically for news regarding any new cameras being released. Adding new cameras to your WiLife Video Security network is easy.
Getting Started User Guide Use the included Camera Cable (8 ft. standard Ethernet cable) to connect the power supply to the camera. Note: The Camera Power Supply has built-in surge protection and must be plugged directly into your wall outlet. Plugging the Camera Power Supply into a surge-protected power strip may reduce the quality and performance of the WiLife system. Outdoor Camera Instructions a. Select a location for the camera.
Getting Started User Guide For the Outdoor Camera, take the paper clip and gently press the reset button hidden below the reset hole on the bottom right side of the camera’s shell (near the back). You will need to use a long paper clip to be able to reach the reset button. For the Spy Camera, take the paper clip and gently press the reset button hidden below the reset hole, located on the back-top of the camera.
Getting Started User Guide HINT: Position the lens straight so that it is well-seated on the lens holder before you begin to screw it in. This will allow it to screw easily and straight. If needed, slightly screw the lens backwards (counter-clockwise) at first so that the threads match up. Product Support If you have any questions about the installation procedures, please check out the Support section of our website for the most recent information.
3 Using the Command Center Application WiLife User Guide Using the Command Center Overview The WiLife Command Center provides a powerful-but-simple interface for managing cameras, recording video, tracking alerts, and configuring remote viewing. Once you learn a few of the basic elements, most operations are easy and intuitive. TWO OPERATING MODES: FULL OPERATION AND BACKGROUND The Command Center application has two operating modes: Full Operation and Background.
Using Command Center Applications The Maximize icon is active from both the Live Screen and Playback Screen. (If you activate Full Screen mode while on the Playback Screen, however, there are not any playback controls. The Playback Controls are only available in standardsized viewing mode.) User Guide FULL-SCREEN MODE HOTKEYS F11 Toggle between full-screen mode and normal mode. Esc, Spacebar, or Enter Return to normal mode.
Using the Command Center User Guide Live View The Live View is the first screen that appears when you open Command Center. From here, you can monitor live video feeds, change screen layouts, and enable and disable cameras and e-mail alerts. This is a screen shot of the Live View, showing the components of the screen. Live Video Windows Command Center can display between 1 and 6 video windows depending on your choice of Viewing Modes.
Using Command Center Applications User Guide scheduled and manual. Password Note: If you activate Password System Lock, then you can have the peace of mind that events can't be armed or disarmed without your password.
Using the Command Center Alerts manually disabled Alerts disabled (Email set up incomplete) Alerts disabled (action is Do Nothing) User Guide Alerts armed by schedule Alerts armed for NO motion Alerts armed for NO motion, send 1st alert Alerts disabled (no active schedule item) Use the Camera Activity Panel The Camera Activity Panel allows you to monitor all your cameras at a glance. It shows you which cameras are connected, set for e-mail alerts, and recording.
Using Command Center Applications User Guide When you zoom in, you see a subsection of the full image. From this viewpoint, you can pan and tilt to the edges of the full image represented by the lens in the camera. The camera can zoom in or out of a picture up to 2x in both VGA and QVGA mode. Note: In order to use digital pan-tilt-zoom, each camera that participates must be updated with the latest firmware.
Using the Command Center User Guide Live Mode Right-Click Context Menus The WiLife Command Center provides quick access to common functions through context menus on the Video Windows and Camera Alerts buttons. To access the context menus simply right-click on the object and choose between the various commands. The following table describes each of the options: Option Description Camera Settings Opens the Setup > Camera dialog, allowing you to make quick edits for the selected camera.
Using Command Center Applications User Guide Change Camera Order In the Live view, Command Center displays each camera’s “feed” in order of the camera’s number. For example, if the Live view is set to display the feed from four cameras, then the lowest camera number (i.e., camera 1) would display in the upper-left corner; camera # 2 would display in the upper-right corner; camera #3 would display in the lower-left corner; and camera #4 in the lower-right corner.
Using the Command Center User Guide Live Mode Hot Key Assignments To allow you to quickly navigate or activate features on the Live Mode, the Command Center provides keyboard shortcuts. You will notice some of these features are only available through the keyboard controls. Hot Key Description Hot Key Description F1 COMMAND CENTER HELP. Same as hitting the "?" button. F5 REFRESH. Refresh all the screens of the Command Center application. CTRL-SHIFT U UPnP Search.
Using Command Center Applications User Guide Playback View Playback View allows you to find, view, and manage your recorded video segments, which Command Center stores in a database on your computer. Your cameras create these segments according to your settings. By default, each camera is set to record when motion is sensed. You can also set the camera to record continuously during specific times or inhibit recording using the Recording Scheduler.
Using the Command Center User Guide To navigate through the segments, use one of these operations: Click on the desired date and time Click and drag the red position line to the left or right, beyond the edge of the window Click on a date in the calendar Use and to step forward and backward through video segments See the section on Hot Key Assignments for more keyboard controls.
Using Command Center Applications User Guide To turn on or off the video for a camera, click the green icon next to the camera name. SEEING VIDEO SEGMENT FILE DETAILS Press the Ctrl button or move your mouse over a video segment in the playback navigation window. The system will display a tool tip that will name the directory the file is saved to; the filename; and the length of the video segment. The graphic below shows this feature.
Using the Command Center User Guide Play Video with Onscreen Controls Like any DVD player, the Playback Controls allow you to play, pause, adjust speed, and step-through your video segments. You use the controls by clicking on each one. If you hold your mouse over the control, Windows will display a tool tip, indicating the name of the control. Keyboard controls exist to help you review your video.
Using Command Center Applications User Guide When the Camera Records Events When the camera detects motion within the specified zones, video segments are recorded and saved to the C:\WiLife Video folder, unless you are running in a pre-WiLife 2.0 version. Then, recorded video is saved to C:\LukWerks Video. Of course, if you specified a different storage file location while completing the WiLife Install Wizard, then the WiLife Video folder and video files will be stored at that location.
Using the Command Center User Guide Send Email Opens the Email Recorded Video screen, allowing you to send the current video frame, the first portion of the video segment, or the whole segment, along with a written message, to email recipients you can designate. Properties Opens the Video Properties window, allowing you to see the metadata attached to the video file.
Using Command Center Applications User Guide Check Online Storage Use the Check Online Storage option to monitor the amount of storage space you are using and/or have available on your WiLife Online account. The Online Storage Space screen also gives you access to view stored videos online and purchase more online storage. To open the Online Storage Space screen, simply go to the Playback screen, right-click on any video clip, and choose the option “Check Online Storage.
Using the Command Center User Guide Print or Save Recorded Video Printing or saving (save as) a video is simple. 1) Navigate to the segment so that it is paused in the playback window. 2) Right-click on the video window to reveal the playback context menu and choose the Print Current Frame, Save Current Frame, or Save Current Segment option. 3) If printing, you will be asked which printer to use. 4) If saving, you will be asked to specify a location and file name for the frame or segment.
Using Command Center Applications User Guide remembers it and keeps these addresses for the next time you send video via e-mail. Note: Adding or deleting a recipient to or from this list does not alter the list of email recipients that has been set up in the Setup > Email tab screen. ADDING AN EMAIL ADDRESS 1) Click the ADD… button. The Add Email Recipient screen displays. 2) Click the E-mail Address radio button. 3) Enter your e-mail address in the available field. 4) Click OK.
Using the Command Center User Guide Online Viewing With WiLife Online, you can monitor nearly-live video feeds from all of your WiLife Command Center sites over the Internet to Windows Mobile-enabled cell phones, Internet Browsers, and other devices that support Windows Media 9 Video. You may have set up this feature when you ran the Setup Wizard.
Using Command Center Applications User Guide SYSTEM TRAY RIGHT-CLICK OPTION DESCRIPTIONS Option Description Show Command Center Display the WiLife Command Center for use. [Scheduled Alerts Options] You can change the current state of the Command Center alerts system from the right-click options displayed here. Hide Command Center If the WiLife Command Center is displayed, this option closes the Command Center to the system tray. The Command Center is still running in the background.
Using the Command Center User Guide Exiting Command Center The WiLife Command Center does not, of course, record when your computer is not running. If you shutdown your computer while Command Center is running, you will see a message reminding you that you are closing Command Center as well.
4 Using Command Center Applications User Guide WiLife Platinum Features WiLife Platinum expands your already powerful video security system with innovative PC and Online features. WiLife Platinum allows you to better protect your property, family, and employees by providing you with desktop notifications, powerful alerts, and increased accessibility to your cameras and recorded video files on the Internet anywhere in the world, at any time.
Using the Command Center User Guide Whenever you attempt to use a Platinum-specific feature, the WiLife Command Center is going to display a popup message that educates you about the Platinum feature you selected to use and displays a link where you can get more information about Platinum and subscribe. Upgrading to WiLife Platinum is easy. Simply log in to your WiLife Online account, follow the link to Upgrade Subscriptions, and sign up for WiLife Platinum.
Using Command Center Applications User Guide 41
Using the Command Center User Guide Online Video Storage Have you wanted an easily accessible, secure storage facility on the Internet for your most important video files? WiLife has made it possible! Online video storage. Easy accessibility. Secure storage server. Plus, uploading video files is faster than counting to three. Literally right-click on the video file you want to upload and select “Protect and upload.
Using Command Center Applications User Guide Online Video Sharing WiLife Platinum gives you the ability to share video files you’ve stored online with friends, family, employees, and even local law enforcement. We call it Online Video Sharing and it’s so easy to do! Online Video Sharing allows you immediate access and ability to: Share fun videos! Help substantiate or refute a claim. Help solve a crime. Create your very own security-minded community with friends, neighbors, co-workers, etc.
Using the Command Center User Guide Online Search & Playback Go beyond live Internet viewing. You can now search for and play video clips from your WiLife Command Center online! Thanks to WiLife Platinum. Access your recorded video from a site anywhere and at any time. Using a user-friendly search tool and numerous search criteria options, find video by date, time, site, or camera. Create and save custom searches. Play full video clips.
Using Command Center Applications User Guide SEARCH RESULTS Video search results can be displayed using two display modes -- text-grid view (default), which includes a header and can be sorted by each column; or by thumbnail tile view, which includes details of the video when you mouse-over the thumbnail. You can switch views without performing a second search.
Using the Command Center User Guide Purchasing WiLife Platinum To purchase WiLife Platinum: 1) Click on the “Get WiLife Platinum Now! Click Here!” button in the left panel. (This button is accessible from any screen on your WiLife Online Account pages.) The Buy WiLife Services page displays.
Using Command Center Applications User Guide Other Cart Options Click the Change link to change the Subscription option. Click the Remove link to remove the Add-on item. 5) Click “Go to Billing Information” to continue. 6) Complete all of the required Payment and Billing Information fields and then click “Continue with Order.” 7) The cart now displays your billing information, displaying an Edit link that allows you to edit the information, if you find it inaccurate. 8) Click “Complete Purchase.
5 Setting System Options The default configuration of your WiLife Command Center provides you with all of the basic features activated so that you have a fully-functioning video security system running in minutes. However, the Command Center lets you change the settings to enable additional features like e-mail alerts, desktop notifications, and online viewing. You can also upgrade to WiLife Platinum.
Setting System Options User Guide Camera Tab Options Use the Setup Camera dialog to view and modify properties for each camera— e.g. define a name, flip the display orientation, and adjust the image quality. You will find the default image settings work for most conditions. However, adjusting these options when conditions require is easy and straightforward.
Setting System Options User Guide Here is a brief review of these options: Option Description Resolution The Resolution dropdown option allows you to set VGA or QVGA resolution. By default, your cameras are set at QVGA (320 x 240) resolution and 15 frames per second (fps). You can experiment with your camera resolution and frame rate to produce the ideal results given the capabilities of your PC.
Setting System Options User Guide Each time the camera detects motion it alerts the Command Center software and records the event and a few prior frames. Once motion is detected, the system records uninterrupted until 5-seconds after the motions stops. This could create seconds or minutes of compressed video.
Setting System Options User Guide b) To delete a single zone, left-click anywhere in the zone and then press the Delete key or click the Clear Selected Zone button. c) To delete all zones, click the Clear All Zones button. d) Finally, to detect motion anywhere on the image, click the Enable Entire Image button. Note: Remember, you can create up to 16 motion zones per camera. Set Motion Detection Sensitivity Setup > Recording > Motion Detection section > Sensitivity Slider.
Setting System Options User Guide Manage Disk Usage The Command Center Disk Usage dialog allows you to view and change the disk allocation rules. The adjustable options include the Video Path and Max Allocation. You can also view the free disk space, current usage, and discard date among other statistics. You open the Command Center Disk Usage dialog by clicking on the VIEW DISK USAGE button on the Setup > Recording dialog. This graphic shows a screen shot of the Disk Usage dialog.
Setting System Options User Guide Alerts Tab Option With the WiLife Command Center, you can receive e-mail and cell phone alerts (messages) when a camera detects motion. You have the option of receiving one of three message types: simple text-only, text and one frame of video, or a video clip. In any case, this e-mail alert option allows you to know when your cameras are capturing motion. You set e-mail alerts on the Command Center Setup > Alerts dialog, which allows you to configure e-mail alerts.
Setting System Options User Guide E-mail and Cell Phone Alerts Setup SEND ALERTS USING ACCOUNT Enter the account information for the e-mail server you will use for sending alert notifications. Information required to enable this option is your e-mail address, account username, account password, and outgoing mail server address. Note: Go to Outgoing Email Server Settings for a list of the more popular web email service providers that includes the addresses for each.
Setting System Options User Guide Email Server Provider Outgoing Email Server Address Netscape smtp.isp.netscape.com Lycos smtp.mail.lycos.com Xmission mail.xmission.com Comcast.net smtp.comcast.net AOL smtp.aol.com CompuServe smtp.compuserve.com NetZero smtp.netzero.com SBC Global smtpauth.sbcglobal.net Add E-mail Addresses Setup > Alerts > Email and Cell Phone Setup. The WiLife Command Center makes adding email address easy.
Setting System Options User Guide Because of limits in many cell phone messaging systems, most will not send you video frames or video clips. To set up the WiLife Command Center to send alerts to your cell phone, follow these easy steps: 1) Click on the SETUP button. 2) Click the Alerts tab. 3) Click on the button "Email and Cell Phone Setup." 4) Click the ADD button. The Edit Email Recipient screen displays. 5) Click the Mobile Phone radio button.
Setting System Options User Guide Desktop Notifications Desktop Notifications allows you to set unique PC alerts that include thumbnails of a video clip, text, and even a distinguishing sound so that you not only see the notification but you hear it as well. Desktop notifications display whenever an important WiLife Command Center event occurs such as a camera was lost/found, a scheduled event was started/stopped, an online viewing session was started/stopped, or motion was detected by a camera.
Setting System Options User Guide Setting Desktop Notifications The following graphic shows and describes the fields applicable to desktop notification functionality: 59
Setting System Options User Guide Online Viewing Setup Online Viewing allows you to view live video from your cameras anywhere and at anytime. If you did not set up Online Viewing during the Setup Wizard, first create a “WiLife Online” account at www.wilife.com/register. Learn more by reading the chapter Using Online Viewing later in this user guide. Verify System Requirements Before beginning the setup, confirm that your system meets our recommended requirements.
Setting System Options User Guide Note: Cell phone users should subscribe to an unlimited data plan to ensure cost effective access.
Setting System Options User Guide Online Dialog Screen Options Once you have created your WiLife Online account, you are ready to setup individual sites such as the Home, Office, or Vacation Home. You use the Setup > Online dialog to configure the site options: Dialog Item Username Usage Displays the username for your WiLife Online account. Click the Change link to edit your account settings. Location Displays the name for this location.
Setting System Options User Guide connected via “Direct Mode.” In Direct Mode, there is no time limit. You can view a video feed for any length of time. Cell phone viewing is limited to 3 minutes. There are answers to more questions available in our Knowledge Base/FAQ (http://wilife.custhelp.com/cgibin/wilife.cfg/php/enduser/std_alp.php) and Tips & Tricks (http://www.wilife.com/Support/TipsAndTricks.
Setting System Options Communication Error User Guide Command Center cannot connect to WiLife at this time. Please try again later. If this error persists, contact your network administrator. Possible causes include firewall software, antivirus software, or a virus. Make sure you have installed all updates and patches and that your firewalls are configured to allow Werks to access the Internet. See the Knowledge Base topic WiLife Online Communication Error.
Setting System Options User Guide 4) When the WiLIfe Setup Wizard screen displays, validate that the option "Create new remote viewing account" is selected. Click Next>. 5) Fill out the fields with basic account and site information -- first/last name and location name. Click Next> to continue. The next screen in the Wizard requests the details that will help you securely login in and manage your WiLife Online account.
Setting System Options User Guide and product updates camera updates. Remove the checkbox if you don’t wish to receive any notifications. I have read and agree to the Terms of Use and Privacy Policy Click this checkbox after you have read the Terms of Use page and Privacy Page. This checkbox must be marked to complete your registration. 6) When you have completed filling out the form, click Next>. 7) You have completed creating your online account. Click Finish.
Setting System Options User Guide Disconnecting WiLife Online Viewing Setup > Online Tab > Clicking Disconnect To disable Online Viewing: 1) Click on the Setup button. 2) Click on the Online tab. 3) Click Disconnect. Connecting WiLife Online Viewing Setup > Online Tab > Clicking Connect 1) Enable WiLife by following these steps: 2) Click on the Setup button. 3) Click on the Online tab. 4) Click Connect.
Setting System Options User Guide Advanced Options The Advanced dialog includes tools that assist you in maintaining the cameras and the application. These tools range from changing passwords to checking for software and firmware updates. Tools would be a more fitting title for the dialog.
Setting System Options User Guide Find My Cameras SETUP > Advanced tab > FIND MY CAMERAS The Find My Cameras Wizard automatically attempts to find all of the cameras on your network, including any new cameras you may have just plugged in. What makes the Wizard wonderful is the fact that it also helps walk you through situations in which Command Center cannot find a camera.
Setting System Options User Guide 6) Click Next > when the test is complete. The Search for Cameras screen displays. Cameras that have been discovered will display with active LED marks. Un-discovered cameras will display with gray LEDs. 7) When Command Center has successfully found the number of cameras you told it to look for, it will display the "Name My Cameras" screen. On this screen, you can enter or edit the name of each camera. Click Next> when you have finished naming your cameras.
Setting System Options User Guide 8) When you have completed the wizard, the last screen of the Wizard displays. Click Finish to close.
Setting System Options User Guide Rediscover Cameras Setup > Advanced > Find Camera section > REDISCOVER button. On rare occasions, you may lose a camera due to powerline problems, bad weather, or even static electricity. Rediscover restarts the camera search process to locate cameras on the network that have a password matching your password (if you have set a password).
Setting System Options User Guide The Password System Lock feature exists on the same screen as the Change Password function located on the Setup > Advanced tab screen. To access, click the Manage Security button. Note: If you are not subscribed for WiLife Platinum, the Access Control section is grayed out. Thus, the “Exit Command Center” function is the only one available under the non-Platinum running Command Center, which requires a password --if a password is set-- to exit Command Center.
Setting System Options User Guide Note: If you are not subscribed for WiLife Platinum, the Access Control section is grayed out. Thus, the “Exit Command Center” function is the only one available under the non-Platinum running Command Center, which requires a password --if a password is set-- to exit Command Center. Similarly, if you are running WiLife Platinum, but no password is set, the Access Control section is also grayed out.
Setting System Options User Guide 2) After the system checks for new firmware updates, it will notify you if an update for your cameras is available. 3) Check the “Select” checkboxes next to the cameras you wish to update. 4) Select the firmware file using the Browse button. We encourage you to update to the version defaulted by the system, as that will always show the latest file. 5) Click the Update Cameras button and wait for the process to complete.
Setting System Options User Guide 3) Each camera will indicate the recommended action to be taken for the files associated with that camera. Most commonly, it simply indicates that No Action is required. If some problems have been discovered, Command Center may suggest that you execute a Repair or Rebuild operation. Repairs are recommended if there are only a limited number of minor issues. Otherwise, a Rebuild will be suggested.
Setting System Options User Guide System Information The System Information screen collects and displays information about the configuration of your system such as hardware configurations, computer components, and software, including signed drivers and unsigned drivers. When support technicians troubleshoot your system configuration, they require specific information about your computer.
Setting System Options Dr. Watson User Guide A program error debugger that helps technical support troubleshoot program errors for computers running on a Windows Operating System. Diagnostics Summary Report The Diagnostics Summary screen displays comprehensive configuration and status details for your WiLife Command Center application such as error tests, WiLife Online status, disk usage, powerline USB adapter, powerline performance, bandwidth test, cameras, motion detection, and email notifications.
6 Scheduling Alerts & Recording Events Scheduling Alerts Overview The Scheduled Alerts feature gives you the ability to easily create scheduled events which cause recording to take place, or which arm email or cell phone alerts during selected periods of time. Scheduled Alerts makes your Command Center a notification tool -- turn email and mobile phone alerts on or off at certain times, day and night. Events will automatically be armed at the times you scheduled.
User Guide There will also be no alerts sent, but this would be the case anyway. It might better be named (Turn Motion-Based Recording Off). HOW DO I CREATE AN EVENT? Create an event by clicking and dragging from the start to the stop time. This creates the event, and opens an edit dialog where you can view and edit the properties of the item. You can bring up this same dialog by double-clicking on any existing item.
User Guide RIGHT-CLICK OPTIONS The WiLife Recording and Alerts Schedule screen offers right-click options that make it easy for you to schedule immediate events that only require you to set the details for the time period. Create any four event types -- Arm Alerts, No Motion, Continuous Recording, or Recording Off. KEY TO COLORED EVENTS The Recording and Alerts Schedule Screen uses four colors to represent the types of events scheduled.
User Guide No-Show Alerts The No-Show detection alerts feature allows you to intelligently monitor an area where you expect motion. And if there is no motion, Command Center alerts you. This feature is perfect for situations that have to happen, such as the kids walking into the house after returning home from school or an employee who should arrive on time to open the store.
User Guide 5) Specify the camera(s) you want involved with this event and set camera alert properties for each participating camera by double-clicking on the camera line or clicking the Edit button. (The Camera Alert Properties screen allows you to specify the type of message you want to receive, the length of time between motion alerts, and the number of alerts.) 6) Click OK to save your new "No Motion" alert event. The Recording and Alerts Schedule Screen will display the new event. Its color is gray.
User Guide Note: You do not need to create an alert event to select "Arm Manual Alerts Now." And, the manual arming of alerts is available with or without the WiLife Platinum upgrade. ARM EARLY The Alerts Scheduler Front Control Panel will always display the next scheduled event in the scheduler's timeline. In the graphical image on this page, the next scheduled event is called 'Event 6.' You simply click on the Arm Early item in order to arm it earlier than it was scheduled.
User Guide Create a Continuous Recording Event Continuously record for a set time and on specific days, if desired, even if there is no motion on the camera. To create a Continuous Recording event, follow these instructions: 1) Click the Alerts Scheduler Front Control Panel > View Schedule. The Recording and Alerts Schedule Screen displays. Note: The Recording and Alert Schedule Screen is also accessible through Setup > Recording tab > SCHEDULE RECORDING TIME.
User Guide 7) Specify camera event properties for each camera by clicking on a camera line or clicking on the Edit button. 8) Click the OK button to save the properties for the event. You will notice the new event displays in the color black. Create An Event To Turn Off Recording Disable recording at set times and on specific days, even if there is no motion on the camera.
User Guide 3) When you have made the desired modifications, click the OK button. Deleting a Recording or Alert Event Over time, you will need to delete a recording or alert event. 1) Click the Alerts Scheduler Front Control Panel > View Schedule. The Recording and Alerts Schedule Screen displays. Note: The Recording and Alert Schedule Screen is also accessible through Setup > Recording tab > SCHEDULE RECORDING TIME. 2) Right-click on the desired event and select the option "Delete Event.
User Guide Using Online Viewing Using the WiLife Command Center, and your WiLife Online account, you can access live video from your cameras anywhere in the world using a Windows Media enabled Internet browser, wireless PDA, or mobile phone. When you enable Remote Viewing, your WiLife Command Center becomes a video server ready to publish video through the secure WiLife network over the Internet to you, wherever you are.
User Guide Mobile cell phone Family Monitor Elder Care Monitor Pet Monitor How Do I Access My WiLife Online Account? You can access your WiLife Online Account using any one of these methods: Using the WiLife Button Online Setup Tab Link Click Setup > Online tab. In the Online Connection section, click on the link http://online.wilife.com Click the WiLife button located on both the Live and Playback screens. Then, click on the menu options My WiLife and select My Cameras. Using WiLife.
User Guide If you would like to use Direct Mode and not be restricted to a time limit, you can enable UPnP on your router. If you cannot enable UPnP, you can manually set ports in the router for Command Center to use. The port addresses Command Center uses are 20570 to 20575. (Contact the manufacturer of the router or see your firewall or router documentation for complete instructions about manually configuring ports.) If you are using Relayed Mode, you do not have the option to switch to Direct Mode.
User Guide Using the My Cameras Page online.wilife.com > My WiLife > Login The My WiLife page allows you to see all your WiLife sites and cameras on one page. Your account page is accessed by going to online.wilife.com. The layout of the page is designed so you can easily distinguish between sites and the cameras used for each site. In the example below, you can see the information and options available for each site.
User Guide View the Video for All Cameras In One Image online.wilife.com > Camera name or icon To view live video for all cameras at a specific site, follow these instructions: 1) Go to online.wilife.com. If you previously marked the “Remember me next time” check box when you logged in, the system will automatically open your My Cameras page. If not, you will need to enter your login name and password. (See Logging into Your WiLife Online Account for instructions.
User Guide 1) Go to online.wilife.com. If you previously marked the “Remember me next time” check box when logging in, the system will automatically open your My Cameras page. If not, you will need to enter your login name and password. (See Logging into Your WiLife Online Account for instructions.) 2) On the My Cameras page, click on the cameras name or icon. The Video Viewing Window will display. Please wait while WiLife connects. 3) Click Cycle. USING THE VIDEO VIEWING WINDOW online.wilife.
User Guide The Normal and Large options allow you to alter the size of the video. The default setting is Normal. Managing Your WiLife Online Account online.wilife.com > My Account Your My WiLife Account allows you to manage account subscriptions and billing, your online account information, and online viewing preferences. Here is an example of what the My Account Page looks like: Changing Video Preferences online.wilife.
User Guide Changing Your WiLife Online Password online.wilife.com > My Account > Change Password The Change Password option can be used when you have accidentally forgotten your original password or if you feel the security of your password has been compromised. Besides, changing your password on a regular basis is one way of ensuring a secure internet experience. Change your password by following these steps: 1) Go to online.wilife.com and click on My Account.
User Guide Changing Your WiLife Online Login Name online.wilife.com > My Account > Change Login Note: When you change your login name, your account will be disabled until you complete the process, as described below. If the e-mail address you are using for your wilife.com login is no longer valid, please change login. A valid email address will allow you to recover a lost password and use other services.
User Guide “Unknown Remote Viewing Account.” This message displays on the Live screen, in the message panel. “Disconnected–Account Unknown.” This message displays on the Online tab screen, in the Status section. 10) You can now go to online.wilife.com and log into My WiLife using your new email. Changing Settings For Personal Preferences online.wilife.
User Guide Manage WiLife Online Page Overview The Manage Sites and Cameras page is used to see details about each location and its cameras for troubleshooting purposes and for removing a location and/or cameras from Online Viewing. The Manage Sites and Cameras page is accessed by clicking on the Pencil icon sitting next to the site line on the My Cameras page.
User Guide Removing a Location or a Camera Removing your location or cameras is perfectly safe and easy. The WiLife Command Center will re-register itself and any cameras to keep your WiLife Online accurate and fully up-to-date. To remove a location or a camera, follow these instructions: 1) Go to online.wilife.com. Note: If you are logged in, the system will automatically open your My Cameras page. If not, you need to Log In.
User Guide Viewing Your Cameras Using a Cell Phone or Handheld The following requirements must be met prior to viewing remotely using a cell phone or handheld: 1) Registered for a WiLife Online account? If not, please see the topic “Create Your WiLife Online Account” for complete details. 2) Have enabled Remote Viewing in Command Center? If not, please see the topic “Enable Command Center for Remote Viewing.
User Guide USING THE WILIFE ONLINE PAGE (FOR HANDHELDS) Your WiLife Online page allows you to see your WiLife network all on one page. In the example on the right, you will notice the names of your locations and cameras. You will see if a Location is Offline or Available. Each camera name is a link that opens the Video Viewing Window and displays live video for the camera you selected. Active cameras appear in green and underlined text.
8 Troubleshooting User Guide Troubleshooting We expect that you will rarely have problems with your WiLife system. However, in the event of a problem, you will find solutions to those issues here. You can also find additional resources at www.wilife.com/support. Below you will find specific tables directed at solving Installation, Configuration, Maintenance and other problems. Choose the one that best fits your circumstance.
Troubleshooting Installation Problem Camera suction cup comes free from the window WiLife User Guide Solution Clean the window to ensure an airtight fit. With your fingertip, place a very light layer of vegetable or olive oil around the edge of the suction cup. Always use the strain relief mini-suction cup for added safety by attaching it to the glass and cable.
Troubleshooting WiLife User Guide Video Problems Video Problem My video is fuzzy My video is too dark or too light My video windows are black and do not show video I cannot see images in low light conditions I cannot see the detail I need in on-screen objects My live video lags several seconds behind the real motion My camera view is too narrow or too wide Live video skips and jumps 104 Solution Clean the lens glass with soft cloth designed for cleaning eyeglasses.
Troubleshooting WiLife User Guide Maintenance Problems Maintenance Problem My CPU is pegged at 100% Message “Password does not match password in powerline adapter” I have forgotten my local WiLife password Solution Test if Command Center.exe is using the CPU by checking Task Manager (CRTL-ALTDEL>Task Manager>Process Tab).
Troubleshooting Maintenance Problem Command Center does not see my cameras Command Center seems to run slowly My camera is not recording motion Command Center is not sending e-mail alerts 106 WiLife User Guide Solution Reset the camera by unplugging the power supply and then replugging it in to the wall. Verify that the camera ON/OFF button on the main Command Center window is set to ON.
Troubleshooting WiLife User Guide Maintenance Problem I am unable to see my site or cameras from WiLife Online account Solution To view your cameras remotely you need four items: proper Command Center configuration, an active WiLife Online account, Internet connectivity, and a compatible remote device. Check the following items: Ensure that you have created a WiLife Online account by registering at www.wilife.com.
Troubleshooting WiLife User Guide camera only and quickly when sending date between the camera and Command Center USB RECEIVER STATUS LIGHTS There are three status lights on the USB Receiver. Because the USB Receiver gets its power from the USB port, these lights will be on even when you have not plugged the receiver into an outlet.
9 Configuring Your Firewall User Guide Configuring Your Firewall Firewall Basics Firewall configuration issues are our most common support call. In this chapter, we help you understand and configure your firewall, saving you and us the trouble of a support call. Simply put, a firewall is a device, software or hardware, which controls the flow of network traffic between your computer and the outside world.
Configuring Your Firewall User Guide Troubleshooting Note: XMPP also happens to be used in some Instant Messaging (IM) software such as Google Talk. If a firewall is trying to block all IM communication, it will likely also block remote viewing and control.
Configuring Your Firewall User Guide Microsoft Firewall Microsoft Firewall is a standard component for Windows XP, Service Pack 2 (SP2). Microsoft does a good job of automatically asking users to allow Command Center to access the network. This automatic configuration method is sufficient in most cases. Here we provide you with instruction for both the automatic and manual configuration methods.
Configuring Your Firewall User Guide If the Windows Firewall is enabled (On), select the Exceptions tab. On the Exceptions tab, check the Command Center box to enable it for network communications. Next, click on the Edit button. If you do NOT see Command Center in the Programs and Services list (rare), you will need to choose Add Program… and find Command Center either in the list of programs or Browse to it at “C:\Program Files\WiLife\Command Center.exe.
Configuring Your Firewall User Guide Norton Internet Security 2001 - 2005 Norton Firewall is a component of several Symantec security products including Norton Internet Security, Norton Personal Firewall, Symantec Client Security, and others. In most cases, Norton will automatically recognize that Command Center is attempting to access the network. It will display a quick configuration dialog.
Configuring Your Firewall User Guide If you do NOT find Command Center in the Program list (rare), you will need to click the Add button. On the program dialog, enter the file name “c:\Program Files\WiLife\Command Center.exe” and click Open. Now repeat the previous step. Finally, click on the Advanced tab and then the GENERAL button. On the General Rules Screen, scroll down to the rule “UPNP Port 1900 Block Rule.” Click on the Modify button and change the rule from Block to Permit.
Configuring Your Firewall User Guide Norton Personal Firewall 2006 Norton Personal Firewall 2006 is a component of several Symantec security products that include Norton Internet Security, Norton Personal Firewall, Norton AntiVirus, Symantec Client Security, and others. While you are installing Command Center, Norton Internet Security will automatically recognize Command Center attempting to access the network. It will prompt you with this Security Alert.
Configuring Your Firewall User Guide You have now successfully configured Norton Firewall 2006. Note: If you may have more than one firewall application running on your PC, you need to disable or configure each one to run with Command Center. Norton Internet Security 2007 Depending on the version and installation options, Norton Internet Security 2007 may not automatically request your permission to Allow the WiLife Command Center (werks.exe) access to the network and cameras.
Configuring Your Firewall 4. User Guide Click the Add button to add the WiLife Command Center (werks.exe) to the program list. 5. Add Werks.exe to the programs list with Allow set as the access option. Typically Werks.exe is installed at c:\program files\WiLife Command Center\Werks.exe. 6. Click Apply to save your change and OK to close the windows.
Configuring Your Firewall User Guide Norton AntiVirus 2007 The Norton AntiVirus firewall has an aggressive worm protection feature that blocks Command Center from giving the cameras a DHCP address when you install Command Center Version 1.5. Even if you have set AntiVirus to allow Command Center, AntiVirus still blocks that traffic. These instructions assist you in temporarily disabling Worm Protection until the WiLife Cameras have received an address.
Configuring Your Firewall User Guide 3) Click on the “Turn Off” button. 4) Click OK. Command Center only needs the feature turned off temporarily. 5) In the Command Center Software, open the Setup program, click on the Advanced tab, and click on the Find My Cameras button. Follow the instructions of the Wizard. Your camera(s) should be located and up and running within minutes.
Configuring Your Firewall User Guide Norton 360 1) Open Norton 360. 2) From the main screen, click on the menu option Tasks and Settings. 3) In the Settings section, click Change Advanced Settings.
Configuring Your Firewall User Guide 4) Click on the Firewall Protection Settings. 5) On the Firewall Program Rules tab, scroll through the list of Programs and find the WiLife Command Center. 6) Click on it so that it is highlighted. Then, in the Access dropdown field, select Custom.
Configuring Your Firewall User Guide Communications: Any Protocol: TCP and UDP. 8) After updating these settings, click Ok. 9) Exit Norton 360.
Configuring Your Firewall User Guide ZoneAlarm Firewall Zone Labs produces several computer security packages including ZoneAlarm Pro and ZoneAlarm. Though there are differences in the UI, they are largely the same. Like other PC firewall products, Zone Labs provides both automatic and manual configuration interfaces. By default, ZoneAlarm will automatically prompt you to allow Command Center.exe to both access the Internet and to act as a server.
Configuring Your Firewall User Guide On the ZoneAlarm Control page, click the Program Control option to show the Program Control Page. Then click the Programs tab and scroll down to the Command Center program. Set each Access and Server option to Allow (as shown). If you do NOT find Command Center listed as a program, you will need to click the ADD button to manually add Command Center to the list.
Configuring Your Firewall User Guide McAfee Security Center All users with the McAfee Security Center running on their PC must follow these instructions in order for the WiLife Command Center to run. Even if you accept to “Allow” WiLife network access at installation time, the McAfee Security firewall will block your cameras. Follow these instructions to ensure access. 1) Open McAfee Security Center. 2) On the Home window, click on the option "Internet & Network" and then click the Configure button.
Configuring Your Firewall User Guide 4) In the Firewall panel, select the option "Program Permissions." 5) In the Program Permissions panel, locate the WiLife Command Center program name and highlight it. If it is highlighted, details about the program will display in the Program Details panel, as shown in the graphic above. In the Action panel, click the option "Grant Full Access." 6) From the Firewall panel, click on the option "System Services.
Configuring Your Firewall User Guide McAfee Personal Firewall McAfee distributes its firewall product in several packages including Internet Security Suite, Personal Firewall Plus, and Desktop Firewall. Though there are differences in the UI, they are largely the same. Like other PC firewall products, McAfee provides both automatic and manual configuration interfaces. By default, Personal Firewall will automatically prompt you to allow Command Center.exe to access the Internet.
Configuring Your Firewall User Guide 4) Finally, you can confirm that Command Center is in the Internet Applications list and marked as “Allow Full Access” along with other networked applications. 5) You have now successfully configured McAfee, but remember that you may have more than one firewall application running on your PC. You need to disable or configure each one. 6) Finally, you may need to exit Command Center (from the task icon) and restart for the changes to take effect.
Configuring Your Firewall User Guide BlackICE Firewall BlackICE is the least friendly of all the firewalls we review here. There are two common implementations of BlackICE: those that have purchased a retail copy of PC Protection Firewall for personal use and those that unknowingly have a copy installed along with either software from an ISP, VPN, or other source. The primary difference between the two is this: The retail (full package) version of BackIce includes a user-interface for making changes.
Configuring Your Firewall User Guide 3) Click the Add button again. Enter the values shown: (Name: UPnP; IP Address: 172.29.0.0172.29.255.255; Check All Ports; Type:UDP; Mode: Accept; Duration of Rule: Forever) and click Add. 4) Click the Add button again. Enter the values shown: (Name: DHCP; IP Address: All Addresses; Port: 67; Type: UDP; Mode: Accept; Duration of Rule: Forever) and click Add. 5) Click OK to close each of the open dialogs.
Configuring Your Firewall User Guide 1) Open an explorer window by clicking on the My Computer icon and change directories to c:\program files\ISS\BlackICE. 2) Open the file firewall.ini with Notepad by double-clicking on the file. 3) Find the [Manual UDP low REJECT] section and add these lines: ACCEPT, 169.254.0.0 – 169.254.255.255, 0 – 65536, UPnP, 2005-10-05, 02:44:06, PERPETUAL, 2000, unknown ACCEPT, 172.29.0.0 – 172.29.255.
Configuring Your Firewall User Guide Windows Live OneCare If your PC is running the Windows Live OneCare firewall, your Command Center system may not be displaying video, even if you placed Command Center on the Allow List. If Command Center is not displaying video, follow these instructions to resolve it: 1. Open the Windows Live OneCare system. The Common Tasks screen displays, as shown in this graphic. 2. Click the option “View or change settings.” (See red arrow.) 3.
Configuring Your Firewall User Guide 4. Click on the Ports and Protocols tab. 5. In the Ports and Protocols section, locate the “Universal Plug and Play – Xbox 360 (UDP 1900) checkbox and select it so that it is marked. Then, hit the Apply button. The video from your cameras should show up in Command Center shortly after this.
Configuring Your Firewall User Guide Turning Off Spam Blocking for WiLife E-mails If you are not receiving WiLife alert e-mails, it may be due to your e-mail service blocking the e-mails because it considers them to be spam. Locate and open the SPAM folder (or Junk E-Mail, Bulk, or a similar name), if you feel that our e-mails are being blocked. Note: If our alert e-mails are not appearing in these locations, contact your provider to troubleshoot further.
Configuring Your Firewall User Guide Yahoo Mail Yahoo Mail places SPAM in the “Bulk Mail” folder. Yahoo uses a mail filtering system called SpamGuard, which is automatically activated. The Bulk Mail folder is generated when you receive your first message that appears to be spam. Spam is automatically deleted after 30 days. If a WiLife alert message is placed in your Bulk Mail folder, click on the "Not Spam" button while viewing that message. GMail GMail places SPAM in the "Spam" folder.
Configuring Your Firewall User Guide Opera M2 Opera M2 places SPAM in the “Spam” folder. To access e-mail messages in this view, toggle the Hotlist by pressing F4, and double-click on "Spam." To get a WiLife alert message out of this folder, right-click on the alert message and then select the "Not Spam" option. You can also highlight the message and then select the “Not Spam” button (or highlight the message and press “A”).
A Configuring Your Firewall User Guide Specifications System Computer Requirements WiLife requires these requirements for proper operation. Additionally, we recommend a more powerful machine to achieve the best results. Number of Cameras Requirement CPU Speed* 1 2 3 4 5 6 2.2 GHz 2.4 GHz 2.6 GHz 298 GHz 3.0 GHz 3.
Specifications User Guide Example Wireless Handheld Devices: Asus MyPal A730W HP iPAQ hx2400 series; hx2700 series; hx3700 series; hx4700 series Dell Axim X51v; X50v; X30v Toshiba e805 BROWSER Common Requirements Browsers Windows Media Player 9 or later Microsoft Internet Explorer Version 5.
Specifications User Guide Property Size Up to 8,000 square feet PHYSICAL METRICS Power Consumption 15 Watts Camera Body Dimensions Height: 5.0 inch (12.7 cm); Width 3.2 inch (8.1 cm); Depth: 1.8 inch (4.6 cm) Power Supply Dimensions Height: 3.8 inch (9.7 cm); Width: 2.9 inch (7.4 cm); Depth: 2.6 inch (6.6 cm) Camera Weight Power Supply Weight 6.7 oz (190 g) 5.
Specifications User Guide Camera Weight 11 lb (500 g) DLC-810c Spy Camera SPY CAMERA FEATURES Processing Power 400 MHz DSP Onboard Image Processing Motion detection up to 16 zones, Auto brightness, Onboard Image Encoding Resolution Frame Rate Bit Rate Color Depth Lens Windows® Media Video 9 Selectable: 320 X 240 or 640 X 480 pixels Selectable: 5, 10 or 15 frames/second Selectable: 150 - 800 kbps 10 bits Focus Preset Pan Angle 50° (manual) Viewing Angle Firmware Updates Communications (to p
Specifications User Guide Powerline Networking WiLife uses powerful power-line networking technology to allow users to easily install and setup your surveillance system. Networking specification Data Rate Data Encryption Security Key Networking protocol Camera discovery IP Address Space HomePlug® Power-line 1.0 14 Mbps (maximum), 5 Mbps (typical) 56 bits (standard DES) Coded user defined password TCP/IP Universal Plug and Play (UPnP) 169.254.0.1 – 169.254.255.255, Mask 255.255.0.
Specifications User Guide Wall and Ceiling Mount Installation Installing the WiLife Camera Wall and Ceiling Mount is simple. Use the recommended tools and drilling template below. As always, use caution to avoid injury. Recommended tools: Screwdriver, electric drill. Surface Pilot Hole Drill Size Pilot Hole Depth Hardwood 2.0 mm (5/64”) 1.2 cm (1/2") Softwood Wallboard (use anchor) 1.6 mm (1/16”) 5.0 mm (3/16”) 1.2 cm (1/2"0 2.
B License and Warranty User Guide Software License and Hardware Warranty Command Center Software License NOTICE TO USER: BE SURE TO CAREFULLY READ AND UNDERSTAND THIS END-USER LICENSE AGREEMENT (“EULA”) BEFORE YOU INSTALL OR USE ANY WILIFE SOFTWARE, FIRMWARE, OR RELATED DOCUMENTATION. BY INSTALLING OR USING ALL OR ANY PORTION OF THE SOFTWARE, YOU INDICATE YOUR ACCEPTANCE OF EACH OF THE TERMS OF THIS LICENSE.
License and Warranty Command Center User Guide OBTAIN BY USING THE SOFTWARE. FURTHER, WILIFE MAKES NO REPRESENTATION (EXPRESS OR IMPLIED) AS TO MATTERS OF NONINFRINGMENT, CONDITION OF TITLE, MERCHANTABILITY, INTEGRATION, SATISFACTORY QUALITY, OR FITNESS FOR ANY PARTICULAR PURPOSE. WILIFE PRODUCTS AND SOFTWARE ARE DESIGNED AND SOLD ONLY TO ASSIST WITH AUTOMATED MONITORING AND CONTROL.
License and Warranty User Guide Limited Product Warranty WiLife, Inc. ("WiLife") warrants to the original purchaser that its hardware products will be free from defects in materials and workmanship for a period of one (1) year from the date of original purchase ("Warranty Period"), as further described below.
License and Warranty Command Center User Guide CONFERRED BY THIS WARRANTY ARE IN ADDITION TO ALL RIGHTS AND REMEDIES CONVEYED BY SUCH CONSUMER PROTECTION LAWS AND REGULATIONS. TO THE EXTENT THAT LIABILITY UNDER SUCH CONSUMER PROTECTION LAWS AND REGULATIONS MAY BE LIMITED, WILIFE'S LIABILITY IS LIMITED, AT ITS SOLE OPTION TO REPLACEMENT OR REPAIR OF THE PRODUCT.
C User Guide Regulatory and Safety Regulatory Information RADIO FREQUENCY INTERFERENCE This device complies with Part 15 of the FCC Rules. Operation is subject to the following two conditions: (1) This device may not cause harmful interference, and (2) this device must accept any interference received, including interference that may cause undesired operation. NOTE: This equipment has been tested and found to comply with the limits for a Class B digital device, pursuant to part 15 of the FCC Rules.
Regulatory and Safety User Guide ELECTRIC SHOCK HAZARD When properly installed and configured, the WiLife equipment is designed to protect users from exposure to hazardous voltage levels. This system should only be operated from the type of power source indicated in this guide and on the system’s label. If you are not sure of the type of power supplied to your home or building, consult your local power company. There are no user serviceable components within any of the equipment enclosures.
Regulatory and Safety User Guide If, after falling, the camera exhibits degraded performance, has ceased operating, shows visible cracks or if there is evidence that internal components have come loose, disconnect the camera from its cable and follow the instructions in this manual for obtaining service repair. EXPOSURE TO MOISTURE The WiLife Indoor and Spy cameras are designed to be used only in dry, indoor environments.
Regulatory and Safety User Guide PROLONGED USE OF EQUIPMENT As with all equipment, care should be taken to minimize the risk of repetitive motion injuries, muscle fatigue, prolonged muscle inactivity and eye strain. Repetitive motion injuries may be caused by common WiLife activities such as typing and computer mouse use. Avoid spending excessive time viewing live or recorded video.
Regulatory and Safety User Guide To protect your privacy, be sure to set a unique password via the WiLife software. Doing this encrypts your camera data and makes the output unreadable by neighboring HomePlug® systems which may be able to detect your signals.
User Guide 152