
Installation Instructions


Installing Your Furnace
ALL OTHER MODELS
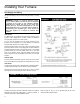
Locate the burner and hex nuts that secure it. Remove the two (2)
hex nuts (one from each end). Flip up the wire hinges. Lift one
end of burner at a time until free. Remove burner and controls
from the compartment.
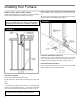
POSITION FURNACE (RECESSED MOUNT ONLY)
NOTE
If your furnace is surface mounted, your mounting was started
during VENT INSTALLATION, page 14. To complete furnace
mounting, go on to FASTEN FURNACE BOTTOM on this page.
ALL MODELS
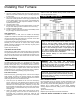
Make sure that the flue collar gasket, as shown on Page 16, Fig.
18, is in place over the flue extension. Check to see if header
plate gaskets are in place.
Hold the furnace at a slight angle (top closer to the wall than
bottom) with the flue extension centered under the oval hole in the
header plate.
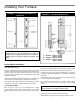
NOTE
Electrical wiring should already be routed to the header plate. If
not, see sections on ELECTRICAL SUPPLY ROUGH-IN, page 12.
Place three (3) square gaskets over the junction box. See Page
16, Fig. 18.
ALL MODELS (RECESSED MOUNT)
Lift furnace up so that the flue extension enters the oval hole in
the header plate. Straighten the furnace by pushing furnace
bottom into the stud space.
IMPORTANT
AFTER FURNACE HAS BEEN PLACED IN POSITION, MAKE
SURE THE GASKETS ARE PRESSING AGAINST THE
FURNACE TOP TO ELIMINATE AIR LEAKS.
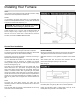
FASTEN FURNACE BOTTOM
(SURFACE AND RECESSED MOUNT)
NOTE
Fasteners are not furnished because of different requirements of
various types of wall construction.
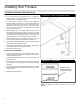
Fasten furnace to floor through holes provided in furnace bottom.
If you have concrete flooring, use an alternate fastening method.
See Fig. 20.
If burner and control assembly were removed, replace them by
reversing "DISCONNECT WIRING" and "REMOVE BURNER
AND CONTROLS" sections on pages 16 and 17.
IMPORTANT
To prevent damage to wiring, make sure not to pinch the wires
between furnace components. Keep them routed away from the
burner.
Re-secure the air discharge shield across the top of the burner
and controls compartment. Small leg of "L" shape must be
positioned toward floor, pointing away from front of furnace. Refer
to the illustration on Page 32 #27A or 34 #21.
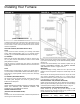
FASTEN FURNACE TOP (SURFACE MOUNTING)
Fasten furnace top to wall using two (2) metal anchors (packed in
plastic bag with thermostat) by placing them over the back flange
of furnace top and screwing to wall. Refer to Page 17, Fig. 20.
FASTEN FURNACE TOP (RECESSED MOUNTING)
Fasten furnace top by drilling two (2) holes through the side
flanges of furnace top and securing with two (2) screws or nails
into the wall studs. Refer to Page 17, Fig. 20.
CAUTION: Be careful not to damage furnace
components or wiring when drilling holes.
PART NUMBER
P321900