
Installation guide


Williams Sound
®
Helping People Hear
4
QUICK START INSTRUCTIONS
1. Make sure the R801 Receiver is set to the same operating frequency as your transmitter.
See the transmitter instructions for frequency identification. Alternately, see step 6 below.
2. Choose a location for the R801 Receiver. Take into account proximity to the sound
system, availability of AC power, rack mounting,and antenna installation requirements.
3. Install the Antenna. The rubber duck antenna threads into the hole on top of the receiver.
Remote antennas connect to the “F” type connector on the rear of the R801. See page 6
for remote antenna installation details.
4. Plug the Power Supply connector into the R801. The locking tab on the connector should
point UP as shown on the R801 rear panel. Plug the power supply into an AC outlet.
5. Connect the R801 Receiver to the audio input of your sound system, using the audio
cable provided. The cable provided is for an unbalanced connection. If you wish to use a
balanced connection, you will need to supply your own TRS cable.
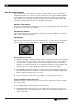
6. Turn the R801 Power switch ON. Change the R801 Channel Selector until the Carrier
light turns on and you hear the transmitter signal in the headphone jack.
7. Adjust the squelch control. See page 7 for details.
8. Set the volume on your sound system.