
User's Manual


PPA T46 Manual Page 6 Preliminary
Setting the Advanced Features
Press the “Menu” button to step through the Basic Features to the “Enter Advanced Setup” screen. Press the right button
to select “Yes”. Press the “Menu” button to step through the Advanced Features (see Table 1). Use the left and right
buttons to adjust each setting:
1. Compression (“COMPRESSION”): Select “1:1” or “2:1” audio compression.
2. Frequency Display Mode (“DISPLAY MODE”): Select “CHANNEL” or “CH NUMBER”. An example of how
the frequency will be displayed on the main screen will appear on the bottom of the menu under the selection.
See Table 2 for a list of frequencies, receiver compatibility, and how they are displayed in each mode.
3. Channel Selection Mode (“CHANNEL MODE”): Select “17 CHANNEL” or “8 CHANNEL” mode.
4. Screen Time-Out Period: Select “10 SECONDS”, “20 SECONDS”, or “30 SECONDS”.
5. Screen Brightness Adjustment (“BRIGHTNESS”): Select “LOW”, “MEDIUM”, or “HIGH”.
Table 2: Frequencies, Channel Numbers, and
Receiver Compatibility
Frequency (MHz)
R37 Channels
(17 Channel Mode)
R35
-
8 Channel
s
(8 Channel Mode)
72.1
1
1
72.3
2
2
72.6
3
3
72.8
4
4
74.7
5
5
75.4
6
6
75.7
7
7
75.9
8
8
72.5
9
-
72.2
10
-
72.4
11
-
72.7
12
-
72.9
13
-
75.3
14
-
75.6
15
-
75.8
16
-
75.5
17
-
Using the Auxiliary Jack
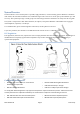
The “Auxiliary Input” jack (see Figure 1) on the top of the T46 can be used to transmit background music or a voice
recording from a CD or MP3 player.
Plug in a desired audio source such as a CD or MP3 player using the “Auxiliary Input” jack (WCA 087 stereo auxiliary
input cable included).
If microphone and auxiliary sources are used together, the audio will be mixed. If only auxiliary source is desired, the
microphone can be muted. Do not remove the microphone from the “Mic Jack”, as the cable is also the transmitting
antenna!
Locking the Menu
Press and hold both the left and right buttons for 3 seconds to lock the menu. A message indicating that the menu has
been locked will appear briefly on the display, which will then return to the Main Screen. The “Menu Locked Indicator”
will appear on this screen (see Figure 1 on Page 4).