
Full Product Manual

Installation
Thermostat Installation (Sold Separately)
Wall Mounting
1. Use Williams thermostat P322016 or any millivolt
thermostat.
2. If an existing thermostat is being replaced and is in a
satisfactory location and the wiring is in good condition, use
existing wiring. If in doubt, use new wiring.
3. If a new location is chosen or if this is a new installation, the
thermostat wire must first be run to the location selected. All
wiring must agree with local codes and ordinances. These
instructions cover bringing the wire down from the attic, but
it can be run from a basement or crawl space using similar
methods.
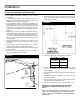
4. Before drilling a hole in the wall at the selected location,
drive a small finishing nail through the ceiling in the comer
of the wall and ceiling above the thermostat location. Pull
the nail out and push a small stiff wire through the hole so it
can be found in the attic. Drill a 1/2-inch hole through the
ceiling wall plate.
5. Probe for obstructions in the partition. Then, drill a 1/2-inch
hole through the wall at the selected location for the
thermostat.
6. From the attic, feed the thermostat wire or a stiff wire
through the wall until even with thermostat location.
7. Snag the thermostat wire through the wall so that 6 inches
of wire protrudes.
8. Route wire to the furnace leaving enough excess wire to
make the connections at the gas valve.
Ca
binet Mounting
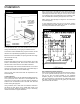
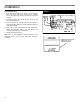
1. Locate the knockout on the right side of the furnace to
mount the thermostat. Remove the knockout by tapping it
lightly with a screwdriver.
2. Cut the thermostat wire to the required length below.
Model
Number
Length
14038 Series
31 inches
22038 Series 45 inches
30038 Series 47 inches
3. Connect the thermostat wires to terminal screws on the
front of the thermostat base. See instructions packaged
with thermostat.
4. Feed the thermostat wires through the knockout and to the
gas valve.
Important: Keep the thermostat wire away from the
combustion chamber.
5. Mount the thermostat to the side of cabinet with the screws
provided. Replace the thermostat cover.
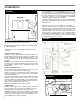
6. Connect the thermostat wire to the gas valve. (Figure 9).
IMPORTANT: BEFORE REMOVING THE FACE PANEL
DISCONNECT THERMOSTAT WIRES AT THE GAS
VALVE.
We have learned that some thermostats will “short
cycle” when mounted directly on the furnace cabinet. In
order to prevent this, the Williams Thermostat P322016
must be used.
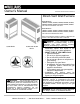
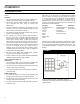
FIGURE 7
FIGURE 8