
Use and Care Manual

Installing Your Furnace
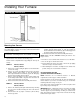
NOTE: Each tube must overlap the collars of the vent cap a
minimum of 1¼-inches, which is obtained when tubes are cut
correctly as previously described.
Trim
To conceal the space between the furnace and wall, use 4701 Trip
Strip Package (not furnished with furnace), ¾-inch round or other
wood trim.
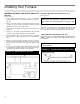
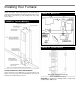
TRIM COVER
Place the trim cover on top of the furnace. See Page 16, Fig. 20.
Drill through the top casing flange and fasten each side with a
sheet metal screw. This plate covers the space between the top of
the furnace and wall opening after electrical connections are
made.
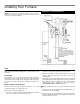
MOUNT FURNACE THROUGH WALL
Mount the furnace through the wall using surface or recessed
mounting instructions. See Pages 9 thru 12.
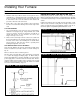
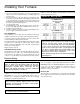
Refer to Fig. 19 for the following steps.
1. Check to see that the air tube protrudes through wall 7/8-inch
min. to 1-inch max. for proper seal in vent cap.
2. Check to see that the vent tube protrudes past the air tube 1/8
inch min. to ¼- inch max. for proper seal in vent cap.
3. Apply a single strip of mastic ("E" provided in the vent cap
carton) continuously around the outer edge of the vent cap
mounting plate.
4. Holding the vent cap in an upright position (embossed "top" on
the mounting plate towards the top of the furnace), push it into
place until the stops are contacted. If the stops prevent the
mounting plate from reaching the wall, refer back to
"DETERMINE PROPER LENGTHS" Page 14.
NOTE: The smaller tube in the vent cap must slide over the vent
“B”.
5. Fasten the vent cap mounting plate to the wall with (4) 1½-
inch wood screws "D'' provided.
6. On masonry construction, drill into the wall and use plugs or
anchors. Additional sealant (silicone) may be required if the
mounting surface is uneven.
FIGURE 19 Vent Installation
5507332
6007732
5507332
6007731