
Full Product Manual


Installing Your Furnace
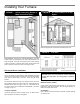
FOR EXAMPLE: Your furnace is rated at 60000 Btu/hr. The water
heater is rated at 30,000 Btu/hr. The total is 90,000 Btu/hr. You
need two grilles, each with 22½-square inches of free opening,
unless connected by horizontal ducts which would require each
grille or opening to have a free area of 45 square inches.
*
Openings for inlet or outlet air should not be made into attic area
if attic is equipped with a thermostat controlled power vent.
Recessed Mount Installation
FIND THE STUDS (See CAUTION on page 7)
Use a stud locator or small finishing nails. Repeatedly drive and
remove a nail into the wall in the area of the stud until it is located.
Then find the inside edge of the stud. Leave the nail at this
location.
The other stud should be about 14½-inches from the one found.
Drive finishing nails on the inside of this stud. Draw wall cutout to
required size as shown on Page 13, Fig. 13. If wall studs are not
on 16-inch centers see "CLOSE OFF STUD SPACE.” (As shown
on Page 12, Fig. 12).
CUT WALL OPENING
Provide an opening as shown on Page 12, Fig. 10. Work from the
top in the attic to cut away the ceiling plate.
WARNING: BEFORE INSTALLING: To avoid
electrical shock, turn off electrical circuits that pass
through the wall where you are going to install the
furnace.
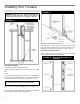
ATTACH HEADER PLATE
MODELS: 6008831; 6008832
Locate header plate between wall studs at 81 3/4 inches from
finished floor and nail into position with end flanges pointing up.
Make sure header plate is level.
ALL MODELS
Hole or electrical conduit is located on left side of header plate as
you face the wall.
FIGURE 7
Grilles Connecting Rooms to
Make Unconfined space
FIGURE 8
Air from Outdoors or Crawl
Space
FIGURE 9
Free
A
rea
Btu/hr.
Btu/hr./Input