
Owners Manual
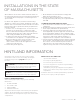


30 VENTED ROOM HEATERS
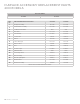
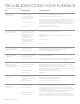
TROUBLESHOOTING YOUR FURNACE
ISSUE
1. Pilot will not stay lit
after following
lighting instructions.
2. Pilot burning - no gas
to the main burner.
3. Burner comes “ON” but
goes OFF before blower
turns ON.
4. Heater not producing
sufficient heat.
5. Heater operates, but
will not shut off after room
temperature is attained.
6. Pilot outage.
7. Main burner will
not stay on.
POSSIBLE CAUSE(S)
A. Generator producing
insufficient millivolts.
B. Loose or dirty generator
connections at gas valve.
C. Generator defective.
D. Grounded thermostat wire.
E. Defective valve.
A. Thermostat not turned to a
position calling for heat.
B. Plugged burner orifice.
C. Improperly wired or broken
thermostat wires.
Defective thermostat.
D. Pilot generator may not be
generating sufficient
millivoltage to open valve.
E. Defective valve.
A. Thermostat location.
B. Defective thermostat.
A. Heater may be too small for
space being heated.
B. Heater not burning at full rate.
A. Thermostat wiring defective.
B. Thermostat location.
C. Defective thermostat.
D. Valve stuck open.
A. Pilot flame may be too low or
blowing (high), causing pilot
to drop out.
B. Drafts or drafty areas.
A. Blockage in vent pipe.
B. Thermostat location.
C. Restriction in vent system
caused by offsets.
CORRECTIVE ACTION
Check pilot flame – it must impinge on the generator from 1/4 to 3/8-inches .
Be sure the thermocouple is fully inserted in its bracket.
Clean and/or tighten the connections at the valve.
Check the generator with millivolt meter. Take reading at the generator
terminals of the valve with the valve placed in “Pilot” position. Disconnect the
thermostat wires. The millivolt reading should be 450 millivolts or more.
Remove the thermostat wires from the valve terminals. If the pilot now stays
lit, trace the thermostat wiring circuit for a ground. May be grounded to
heater, gas supply, nails or staples.
Replace the gas valve after above is verified.
Set the thermostat to a position calling for heat.
Clean or replace.
Check the connections at valve terminals. If valve operates, check the
thermostat wires.
See 1A and 1C above.
Replace.
Check the thermostat location. It should not be in the path of warm air
discharge from heater, near a lamp, or above a T.V. or stereo.
Check the thermostat calibration or replace.
Check heat sizing calculations.
Check for low gas pressure at gas valve. It should be 4 inches W.C. for Natural
Gas; 10.5 inches W.C. for propane gas Check for blocked burner orifice.
Thermostat lead wires may be shorted together, caused by a nail or staple.
Check by removing thermostat leads from valve terminals.
Check thermostat location. If on an outside wall, or there is a hole in the wall
behind thermostat, cold air may be coming in contact with the thermostat.
Relocate the thermostat or plug the hole.
Verify thermostat temperature reading or replace.
Replace valve.
Adjust pilot flame. Pilot orifice may be plugged
(Check for spider webs or other material).
Check for doorway and high air movement areas.
Checks vent pipe for blockage, such as bird nests, twigs, leaves, etc.
Check thermostat location - if on an outside wall or there is a hole in wall
behind the thermostat causing cold air to contact the thermostat, relocate
the thermostat or plug the hole.
Check that the vent cap is properly installed, and not placed too far down on
the vent pipe. Cap must be the same manufacturer as the vent.
All type “B” vents shall extend in a vertical direction with no more than two
offsets not exceeding 45 degrees. Any angle greater than 45 degrees from
vertical is considered horizontal. Any offsets used should be as far above the
For qualified service technicians.