
Installation Guide

Using Wilsonart Type II adhesive, apply two 1/8” beads to the top and bottom areas of the
flat backside of the Decorative Edge. (FABTIPS: Do not use contact adhesive.)
Smooth the adhesive with scrap laminate material and apply molding to the prepared
substrate. Use fiber-reinforced tape applied every two to three
inches down the length of the molding and around the corners
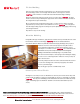
vertically to secure miter corners. (FABTIPS: Use a laminate faced
wood block and 3” pinch clamp to maintain correct height of
molding to the laminate countertop edge—see photo at left).
Move the block and clamp to each taping location during the taping
process to secure a flush application. Twist one end of your tape to
make removal easier.
Use 3-way clamps at both sides of the radius and miter intersection
to secure the molding to the countertop. Apply tape around the
corner to pull miters tight.
Wipe o any glue squeeze out with a damp cloth.
Glue the Molding
Allow glue to set under pressure for 45 minutes to an hour, then remove all the tape and
clamps. Remove adhesive residue by scraping with a scrap piece of laminate or molding.
(FABTIPS: A scrap piece of molding can be rubbed over the seams to smooth any sharp
edges. A matching dry erase marker or SeamFil® can also be used to touch up seam
areas.)
Clean-up and Final Finish
Fit the Molding
Start by rough cutting all the Decorative Edge pieces. Rough cut and dry fit the
Decorative Edges to the desired length and smooth the cut using a disc sander.
(FABTIPS: Trim a minimum 1” from both ends of the Decorative Edge molding).
Divide the angle finder dimension by two to get your miter angle. (FABTIPS: An angle
finder is the easiest way to identify the angle at the corners where the radius connects to
the straight lines of your countertop.)
We recommend using an adjustable miter gauge on a disc sander to make any slight
adjustments to provide you the best fit at mitered corners. (FABTIPS: Use scrap pieces
from the rough cutting stage to accurately set up the adjustable miter gauge prior to using
precut edge material.)
Repeat these steps for all molding.
This is an addendum to the Decorative Edge Fabrication Manual BR1515 (Rev. 9-30-2011). More detailed installation
instructions are available on the Wilsonart website: www.wilsonart.com. The Decorative Edge fabrication video can be viewed
here: http://www.youtube.com/watch?v=h_v9yIBEGuk&feature=share&list=UU2kGD-a6FN9sTftSWzP6UIQ.
Wilsonart LLC - Technical Services Tel: 800-433-3222 Fax: 254-207-3209 E-mail: smartline@wilsonart.com