6" Bench Grinder Model No. 17204 6" BENC H GRIN Operation and Safety Instructions For your safety WARNING: Read and understand all instructions. Failure to follow all instructions may result in electric shock, fire and/or serious injury.
IMPORTANT INFORMATION INTRODUCTION SPECIFICATIONS Your 6" Bench Grinder is a dependable tool that is designed for hand-grinding operations such as sharpening chisels, screwdrivers, drill bits, removing excess metal, and smoothing metal surfaces. Easy to operate, it’s the ideal bench grinder for the serious Do-It-Yourselfer. Model Number ................................................. 17204 Power Source.....................................120V AC, 60 Hz Maximum developed horsepower .....................
SAFETY Wear the Proper Apparel – and nonslip footwear when operating power tools. Do not wear loose clothing, gloves, neckties, rings, bracelets or other jewelry which may become caught in moving parts. Keep long hair away from your face and tied back. Roll long sleeves above the elbow. Read, understand and follow all operating instructions, safety operations and symbols in this manual before operating and maintaining your power tool.
SAFETY Never Leave the Tool Unattended While it’s Running – turn OFF the power. Do not leave the tool unattended until it reaches a complete stop. Only wear safety goggles that comply with ANSI Z87.1 The operation of any grinder can result in foreign objects being thrown into your eyes, which can result in severe eye damage. ● Glasses or goggles that are not in compliance with ANSI Z87.1 could break resulting in severe eye injury. Wear a face or dust mask when working in a dusty environment.
SAFETY Keep all wheel guards in place. Do not use the grinder with the wheel guard removed. Use a separate electrical circuit for your tools. This circuit must not be less than a #12 wire and should be protected with a 15 Amp time delayed fuse. Before connecting the motor to the power line, make sure the switch is in the OFF position and the electric current is rated the same as the current stamped on the motor nameplate. Running at a lower voltage will damage the motor.
SAFETY Use only 3-wire extension cords that have 3-prong grounding plugs and 3-pole receptacles that accept the tool’s plug. Guidelines for Extension Cords Use proper extension cord. Make sure your extension cord is in good condition. When using an extension cord, be sure to use one heavy enough to carry the current your product will draw. An undersized cord will cause a drop in line voltage, resulting in loss of power and cause overheating.
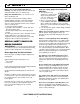
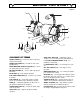
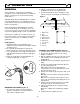
BEFORE YOU START Figure 1 9 6 11A 11B GLOSSARY OF TERMS TOOL REST ARM (10A) --- adjustable to move workpiece closer or away from the grinding wheel. WHEEL GUARD (1) --- houses the wheel, exposing only the work surface. 6 x 3/4 INCH GRINDING WHEEL (11A) --- for grinding or sharpening WHEEL END COVER (2) --- shields the side of the grinding wheel. 6" WIRE WHEEL (11B) --- for removing rust, scale, etc. REAR-MOUNTED EXHAUST CHUTES (3) --- directs the debris away from the operator.
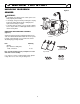
BEFORE YOU START UNPACKING YOUR BENCH GRINDER Figure 2 WARNING: • To avoid injury do not plug the power cord into power source during unpacking and assembly. • To avoid injury, if any part is missing or damaged, do not plug • in the bench grinder until the missing or damaged part is replaced, and assembly is complete. To avoid fire and toxic reaction, never use gasoline, naphtha, acetone, lacquer, thinner, or similar highly volatile solvents to clean the bench grinder.
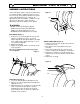
BEFORE YOU START ASSEMBLY INSTRUCTIONS Figure 4 Your bench grinder requires only the assembly of the eye shields and proper adjustment of the tool rests. For your safety, do not plug the grinder into a power source until all adjustments are complete. An adjustable wrench and a Phillips screwdriver are the only tools you will need to make all normal adjustments and wheel changes on this grinder. 1/16" WARNING: • • • • DO NOT assemble when the grinder is plugged in.
OPERATION 2. Align the mounting holes on the grinder with predrilled holes in a bench or grinder stand. 3. Insert bolts through the holes and tighten, using washers, and nuts (not included) as shown in Fig. 7. OPERATION A bench grinder is designed for hand grinding operations such as sharpening chisels, screwdrivers, drill bits, removing excess metal, and smoothing metal surfaces.
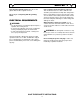
OPERATION 10. Check for proper clearances between the grinding wheel and the tool rests and spark arrestors. 11. While still unplugged, hand turn the wheel to check for alignment and to see if any other part is binding the grinding wheel. 12. DO NOT stand in front of the grinder when starting. Stand to one side and turn on the grinder. Let it come up to speed and idle for one minute. 4 5 1 3 2 4 1 3 Figure 9 2 BEFORE GRINDING 1. Adjust the eye shield. 2.
OPERATION USING DRESSING WHEEL (NOT SUPPLIED) (Figure 10) Grinding wheels tend to fill up (with the material you are grinding), get dull, and lose their shape. The dressing wheel is the one remedy for all three of these conditions. 1. Adjust the tool rests (1) to a horizontal position. 2. Turn on the grinder, making sure to follow all safety precautions. 3.
TROUBLESHOOTING PROBLEM PROBABLE CAUSE REMEDY Motor will not start 1. 2. 3. 4. 5. 6. 1. 2. 3. 4. 5. 6. Motor will not start and fuse or circuit breaker opens 1. Too many electrical machines running on the same outlet 2. Incorrect fuse Not plugged into receptacle Switch not in "ON" position Motor cord cut or abraded Plug on cord is faulty Fuse or circuit breaker open Faulty motor 3. Wheels cannot rotate because of obstruction 4. Undersized extension cord 5.
SERVICE FOR REPLACEMENT PARTS AND SERVICE When servicing your Wilton® product, use only Wilton® replacement parts. Use of any other parts may cause product damage. All servicing of the tool should be performed by a qualified service technician. When requesting service or ordering parts, always provide the model number, part number and description. In the U.S.: WMH TOOL GROUP Consumer Relations 427 Sanford Road Lavergne, TN 37086 Phone: 1-800-274-6846 (technical assistance) 1-800-274-6848 (parts) www.