
Specifications


OPERATION
11
10. Check for proper clearances between the grinding
wheel and the tool rests and spark arrestors.
11. While still unplugged, hand turn the wheel to
check for alignment and to see if any other part is
binding the grinding wheel.
12. DO NOT stand in front of the grinder when
starting. Stand to one side and turn on the grinder.
Let it come up to speed and idle for one minute.
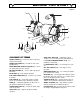
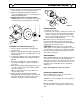
CHANGING THE LIGHT BULB (Figure 9)
1. Turn the grinder switch "OFF" and unplug the
electrical cord.
2. Rotate the shade (1) until the triangle mark (2) clicks
into the notch (3) on the socket (4). Pull the shade
forward and off.
3. To remove the bulb from the socket, gently depress
the bulb while turning it counterclockwise. Slide the
bulb out.
4. Insert the new bulb in the socket and align the
2 pins (5) at the bulb base with the channels in
the socket.
5. Slide the bulb downward applying gentle pressure
to set the socket spring. Turn the bulb clockwise
to lock into position.
Note: Use only automotive dome/courtesy bulb No. 89
(12V, 6-W, single contact).
6. Replace the shade (1) by aligning the triangle
mark (2) with the notch (3) on the socket. Push until
it clicks into the groove. Rotate the shade to lock,
and to direct the light to the desired location.
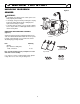
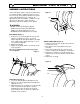
BEFORE GRINDING
1. Adjust the eye shield.
2. Check for 1/16" clearance between the wheel and
tool rests; and 1/8" clearance between the wheel
and the spark arrestors. Hand turn the grinding
wheel to check alignment and to be sure no other
part is binding the grinding wheel.
Note: Always keep the tool rests adjusted so they clear the
wheel and are located at the center line of the wheel or just
below the center line. This will help prevent accidental jamming of
work between the wheel and the tool rest.
CAUTION:
DO NOT stand in front of the grinder when
starting. Stand to one side and turn on the grinder. Let it come up
to speed and idle for one minute. There is always the possibility
that a piece from a damaged grinding wheel may be thrown off
when coming up to full speed.
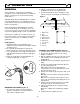
WHEN GRINDING
When grinding, ALWAYS keep the workpiece moving
across the face of the wheel. Continually grinding
against the same spot on the wheel will cause grooves
to be worn into the face of the wheel. Tool rests can
be adjusted to accommodate larger, odd-shaped
work pieces.
Never grind against the side of the wheel.
RESHAPING GRINDING WHEEL
When a grinding wheel wears out-of-round it is
necessary to reshape the wheel.
ALWAYS use the dressing wheel tool (not supplied)
when reshaping.
Note: After reshaping it will be necessary to readjust the tool
rests and spark arrestors to maintain proper clearance from the
wheel.
1
3
4
5
2
132
4
Figure 8
Figure 9