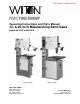
This Manual is Bookmarked Operating Instructions and Parts Manual 14- & 20-inch Metalworking Band Saws Models 8014FW and 8020FW Model 8014FW Model 8020FW WMH TOOL GROUP 2420 Vantage Drive Elgin, Illinois 60123 Ph.: 800-274-6848 www.wmhtoolgroup.com Part No.
This manual has been prepared for the owner and operators of a Wilton 8014FW or 8020FW Band Saw. Its purpose, aside from machine operation, is to promote safety using accepted operating and maintenance procedures. To obtain maximum life and efficiency from your band saw and to aid in using it safely, please read this manual thoroughly and follow the instructions carefully. Warranty and Service WMH Tool Group warrants every product it sells.
Table of Contents Warranty and Service ..............................................................................................................................2 Table of Contents ....................................................................................................................................3 Warning...................................................................................................................................................4 Introduction.........................
Warning 1. Read and understand the entire owners manual before attempting assembly or operation. 2. Read and understand the warnings posted on the machine and in this manual. Failure to comply with all of these warnings may cause serious injury. 3. Replace the warning labels if they become obscured or removed. 4. This band saw is designed and intended for use by properly trained and experienced personnel only.
blahblahblah 21. Give your work undivided attention. Looking around, carrying on a conversation and “horse-play” are careless acts that can result in serious injury. 22. Maintain a balanced stance at all times so that you do not fall or lean against the blade or other moving parts. Do not overreach or use excessive force to perform any machine operation. 23. Use the right tool at the correct speed and feed rate. Do not force a tool or attachment to do a job for which it was not designed.
Introduction This manual is provided by WMH Tool Group covering the safe operation and maintenance procedures for a Wilton Model 8014FW or 8020FW Band Saw. This manual contains instructions on installation, safety precautions, general operating procedures, maintenance instructions and parts breakdown. This machine has been designed and constructed to provide years of trouble free operation if used in accordance with instructions set forth in this manual.
Features and Terminology 1 – Variable Speed Handwheel 2 – Fence 3 – Work Lamp 4 – Chip Blower Hose 5 – Guide Post Lock Knob 6 – Tension Handwheel 7 – Speed and Pitch Selector 8 – Upper Door 9 – Digital Readout 10 – On/Off Buttons 11 – Shear 12 – Lower Door 13 – Pressure Selector Switch 14 – Anneal Button 15 – Weld Button 16 – Welder Clamp 17 – Clamp Handle 18 – Grinder Toggle Switch 19 – Grinder 20 – Gear Selector Lever (8020FW only) 21 – Post Elevating Handwheel (8020FW only) 7
Contents of the Shipping Container Unpacking 1 1 1 1 1 1 1 1 1 Open shipping container and check for shipping damage. Smaller parts are found in a separate box at the foot of the band saw. Report any damage immediately to your distributor and shipping agent. Do not discard any shipping material until the Band Saw is set up and running properly. Compare the contents of your container with the following parts list to make sure all parts are intact.
Installation and Assembly Tools required for assembly: Forklift or hoist with strap or chain Set of hex wrenches (provided) Remove all crating and plastic from around the band saw. Remove any lag screws or holding straps which secure the saw to the wood pallet. Remove the eye bolt from the tool box, and screw it into the hole at the top of the machine. Lift the band saw from the pallet using a strap or chain connected to the eye bolt.
Improper connection of the equipmentgrounding conductor can result in a risk of electric shock. The conductor with insulation having an outer surface that is green with or without yellow stripes, is the equipmentgrounding conductor. If repair or replacement of the electric cord or plug is necessary, do not connect the equipment-grounding conductor to a live terminal.
Adjustments [NOTE: Procedures for the model 8014FW and the model 8020FW are identical except where noted.] Blade Removal and Installation Wear leather gloves when removing or installing band saw blades. New blades usually come in a coiled position; to prevent injury, hold the blade with one hand while carefully uncoiling it with the other. Figure 6 (Model 8014FW only) 1. Disconnect machine from power source. 2. Open upper and lower doors. 3.
Keep in mind that too much or too little blade tension can cause blade breakage and/or poor cutting performance. If the band saw is to be idle for a period of time, release tension on the blade – this will prolong blade life. Blade Tracking Blade tracking has been tested at the factory but should be checked as the machine receives use, and after each blade change. 1. Disconnect machine from power source. 2. Move the upper and lower blade guides away from the blade (see “Blade Guides”). 3.
3. Tighten the securely. socket head cap screws 4. This procedure should be done for both upper and lower guide housings. 5. Open upper door and rotate the wheel by hand until the weld portion of the blade is between the two blade guides. 6. Loosen the socket head cap screws (Figure 9) on the blade guides. 7. Move the blade guides so they are as close to the blade as possible without touching it. 8. Tighten the socket head cap screws (Figure 9).
Replacing Drive Belts (See Figure 13) 1. Disconnect machine from power source. 2. To remove the air compressor belt, loosen the two hex cap screws (A, Figure 13) on the mounting plate and tilt the air compressor toward the motor. After installing a new belt, tilt the air compressor away from the motor to tension the belt, and re-tighten the two hex cap screws. 3. To remove the motor drive belt, first remove the air compressor belt (see above).
3. When the saw has completed about 1/3 of the cut, increase the feed rate slightly and allow the saw to complete the cut. 4. Keep the feed rate at the same setting and begin a second cut on the same or similar workpiece. 5. When the saw has completed about 1/3 of the cut, increase the feed rate while watching the chip formation until cutting is at its most efficient rate (refer to “Evaluating Cutting Efficiency” below). Allow the saw to complete the cut. Figure 14 (Model 8014FW only) 6.
Welder Operation Wear eye protection while operating the welder. Use care when handling the blade after welding to avoid burns. The welding procedure involves the following steps: Shearing the blade, grinding teeth to allow for the weld area, the actual welding, inspection of the blade, annealing, grinding and a final inspection of the blade. This procedure can be accomplished using the shear and welder assemblies on your band saw.
5. Turn pressure knob to “0” position (pointed downward). NOTE: There will be some resistance when turning the knob. 6. Insert one end of the blade in the left clamp (Figure 19). Position the back edge of the blade against the back edge of the left clamp. Then position the end of the blade midway between the left and right clamps. Tighten the left clamp. 7. Insert the other end of the blade in the right clamp. Position the back edge of the blade against the back of the right clamp.
14. Turn the pressure selector knob all the way to the left so the clamp jaws are closest to each other. 15. Insert the blade into the clamps so the weld area is centered between the clamps. Secure the blade in the jaws with the clamp handles. 16. The annealing procedure involves “jogging” (pressing and releasing) the anneal button (Figure 19). Do not press and hold the anneal push button. The weld will be overheated and will fail due to the excessive heat.
If the blade is thicker at the weld than at the rest of the blade, using the blade may damage the guides. 20. When grinding, do not hit the teeth, or grind deeper than the thickness of the blade; or burn or overheat the weld area. Be sure to remove flash from the back edge of the blade. Any flash or “stub” teeth which project beyond the normal set or height of the other teeth must be ground off. Clean Up It is very important that the clamp jaws be kept clean at all times.
Gage Use the standard gage (blade thickness) except when the increased thickness of the workpiece decreases accuracy and width cannot be increased to compensate. Examples of heavy gage applications: 1. When radius cutting in thick materials. 2. When the maximum width usable on the machine still provides insufficient beam strength for the blade. (Beam strength is the blade’s resistance to compression caused by strong feeding or the type of material being cut). Pitch Pitch is measured in “teeth per inch” (T.
The Hook blade has larger teeth and gullets and a positive rake angle which permits better feed and chip removal. It is useful for both cast iron as well as hard, nonferrous alloys. Variable-tooth blades combine features of the other styles. They generally offer smooth cuts and long blade life, while reducing noise and vibration. Set The term “set” refers to the way in which the saw teeth are bent or positioned. Bending the teeth creates a kerf that is wider than the back of the blade.
Maintenance Make sure the chip brush on the lower band wheel is properly adjusted. Before doing maintenance on the machine, disconnect it from the electrical supply by pulling out the plug or switching off the main switch! Failure to comply may cause serious injury. If the power cord is worn, cut, or damaged in any way, have it replaced immediately. The chart (Figure 28) identifies areas that require cleaning and/or lubricating. Use good quality, general purpose lubricants.
Speed and Pitch Chart 23
Typical Band Saw Operations 24
Troubleshooting – Operating Problems Trouble Probable Cause Remedy Blade has been improperly welded. Re-weld the blade (see page 1619). Blade not installed properly. Set the blade guides closer, and increase blade tension. Feeding workpiece too forcefully. Decrease feed rate. Incorrect choice of blade. Use a proper width blade for radius or wavy line cutting. Blade tooth has improper set. File to proper set or replace blade. Not enough blade tension. Increase tension. Guide post too high.
Troubleshooting – Mechanical and Electrical Problems Trouble Machine will not start/restart or repeatedly trips circuit breaker or blows fuses. Probable Cause Remedy No incoming power. Verify machine is connected to power source. Make sure START button is pushed in completely, and the STOP button is disengaged. Cord damaged. Replace cord. Overload automatic reset has not reset.
Trouble Machine will not start/restart or repeatedly trips circuit breaker or blows fuses. Band Saw does not come up to speed. Probable Cause Remedy Motor failure. If electric motor is suspect, you have two options: Have a qualified electrician test the motor for function or remove the motor and take it to a qualified electric motor repair shop and have it tested. Miswiring of the unit. Double check to confirm all electrical connections are correct.
Troubleshooting – Welded Blade Inspection Trouble Probable Cause Remedy Weld is misaligned. Dirt or scale on clamp jaws or blade. Always keep jaws clean. Clean blade before welding. Blade ends not square. Before welding, grind cut edges of the blade until they are square. Use the shear on the band saw for square cuts. Blade ends not correctly aligned when clamped in jaws. Align the ends properly before clamping. Worn clamp jaws Replace clamp jaws. Clamp jaws not aligned correctly.
Troubleshooting – Welder Mechanical Problems Trouble Weld could not be made. Jaws do not move. Weld area melts when weld switch is pushed. Blade can not be tightly clamped with the clamp jaws. Annealing doesn’t occur when the annealing button is pushed. Annealing button will not return to correct position after it is released. Grinder will not run when the Grinder switch is pushed. Probable Cause Remedy Wire connection is poor; connecting point of welding switch is bad.
Parts List: Band Saw Assembly (8014FW only) (refer to breakdown on page 35) Index No. Part No. Description Size Qty 1............... VBS1408-1010........ Work Table........................................................ ................................... 1 2............... VBS14-102 ............. Table Support Frame......................................... ................................... 1 3............... TS-1533032 ............ Phillips Pan Head Machine Screw...................... 5 x 10mm .....
57............. 9015 ....................... Guide Post Locker ............................................. ................................... 1 58............. 9210 ....................... Handle Knob...................................................... ................................... 1 59............. VBS1610-2000........ Main Drive Motor ............................................... ................................... 1 60............. TS-0051051 ............ Hex Cap Screw.......................
117........... TS-0680021 ............ Flat Washer....................................................... 1/4"............................. 1 118........... 8014FW-1118 ......... Ball Bearing....................................................... ................................... 2 119........... 8014FW-1119 ......... Air Pump Housing.............................................. ................................... 1 120........... 8014FW-1120 ......... Air Pump Cover .....................................
177........... TS-1551041 ............ Lock Washer ..................................................... 6mm........................... 2 178........... TS-1540041 ............ Hex Nut ............................................................. 6mm........................... 2 179........... VBS1408-5140........ Upper Door........................................................ ................................... 1 180........... 9300 ....................... Upper Door Hinge...............................
237........... TS-1551041 ............ Lock Washer ..................................................... 6mm........................... 3 238........... TS-1550041 ............ Flat Washer....................................................... 6mm........................... 3 239........... TS-0211101 ............ Socket Head Cap Screw.................................... 1/2-13 x 2¼" ............... 1 240........... TS-0680061 ............ Flat Washer.......................................................
Band Saw Assembly (8014FW only) 35
Parts List: Welder, Shear and Work Lamp Assemblies (8014FW only) (refer to breakdown on page 39) Index No. Part No. Description Size Qty 2............... 8014FW-22 ............. Pan Head Bolt ................................................... #5 x 5/8" ..................... 2 3............... 8014FW-23 ............. Lock Washer ..................................................... #5............................... 2 4............... PR-EV-6011............ Insulator .....................................
57............. PR-EV-6220............ Short Spring ...................................................... ................................... 1 58............. 8014FW-258 ........... Pan Head Bolt ................................................... 5 x 6mm ..................... 2 59............. TS-1551031 ............ Lock Washer ..................................................... 5mm........................... 2 60............. PR-EV-6230............ Spring, Long........................................
117........... PR-EV-1920............ Spindle Lift ........................................................ ................................... 1 118........... 8014FW-2118 ......... Retaining Ring................................................... 25mm ......................... 2 119........... PR-EV-1930............ Blade Shaft........................................................ ................................... 1 120........... 8014FW-2120 ......... Retaining Ring...................................
Welder, Shear and Work Lamp Assemblies (8014FW only) 39
Parts List: Band Saw Assembly (8020FW only) (refer to breakdowns on pages 47-48) Index No. Part No. Description Size Qty 1............... VBS2012-0500........ Gear Box ........................................................... ................................... 1 2............... TS-0209091 ............ Socket Head Cap Screw.................................... 3/8-16 x 2” .................. 4 3............... TS-0720091 ............ Lock Washer .....................................................
56............. TS-0680042 ............ Flat Washer....................................................... 3/8”............................. 2 57............. 8020FW-157 ........... Left Table Bracket ............................................. ................................... 1 58............. TS-0060091 ............ Hex Cap Screw.................................................. 3/8-16 x 2” .................. 2 59............. TS-0720091 ............ Lock Washer ......................................
116........... VBS2012-9015........ Guide Post Lock ................................................ ................................... 1 117........... VBS2012-9033........ Post Elevating Handwheel ................................. ................................... 1 118........... TS-0270111 ............ Socket Set Screw .............................................. 5/16-18 x 1/2” ............. 1 119........... 8020FW-1119 ......... Handle Knob...................................................... ...
176........... VBS2012-9790........ Chip Stopper ..................................................... ................................... 1 177........... TS-0050031 ............ Hex Cap Screw.................................................. 1/4-20 x 3/4” ............... 1 178........... TS-0680021 ............ Flat Washer....................................................... 1/4”............................. 1 179........... 8020FW-1179 ......... Ball Bearing.............................................
236........... VBS2012-9500........ Spring Plate....................................................... ................................... 2 237........... TS-1533032 ............ Phillips Pan Head Machine Screw...................... 5 x 10mm ................... 4 238........... TS-1551031 ............ Lock Washer ..................................................... 5mm........................... 4 239........... TS-1540031 ............ Hex Nut .............................................................
296........... VBS2012-7010........ Spring................................................................ ................................... 1 297........... VBS2012-7020........ Variable Speed Disc – Upper Outside................ ................................... 1 298........... TS-0208041 ............ Socket Head Cap Screw.................................... 5/16-18 x 3/4” ............. 1 299........... VBS2012-7030........ Variable Speed Disc – Upper Inside................... .......................
356........... 8020FW-1356 ......... Brass Handle..................................................... ................................... 1 357........... 8020FW-1357 ......... Selector Bushing ............................................... ................................... 1 358........... TS-1550011 ............ Flat Washer....................................................... 3mm........................... 1 359........... 8020FW-1359 ......... Lock Washer ...........................................
Band Saw Assembly (8020FW only) 47
Band Saw Assembly (8020FW only) 48
Parts List: Welder, Shear and Work Lamp Assemblies (8020FW only) (refer to breakdown on page 52) Index No. Part No. Description Size Qty 1...............JWG34-601............. Limit Switch ....................................................... ................................... 1 2...............8014FW-22 ............. Phillips Pan Head Machine Screw...................... #5 x 5/8” ..................... 2 3...............8014FW-23 ............. Lock Washer..............................................
75 .............8014FW-272 ........... Spacer............................................................... ................................... 2 76 .............TS-1540041 ............ Hex Nut ............................................................. ................................... 1 77 .............VBS1220M-629....... Grinder Guard.................................................... ................................... 1 78 .............TS-1513021 ............ Socket Head Flat Screw...............
46 .............TS-1550011 ............ Flat Washer ....................................................... 3mm ........................... 2 47 .............8020FW-247 ........... Hex Nut ............................................................. #8-32 .......................... 2 48 .............PR-EV-6170............ Pressure Adjust Knob ........................................ ................................... 1 49 .............PR-EV-6180............ Shaft...........................................
Welder, Shear and Work Lamp Assemblies (8020FW only) 52
Electrical Connections – Model 8014FW only 53
Electrical Connections – Model 8020FW only 54
WMH Tool Group 2420 Vantage Drive Elgin, Illinois 60123 Phone: 800-274-6848 www.wmhtoolgroup.