
User Manual
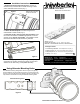

Package Contents:
• Arca-Swiss Style QR Plate: AP-552 Replacement Foot (Qty 1)
• Mounting Screws: M3 x 12mm Socket Head Cap Screw (Qty 4)
• Safety Stop Screws: M3 x 6mm Socket Head Cap Screw (Qty 2)
• Hex Key: 2.5mm (Qty 1)
Weight: 4.2 oz
Product Dimensions (L x W x H): 5.5” x 1.5” x 0.5”
Materials: Anodized 6061 Aluminum, Stainless Steel
Instructions continued on back >>
Wimberley, Inc. Phone: 1-434-529-8385
1750 Broadway St Toll Free: 1-888-665-2746 (USA & Canada)
Charlottesville, VA
22902 USA www.tripodhead.com info@tripodhead.com
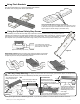
1. Remove the factory foot from the lens. Use the en-
closed hex key to remove all four small mounting screws
on the underside of the lens foot (Fig. 1).
Remove all 4 mounting
screws on lens foot
Figure 1
Wimberley, Inc. Phone: 1-434-529-8385
1750 Broadway St Toll Free: 1-888-665-2746 (USA & Canada)
Charlottesville, VA
22902 USA www.tripodhead.com info@tripodhead.com
5 Year Warranty – See www.tripodhead.com/warranty.cfm for complete details
Figure 2
Made in USA
AP-552
Quick-release Replacement
Foot for Nikon:
200 f/2 VR I and 200 f/2 VR II
Installation Instructions
4. Install safety stop screws (Fig. 4 on pg 2). Safety stop
screws are not required, however they keep your lens and
camera secure when using a compatible QR clamp.
2. Attach the AP-552 plate to the lens using the four
enclosed M3 x 12mm screws (Fig. 2).
3. Drive the screw in until you first meet resistance, then
turn it about 30° farther to establish appropriate, but not ex-
cessive, torque. Do not over tighten; it is possible to shear
the head off the fastener with the hex key included.
Using Alternate Mounting Holes
The Standard mounting configuration shown in Figure 2 is typically
the most Ideal for use as a handle. However if you have a large cam-
era grip or are using the 552 in the orientation shown to the right, you
may choose to mount the lens using the alternate mounting holes.
Figure 3
Alternate Mounting Holes