
Instruction Manual
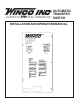


PAGE 5
60706-1450117-00
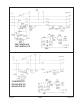
All three neutral connections are made to the appropriate
neutral lugs. These lugs have been prewired common
in the A.T.S. A neutral to ground bond has also been
installed in the A.T.S. panel. If your system requires an
isolated neutral this bond, a copper jumper strap, should
be removed. If this jumper strap is removed remember
to properly ground the Automatic Transfer Switch using
the grounding lug provided.
THREE PHASE POWER MONITOR
All three phase Automatic Transfer Switches have a three
phase power monitor installed in them to monitor each
phase for low voltage. This three phase monitor is
phase rotation sensitive also, and comes from the factory
set up for A-B-C phase rotation. If you have trouble
getting the A.T.S. to pickup the line power on initial
installation, try switching the A and B phase on the
monitor. Your rotation may be C-B-A. If so, be sure to
match the generator rotation to your current normal
power rotation or your three phase motors will try to turn
backwards.
*************
***** WARNING *****
*************
When installing a Three Phase 240 Volt Delta system be
sure you know which lead is the high voltage leg (208
Volt line to neutral). The Automatic Transfer Switch is set
up for the high voltage lead to be connected at G3, T3
and L3. Under no circumstance use G1, T1 and L1 as
doing so will damage the A.T.S. controls.
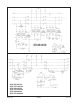
D.C. ELECTRICAL INTERCONNECTION
*******CAUTION******
Never run the AC and DC wiring in the same conduit.
The start circuitry in these A.T.S. is a dry contact closure
to operate system. When the power fails the start/stop
relay on the door closes and connects start 1 wire to Start
23. These connections are not polarity sensitive. If your
Engine-Generator set needs any other type of signal to
operate, you will need to contact the WINCO, Inc. Service
Department at 507-357-6831.
Two control wires are required to be installed between
the A.T.S. panel and the generator control. Depending on
the distance 14 to 16 gauge stranded wire should be
sufficient. These wires should be labeled “Start 1” and
“Start 23”.
SETTING THE EXERCISER CLOCK
Setting the current time and date.
1. Position the top right hand (RUN) slide switch to the
left position.
2. Push the clock’s “Day Select Button” until the clock
displays a triangle under the number corresponding to
the current day of the week. (Monday is day 1, Sunday is
day 7)
3. Push the “Hour Select Button” until the display
indicates the correct time in hours. Note: In the afternoon
you should push the button until a “P” is displayed
beside the correct hour.
4. Push the “Minute Select Button” until the display
indicates the correct time in minutes.
5. Position the top right hand (RUN) slide switch to the
center position. The correct time and date should now
be displayed.
Setting the Exerciser Program:
1. Position the top right hand (RUN) slide switch to the
right hand position.
2. Position the top left hand (AUTO) slide switch to the
center position.
3. Press the “Program Select Button” until No 1 is
displayed on the clock to the right of the time.
4. Push the “Day Select Button” to select the day you
want the engine generator set to start up and run. Note:
You can get more than one triangle displayed on the
clock. If this happens just keep pressing the button and it
will work back through the cycle and display only one
triangle under whichever day you desire.
5. With the “Hour” and “Minute” buttons select the time
of day you want the engine to start up.
6. Press the “Program Select Button” until No. 2 is
displayed on the clock.
7. Push the “Day Select Button” to select the day you
want the engine to stop. This must be the same day you
selected in step 4 above.
8. With the “Hour” and “Minute” buttons, select the time
you want the engine to stop. It is recommended you let
the engine run at least 15 minutes during any exercise
period.
9. Position the top right hand (RUN) slide switch to the
center (RUN) position.
CLOCK NOTES:
This seven day exerciser clock has seven additional
program cycles available. Always keep in mind the odd
number turns the unit on and the even number shuts the
unit off. (i.e. (3 on, 4 off) (5 on, 6 off) etc.)
The relay in the clock will not work unless the transfer
switch is installed and powered up. The relay needs 120
volts AC to operate.