PlasmaWave™ True HEPA Air Cleaner CUSTOMER SERVICE Mail requests or comments to: Winix Inc. 2500 W. Higgins Rd. Suite 610 Hoffman Estates, IL 60195 Please be sure to specify a model number. Tel: 1.847.781.9991 Fax: 1.847.781.9992 Toll Free: 1-877-MY-WINIX (699-4649) Email: info@winixinc.com Website: www.winixinc.com Please visit our website or contact us to purchase a Winix Replacement Filter Cassette. NOTE: IF YOU EXPERIENCE A PROBLEM, PLEASE CONTACT CUSTOMER SERVICE. REFER TO YOUR WARRANTY.
PlasmaWave™ True HEPA Air Cleaner Operator’s Manual WAC-9000 CAUTION: Read and follow all safety rules and instructions before operating this equipment. Español: p.
TABLE OF CONTENTS Warranty......................................................2 Package Contents......................................2 Safety Instructions......................................3 Product Specifications................................4 Air Cleaner Features...............................4-5 Air Cleaner Set-Up.....................................6 Display Panel..............................................7 Operation................................................8-9 Remote Control..........
SAFETY INSTRUCTIONS Thank you for purchasing a Winix air cleaner. Please read this manual carefully before using. This product is for household use only. • Remove the power plug from the outlet when the unit is not in use. • Do not handle the power plug with wet hands. • Do not operate the unit when using indoor smoke-generating insecticides. • Do not clean unit with benzene or paint thinner. Do not spray insecticides on the unit.
PRODUCT SPECIFICATIONS Room Area Served Power Supply Power Rate Fan Speed Display Control Type Dust Sensor Odor Sensor Light Sensor Timer Sleep Mode Filters Cleaning System CADR HEPA Filter Technology Color Remote Control Dimensions Weight WAC-9000 WAC-9000S 280 sq. ft.
• Light Sensor Automatically activates Sleep mode when the room is darkened, to ensure continuously quiet and energy-efficient operation. FIVE-STAGE CLEANING Air undergoes five separate processes before returning, freshened and cleaned, to the room. • Washable Anti-Bacterial Pre-Filter This reusable filter collects large particles, pollen, pet hair, lint, etc. • Change Filter Alert Lets you know when it's time to replace the complete filter cassete. • True HEPA Filter Captures 99.
AIR CLEANER SET-UP NOTE: Follow these instructions for best results. • Place unit at least 7 feet from equipment that emits electric waves such as televisions or radios. • Place unit at least 2 feet from the wall. • Keep sensors away from drafty areas. • Keep curtains away from sensors, as they may interfere with air intake/outlet. • Place unit on a stable surface with plenty of air circulation. 5. Return the filter cassette into the main unit. 6.
DISPLAY PANEL 1 4 9 6 2 3 12 7 10 5 8 11 3 1. TIMER - Press the TIMER button once for 1 hour of operation; press the button a second time for 4 hours; press a third time for 8 hours. Pressing the TIMER button a fourth time returns to the Off Timer mode. 7. LIGHT SENSOR - Automatically activates Sleep mode when room is darkened. 2. FUNCTION - Press the FUNCTION button once to set the unit to Auto. Continue to press the button for Sleep > Low > Medium > High > Return to Auto. 9.
OPERATION AUTOMATIC OPERATION • TURBO The TURBO level, the highest fan speed, can be activated manually for maximum air circulation. The unit is set to default to Automatic operation when it is first turned on. The air cleaner will automatically sense the amount of impurities in the air, and adjust the fan speed accordingly. TURBO • PLASMA ON/OFF Activate PlasmaWave TM by depressing for 2-3 seconds the PLASMA ON/OFF button on the remote, or the POWER button on the unit.
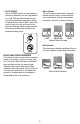
• Odor Sensor The odor sensor responds to cigarette smoke and pet odors, as well as other air contaminants such as insecticides, cosmetics, alcohol, or aerosol sprays. • AUTO SLEEP Use the TIMER button on the display or remote to manually turn the light sensor on or off. With the light sensor on, the unit will automatically operate in Sleep mode when the room is dark. When the room is light, the unit will revert to its previous settings.
REMOTE CONTROL OPERATION PREPARATION • Press and slide the back cover of the remote to remove. • Insert batteries as shown. • Close the back cover. BATTERY USE • The batteries for the remote control are for initial use only. Change the batteries when necessary. • When replacing the batteries, replace both at once with 2 new AA batteries. • Incorrect battery usage may cause battery fluid leakage and/or damage. • When not using the remote control for an extended period of time, remove the batteries.
POWER button PLASMA ON/OFF button AUTO SLEEP button TIMER button SLEEP button TURBO button FAN CONTROL buttons AUTO button NOTE: This equipment has been tested and found to comply with the limits for a Class B digital device, pursuant to 15 of the FCC Rules. These limits are designed to provide reasonable protection against harmful interference in a residential installation.
CARE AND MAINTENANCE CLEANING • Clean unit as necessary by wiping with a dry, soft cloth; for stubborn stains, use a warm, damp cloth. • Do not use volatile fluids such as benzene, paint thinner, or scouring powder, as they may damage the unit surface. • Keep the unit dry. • Clean the wall behind the air outlet periodically, as it may become dirty. Replacement Procedure 1. Remove the front panel by grasping the bottom outside edges and gently pulling toward you. 2.
4. Place the new filter cassette in the main unit. 2. Remove the Pre-Filter by gently pulling one side of the cassette frame outward while lifting the Pre-Filter tab at the same time. When one edge is clear of the frame, the Pre-Filter will slide out for cleaning. 5. Replace the front panel after pressing CHANGE FILTER reset button. 3. Lightly vacuum the Pre-Filter and wash with water and a mild household detergent. Rinse, and shake off excess water. 6.
5. Wash the filter in warm water with a mild household detergent. Rinse, and shake off excess water. 8. Replace the filter cassette and front panel as described in Replacement Procedure. 9. Plug in the power cord to a wall outlet and turn on the unit. Dust Sensor Cleaning Lightly vacuum the dust sensor every two months after removing the front panel. 6. Do not dry the two filters—running the unit will be sufficient to dry them. 7.
TROUBLESHOOTING Before you call Solutions to Common Problems Review this list before you call for service. This list covers problems that are not the result of defective materials or workmanship. PROBLEM POSSIBLE SOLUTION The remote control does not work. • Make sure the remote control batteries are inserted correctly. • Replace worn-out batteries. The unit leaves smoke and odors in the air. • Make sure the sensor is not blocked or clogged. • Move the unit closer to the offending odors.
PlasmaWave™ Purificador de aire True HEPA Manual del operario WAC-9000 ADVERTENCIA: WAC-9000S Lea y siga todas las reglas e instrucciones de seguridad antes de operar este equipo.
ÍNDICE GARANTÍA UN AÑO DE GARANTÍA LIMITADA SOBRE EL PURIFICADOR DE AIRE WINIX PLASMAWAVETM Si este purificador de aire fallara debido a defectos del material o mano de obra dentro de un año de la fecha de comprarlo, devuélvalo al lugar donde lo compró y recibirá uno nuevo, sin costo. • Esta garantía no incluye el marco con filtro de recambio para el purificador de aire, que es una pieza de consumo que se puede desgastar antes de un año de uso normal.
INSTRUCCIONES DE SEGURIDAD Agradecemos su compra de un purificador de aire Winix. Antes de usarlo, por favor lea este manual detenidamente. Este producto es solamente para uso en el hogar. INFORMACIÓN IMPORTANTE SOBRE EL USO DE SU PURIFICADOR DE AIRE ADVERTENCIA: Siga las instrucciones de este manual para reducir el riesgo de choque eléctrico, corto circuito o incendio: • No reparar o modificar el equipo a menos que sea recomendado específicamente en este manual.
ESPECIFICACIONES DEL PRODUCTO WAC-9000 Área De Purificación Corriente Eléctrica Potencia En Vatios Velocidad Del Soplador Panel De Control Control Detector De Polvo Detector De Olores Detector De Luz Temporizador Modo De Reposo (Sleep Mode) Filtros Sistema De Purificación CADR Filtro Hepa Tecnología Color Control Remoto Dimensiones Peso WAC-9000S 280 sq. ft. (26 m ) CA 120V, 60 Hz Baja 6W, Turbo 50W 4 velocidades 210 sq. ft. (19.
• Operación sencilla Para su conveniencia, los purificadores de aire Winix tienen control remoto y un panel de control fácil de usar. PURIFICACIÓN EN CINCO ETAPAS El aire pasa por cinco procesos independientes antes de regresar fresco y limpio a la habitación. • Detector de luz Pone en marcha al Modo de reposo automáticamente cuando se oscurece la habitación, para asegurar continuamente un funcionamiento silencioso y ahorro de energía.
MONTAJE DEL PURIFICADOR DE AIRE NOTA: Para obtener resultados óptimos, seguir estas instrucciones. • Colocar el purificador a por lo menos 7 pies (2.1 m) de equipos que emiten ondas eléctricas, tales como televisores o radios. • Ubicar el equipo a por lo menos 2 pies (61 cm) de la pared. • Mantener los detectores alejados de zonas donde hay corrientes de aire. • Mantener las cortinas alejadas de los detectores, pues pueden obstaculizar la entrada y salida del aire.
PANEL DE CONTROL 1 4 9 6 2 3 12 7 10 5 1. TEMPORIZADOR - Para 1 hora de operación presionar el botón TIMER. Presionarlo por segunda vez para 4 horas, y una tercera vez para 8 horas. Al presionar el botón TIMER por cuarta vez, se apaga el temporizador. 2. FUNCIÓN - Presionar el botón FUNCTION una vez para poner al equipo en modo automático. Al continuar presionándolo, pasa a Reposo > Bajo > Mediano > Alto > Vuelve a modo automático. 3.
OPERACIÓN OPERACIÓN AUTOMÁTICA La unidad está prefijada para funcionamiento automático cuando se le prende por primera vez. El purificador de aire detecta automáticamente el nivel de impurezas del aire y regulan apropiadamente la velocidad del soplador. • TURBO El nivel TURBO, la más alta velocidad del soplador, se puede activar manualmente para obtener máxima circulación de aire.
• REPOSO AUTOMÁTICO Usar el botón TIMER del panel de control o del control remoto para prender o apagar manualmente el detector de luz. Con el detector de luz activado, el equipo funcionará automáticamente en modo de reposo cuando se oscurece la habitación. Cuando hay luz en la habitación, regresará a la función anterior. El modo de Reposo proporciona el nivel más silencioso del soplador, y baja la luz del panel de control.
OPERACIÓN DEL CONTROL REMOTO PREPARACIÓN • Presionar y deslizar la tapa trasera para sacarla del control remoto. • Insertar las pilas tal como se indica. • Cerrar la tapa trasera. USO DE LAS PILAS • Las pilas para el control remoto son solamente para uso inicial. Deben cambiarse cuando sea necesario. • Al reemplazar las pilas, cambiar las dos al mismo tiempo con 2 pilas AA nuevas. • Uso incorrecto de las pilas puede causar derrame del fluido o daños.
Botón POWER Botón PLASMA ON/OFF Botón AUTO SLEEP Botón TIMER Botón SLEEP Botón TURBO Botones FAN CONTROL Botón AUTO NOTA: Este equipo ha sido examinado y encontrado en cumplimiento con los límites permitidos para dispositivos digitales de la Clase B, de acuerdo con 15 de los reglamentos de la FCC. Estos límites son diseñados para proporcionar protección razonable contra interferencia dañina en instalaciones residenciales.
CUIDADO Y MANTENIMIENTO LIMPIEZA • Limpiar la unidad cuando sea necesario con un paño seco y suave. Para manchas reacias, usar un trapo humedecido con agua tibia. • No usar fluidos volátiles tales como bencina, disolvente de pintura o detergente en polvo, ya que éstos pueden dañar la superficie de la unidad. • Mantener seco al equipo. • Limpiar periódicamente la pared detrás del escape de aire del equipo, ya que se puede ensuciar.
4. Colocar el nuevo marco del filtro en la unidad principal. 5. Reponer el panel frontal después de presionar el botón CHANGE FILTER. 6. Enchufar el equipo al tomacorriente de la pared y prenderlo. Limpieza del filtro Recomendamos que se limpie el prefiltro antibacteriano lavable y el filtro de malla Nano-Plata/filtro de carbón cada tres meses después de uso normal. El intervalo entre limpiezas varía dependiendo de la condición de la habitación. 1.
5. Lavar el filtro con agua tibia y un detergente doméstico suave. Enjuagar y sacudirlo para quitarle el exceso de agua. 8. Reponer el filtro y el panel frontal como se describió en el “Procedimiento del recambio”. 9. Enchufar el equipo al tomacorriente de la pared y prenderlo. Limpieza del detector de polvo Aspirar ligeramente el detector de polvo cada dos meses después de sacar el panel frontal. 6. No se deben secar los dos filtros; utilizarlos en el equipo será suficiente para que se sequen. 7.
RESOLUCIÓN DE PROBLEMAS Antes de llamar: Solución de problemas comunes Revisar esta lista antes de llamar a pedir ayuda. Esta lista cubre los problemas que no son causados por material o mano de obra defectuosos. PROBLEMA POSIBLE SOLUCIÓN El aparato de control remoto no funciona. • Asegurarse que las pilas del control remoto han sido instaladas correctamente. • Reemplazar las pilas desgastadas. El equipo deja humo y olores en el aire. • Asegurarse que el detector no esté bloqueado o obstruido.
SERVICIO AL CLIENTE Envíe sus consultas o comentarios a: Winix Inc. 2500 West Higgins Rd, Suite 610 Hoffman Estates IL 60195 Asegúrese de mencionar el número del modelo Tel.: 1.847.781.9991 Telefax: 1.847.781.9992 Teléfono sin cargo: 1-877-MY-WINIX (699-4649) Correo electrónico: info@winixinc.com Sitio web: www.winixinc.com Visite nuestro sitio web o contáctese con nosotros para comprar su filtro Winix de recambio. NOTA: SI TIENE ALGÚN PROBLEMA, POR FAVOR LLAME AL SERVICIO AL CLIENTE.