DVD/DVB-T COMBO PLAYER PDVDX100S/PDVDX100B INSTRUCTION BOOK Please read this IB carefully to get the best performance from this player. PDVDX100S-100B-im.
TABLE OF CONTENT Safety information ......................................... 3 SETUP ........................................................... 16 Precautions ..................................................... 4 PLAYBACK MP3/JPEG ................................. 16 Features .......................................................... 5 1. PLAYBACK MENU ....................................... 16 Accessories ................................................... 6 2. PLAYBACK MP3 ..................
SAFETY INFORMATION Dear customer: We take this opportunity to thank you for purchasing this DVD/CD/DivX player with built-in Digital Terrestrial Receiver. We strongly recommend that you study carefully the operation instruction before attempting to operate the unit and that you have noted the list precautions. Note: This unit can be used only where the power supply is 240V,50Hz, it can’t be used elsewhere. Caution DVD/DVB IS A CLASS 1 LASER PRODUCT.
Precautions Features Power cord protection To avoid any malfunctions of the unit, and to protect against electric shock, fire or personal injury, please observe the following. Hold the plug firmly when connecting or disconnecting the AC power cord to this unit. Do not connect or disconnect the AC power when your hands are wet. Keep the AC power cord away from heating appliances. Never put any heavy object on the AC power cord Do not attempt to repair or reconstruct the AC power cord in any way.
Features Full function remote control. Intelligent software update. Compatible with PAL DVD and NTSC DVD This player can play discs recorded in either PAL or NTSC system. However, the player must be connected to a multi-system TV to play both PAL DVD and NTSC DVD. The use of a multi-system TV is recommended and set the video output of this player as AUTO in the video setup. Compatible with CD and DVD This player could play various discs such as DVD, CD (8cm/12cm discs).
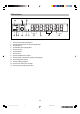
ACCESSORIES Remote control one piece Instruction Book one piece Batteries two pieces Customer Care Centre Sheet one piece 3 Pin AV Cable one piece Front panel reference 1. Power button 7. SKIP-/CH- button 2. VFD display 8. DVD/DVB switch button 3. STANDBY LED 9. PLAY/PAUSE button 4. Remote control sensor 10. STOP button 5. Disc tray 11. SKIP+/CH+ button 6. OPEN/CLOSE button -6PDVDX100S-100B-im.
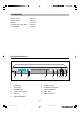
Rear panel reference 1. 2. 3. 4. 5. 6. 7. 8. 9. 5.1 CH SUBWOOFER output jack 5.1 CH SR output jack 5.1 CH FR output jack Optical output jack S-video output jack only for DVD player Chromatic aberration signal Y-axis output jack only for DVD player Video output Chromatic aberration signal Cr/Proutput jack only for DVD player Chromatic aberration signal Cb/Pb output jack only for DVD player 10. Coaxial output jack 11. 5.1CH FL output jack 12. 5.1CH SL output jack 13. 14. 15. 16. 5.
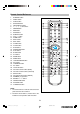
Remote Control Reference 1. 2. 3. 4. 5. 6. 7. 8. 9. 10. 11. 12. 13. 14. 15. 16. 17. 18. 19. 20. 21. 22. 23. 24. 25. 26. 27. 28. 29. 30. 31. 32. 33. 34. 35. 36. 37. STANDBY button ANGLE button AUDIO button EXIT/VIDEO OUT INFO/DISPLAY button , , , , OK buttons GREEN button RED button MUTE button SUBTITLE button VOL+ / - button ZOOM button SKIP+ button SKIP- button F.RWD button F.
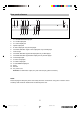
VFD reference 1. 2. 3. 4. 5. 6. 7. 8. 9. 10. 11. 12. 13. Shows when playing DVD discs Shows DVB when the unit is at the DVB mode Shows DVB-T Shows MP3 when playing MP3 Shows second Shows minute Shows hour Shows chapter/track number Shows pause symbol when pausing the playback Shows playback symbol Shows rotating playback Shows timer when timer is setup Shows CD when playing CD discs -9PDVDX100S-100B-im.
BASIC CONNECTION Ensure that the power switch of this unit and other equipment to be connected is turned off before commencing connection Read through the instructions before connecting other equipment Ensure that you observe the color-coding when connecting audio and video cords Please use only one kind of connection with TV set for the unit and choose correct video output setting, otherwise there may be image distortion. DVD player part Connection ture output. 3.
BASIC CONNECTION C: Connection to audio system 1. DVD/DVB Combo Player 2. Audio system (optional) 3. Audio cords 4. Coaxial cable, to the audio system coaxial input connector 5. Optical cable, to the audio system optical input connector 6. To center audio input connector 7. To audio input connector (subwoofer, surround left, surround right, front left, front right). Regarding the audio system connection to other unit, please kindly refer to the audio system instruction manual.
DVB-T Connection Part A: Connection to TV and antenna 1. TV Set (optional) 2. Power cord 3. Video cable (optional) 4.5. Audio cords, to TV FL, FR audio input Connectors (optional) 6. Antenna (optional) Note: YPrPb and S-video output only for DVD player. B: Connection to TV and another DVB-T Receiver 1. TV set (Optional) 2. Antenna (Optional) 3. Video cable (optional) 4.5. Audio cords, to TV FL, FR audio input 6. DVD/DVB Combo Player (optional) 7. Power cord -12PDVDX100S-100B-im.
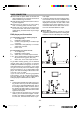
REMOTE CONTROL PREPARATION Battery Installation Insert the batteries while observing the positive (+) and negative (-) polarities as Figure A Service life of batteries The batteries normally last for a year although this depends on the operation and on how often the remote control is used. If the remote control unit fails to work even when it is operated near the player, replace the batteries with new ones.
OPERATION DVD PLAYER OPERATION PART The option of display language catalog is preset to English. Please refer to Setup operation Most of functions are operated by remote control. Either operation of remote control and front panel is effected when their buttons indicate the same function Preparation Turn the TV on and select AV as the TV input Switch on the stereo system power if the player has been connected to stereo system. Note: some of buttons will have double function.
OPERATION (silence), press again to cancel MUTE. And pressing VOL+ or VOL can cancel MUTE also. VOL+/VOLPress VOL+/VOL- button during playback may change volume for audio output Note: 1. The volume is set as largest initially. 2. VOL+/VOL- button will lose function when using this digital output. DISPLAY Press DISPLAY button during play to show the disc’s relevant information on TV screen. ZOOM Press ZOOM button during playback or pause to zoom up the current picture.
OPERATION TITLE (DVD only) For DVD discs, press TTX/TITLE button on remote control during playback, a list of titles of the disc (depends on discs) will be displayed on TV set. Use direction button or number button to select your preferred title then press “OK” button to confirm and start playing from the selected point. MENU Press TV/R/MENU button on remote control during playback discs, a list of menus on the disc (depends on discs) will be displayed on TV set.
DVD PLAYER Setup Interface Menu, Submenu and Options SHEET Menu Submenu Options Description English On Screen Display French On Screen Display Spanish On Screen Display English subtitle French subtitle Spanish subtitle Automatically Display Subtitle Turn off the subtitle English audio language French audio language Spanish audio language English DVD menu French DVD menu Spanish DVD menu Set TV screen at 4:3 Letter Box Set TV at screen 4:3 Pan Scan Set TV at screen16:9 Set TV system as NTSC Set TV system
OPERATION DVB Operation Part: Fast installation operation: Connect this unit and other equipments according to “BASIC CONNECTION” 1. Power on the POWER switch on front panel. 2. Press SETUP button, then enter into the SETUP menu, restore the factory setup.(You should operate this item if this unit is used for the first time or the software has been upgraded.) 3. Enter into the SCAN menu, Scan Type and choose AUTO SCAN, press OK button to start automatically scan. 4.
OPERATION 2.1 Service add to favor Four color button on bottom of service window are defined as favor list button: News (red) Movie (green) Sports (yellow) Music (blue). Press button to choose the service, press color button to add the service to favor list accordingly and the color favor icon is showed on the right. Press the color button to remove the service from the favor list and the color favor icon disappear.
OPERATION 3.2 Auto Scan Select Auto Scan, choose an Update mode, press OK button, the screen shows Message Box of Scan Process and begin to scan. You can press EXIT/VIDEO OUT button to exit. Note: When select Auto scan, service number can not setup, and the system will automatically scan. The Message Box of Scan Process shows the percentage of the scan process, TV channels and radio channels have been displayed in two columns.
OPERATION Note: When turn 0off the unit and press STANDBY button enter to standby status, set up to sleep time is invalid. 4.4 Password Setup Use the digital buttons to input the old password, then input a new password, retype the new password, press OK button, then the new password has been enable. 4.5 LCN Setup Choose this item to setup the On / Off status of LCN.
SETUP Main Menu Service Sub-Menu TV Service/Radio Service Scan Type Scan Channel Update Mode Main Menu AV Setup Language Setup Setup Time Setup Option TV/Radio Lock Move News (red) Movie (green) Sports (yellow) Music (blue) Manual Scan Auto Scan Description TV/Radio Lock the service Move the service Favor : News Favor : Movie Favor : Sports Favor : Music Manual Scan Auto Scan Nit Scan Nit(Net Information table) Scan Channel Append Replace 4:3 Letter Box 16:9 Pan & Scan TV Shape 4:3 FullFrame 16
FOR REFERENCE ONLY Maintenance Be sure to turn the unit off and disconnect the AC power cord before maintaining the unit. Keep the unit clean. If the surfaces are extremely dirty, wipe the unit with a dry soft cloth. Never use alcohol, benzene or other chemicals. Do not use compressed air to remove dust. Ask the technician to maintain the unit when problems appear. DEFINITION OF TERMS DVB MPEG-2 DVB is the abbreviation of Digital Video Broadcasting, which is a standardization group.
FOR YOUR REFERENCE Specification Power requirement : ~240V,50Hz Power consumption : 28W Operating temperature range : 0~+40°C Operating humidity range : 5~90% (no condensation) DVD PART: Disc played: 1. DVD-video disc 12cm single-sided, single-layer 12cm single-sided, double-layer 12cm double-sided, double-layer (single sided) 8cm single-sided, single-layer 8cm single-sided, double-layer 8cm double-sided, double-layer (single sided) 2.
FOR YOUR REFERENCE Troubleshooting Check the chart below for a possible cause of the problem you are experiencing before requesting service for this unit. Some simple checks or a minor adjustment on your part may eliminate the problem and restore proper operation. Let the technician maintain the unit. Keep away from static electricity properly before maintenance as loader, key IC are easy to be damaged by it.