Model: 32L05 32” 16:9 Digital LCD Television/ PC Monitor Operating Manual http://wintal.com.au Manual 32L05.
Manual 32L05.
TABLE OF CONTENTS 1. PreFace 1 2. Safety Precautions 1 3. Front, Back Connections 2 4. TV Installation Guide 3 4.1 Connecting Antennas 3 4.2 AV Video Input 3 4.3 S-Video Input 3 4.4 YCbCr Connection 4 4.5 YPbPr Connection 4 4.6 PC (VGA) Connection 4 4.7 AV Video Out Connection 5 4.8 DVI Connection 5 5. Manual 32L05.indd c Configuration 6 5.1 Picture Setting 6 5.2 AUDIO SETTING 6 5.3 SOURCE SETTING 7 5.4 TV CHANNEL SEARCH 7 6.
1. PREFACE Congratulations on your purchase of a Wintal LCD! Please read this manual thoroughly before operating the monitor. Make sure the monitor was not damaged in transit. Should the monitor be damaged, do not install it and contact your dealer. Check that you have all the accessories according to the model. 2. SAFETY PRECAUTIONS Place the Monitor on a stable surface. Do not use the monitor with other fixations than those provided or suggested by the manufacturer.
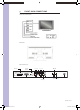
3. FRONT, BACK CONNECTIONS Front View and Controls Back View Rear Connections DVI Input PC Audio R/L Input Y Pb Pr Y Cb Cr PC AV Out AV1 AV2 VGA Input Audio R/L Audio R/L S-Video CVBS Video Audio R/L Out RF In CVBS Video Out Wintal LCD | 2 Manual 32L05.
4. TV INSTALLATION GUIDE 4.1 Connecting Antennas To ensure good picture and sound, TV antenna system needs to be installed. The antenna system as shown can be sourced from TV equipment shops, which will provide service for correct installation and connection. After installation, insert the 75-ohm antenna plug into the antenna jack as shown. 4.2 AV Video Input 4.3 S-Video Input 3 | Wintal LCD Manual 32L05.
4.4 YCbCr Connection 4.5 YPbPr Connection 4.6 PC (VGA) Connection Wintal LCD | 4 Manual 32L05.
4.7 AV Video Out Connection 4.8 DVI Connection 5 | Wintal LCD Manual 32L05.
5. CONFIGURATION 5.1 Picture Setting Press key until the screen displays as below. a. Press ► key to access image adjusting programmer. Press ▲ or ▼ key to select Mode, Bright, Contrast, Colour and Sharpness for required adjusting option. Press ◄ or ► key to adjust the setting selected. 5.2 AUDIO SETTING Press key until the screen displays as below. a.
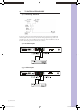
5.3 SOURCE SETTING Press key until the screen displays as below. a. Press ► key to access Input Group –Blue Screen –Language—Reset menu setting. b. Press ▲ or ▼ key to select exact menu setting. c. Select menu, press ► key to access TV-SCART-DVD-PC for choose input source. In menu, will access to choose terminal-select in sub-menu SCART CVBS or SCART RGB for input source. d. Press ▲ or ▼ key to access OSD , select your language.
6.
7. a. b. c. REMOTE CONTROL SETUP Open the cover Insert the supplied “AA” size batteries When inserting the batteries, make sure correct polarities as per the “+” and “-” marks on the batteries are correct Replace the battery cover 7.1 Battery Usage Caution To prevent battery leakage which may result in injury or damage to the remote: 1. 2. 3. 8. Install all batteries correctly, and as marked on the remote control Do not mix batteries: (OLD and NEW or CARBON and ALKALINE, etc.
9. TROUBLESHOOTING & ADVICE Before calling our Customer Centre, please check if you can the following suggestions will solve your problem. Troubleshooting No signal Incorrect colour shades Control Please check that all cables and connectors are correctly plugged in.
10. SPECIFICATIONS Screen Size 32 Inch Display Type TFT LCD Resolution(Pixel) 1366*768 Brightness 550nits Color 24bit (16.7m) Contrast Ratio 800:1 View Angle(H/V) 170 Aspect Ratio 16:9 Power Source 100-240VAC,50/60HZ. ≤200W TV System PAL/SECAM Video Input Fromat PAL/ NTSC Antenna Input Standard antenna socket 75Ω Audio Output L/R 10W*2 VGA Input Format 640*480/60Hz, 800*600/60Hz, 1024*768/60Hz Input Ouput RGB 0.7VP-P VIDEO CVBS:1.0VP-P, 75∩; RCA AV Video1.
Manual 32L05.