USER MANUAL v1.
Safety InstructionS Read following items carefully before operating this receiver. Installation ▪▪ This receiver should be installed horizontally. Unbalanced installation may cause damage.
Symbols on the Receiver Part 1: Warning Mark SHOCK HAZARD: DO NOT OPEN RISQUE DE CHOC: NE PAS ENLEVER This mark appears on rear panel of this receiver, painted prominently in contrasting colour to background. It consists of two graphical symbols and warning messages. The detailed specifications are as follows: Warning: To reduce the risk of electric shock, don’t remove the cover (or back). Equipment service and maintenance should be undertaken by qualified personnel.
Contents 1. Before Using YOUR PVR10HD 1.1 In the Box 1.2 Main Feature 1.3 Front Panel 1.4 Rear Panel 1.5 Remote Control 1.5.2 Remote CONTROL - General KEYS 1.5.3 REMOTE CONTROL - PVR KEYS 1.5.4 Remote Control - LeArning Keys 2. Installation 2.1 CONNECTING TO YOUR TV 2.1.1 TV CONNECTION - HDMI 2.1.2 TV CONNECTION - COMPONENT 2.1.3 TV CONNECTION - S-VIDEO 2.1.4 TV CONNECTION - COMPOSITE AV 2.2 EXTERNAL CONNECTIONS 2.2.1 external av in 2.2.2 Connecting to other devices 2.3 Power On 2.
4.5.3 Delete Schedule 4.6 Operation while recording 4.6.1 View/ Modify Recording Information 4.6.2 Switching channels while recording 4.6.3 Playback Current Program 4.7 Playback Pre-Recorded Files 4.7.1 Pause 4.7.2 Rewind/ Fast Forward 4.7.3 SLOW FORWARD 4.7.4 Playback Progress Bar 4.7.5 SKIP BACK/ SKIP FORWARD 4.7.6 Bookmarks 4.7.7 FILE EDITING (FILE CUT) 4.7.8 Stop Playback 4.8 File Operations 4.8.1 Delete Recorded Files 4.8.2 Group Recorded Files 4.8.3 Rename Recorded File 4.8.
1. Before Using YOUR PVR10HD 1.1 In the Box Once you have unpacked your PVR10HD, please ensure that the following has been included: 1. RF Cross over lead Switch between operation and standby modes 2. Composite AV lead Receive infrared remote control signal 3. 12V DC power supply Display status 4. Remote control Open the cover to reveal the front USB port 5. 2x ‘AAA’ batteries Pull down from the right edge to open cover 6. Customer Care info sheet 1.
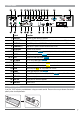
1.4 Rear Panel 1 3 7 6 9 11 13 14 15 16 17 18 2 4 5 8 10 Label 12 19 20 21 23 24 22 Function 1. ANT IN 1 Connect to your terrestrial antenna 2. LOOP OUT 1 Loop out RF signal to ANT IN 2 using the included cross over RF lead 3. ANT IN 2 Input RF signal from LOOP OUT 1 using the included cross over RF lead 4. LOOP OUT 2 Loop out RF signal to another receiver and/ or VCR 5. ETHERNET Connect to the internet 6-7-8. Y Pb Pr 9. CVBS 10-11. L-R 12.
1.5.
1.5.
1.5.4 Remote Control - LeArning Keys The PVR10HD’s remote control has learning keys located on the top left corner. These keys (except for the SET key) can be used to memorize corresponding keys from an existing remote, such as your TV or AV receiver. With this feature you could easily turn your TV on and off, and adjust the volume of your AV receiver using the PVR10HD’s remote control without having to touch the remote for your TV or AV receiver.
2. Installation Before you turn on your PVR10HD, please connect your TV and other devices first. If you wish to watch and record two channels simultaneously you will need to make sure that you have connected the LOOP OUT 1 output with the ANT IN 2 input using the supplied cross over RF cable! 2.1 CONNECTING TO YOUR TV There are four ways to connect the PVR10HD to your TV. 2.1.
2.1.2 TV CONNECTION - COMPONENT Power Supply RF CABLE YPbPr CABLE RCA CABLE COMPONENT INPUT AUDIO ▪▪ Use an RF cable to connect the TV antenna to the ANT IN 1 input on the PVR10HD. ▪▪ Using a 3x RCA component lead, connect the green Y , the blue Pb and the red Pr connectors to the corresponding ports on your PVR10HD and TV.
2.1.3 TV CONNECTION - S-VIDEO Power Supply RF CABLE RCA CABLE S-VIDEO CABLE AUDIO S-VIDEO ▪▪ Use an RF cable to connect the TV antenna to the ANT IN 1 input on the PVR10HD. ▪▪ Using an S-VIDEO (S-VHS) lead, connect one end to the S-VIDEO output on your PVR10HD and the other end to the S-VIDEO input on your TV.
2.1.4 TV CONNECTION - COMPOSITE AV Use the included AV lead to make a connection between your TV and the PVR10HD. Power Supply RF CABLE RCA CABLE AV INPUT ▪▪ Use an RF cable to connect the TV antenna to the ANT IN 1 input on the PVR10HD. ▪▪ For video, connect the yellow end of the Composite AV lead to the CVBS input on the back of your PVR10HD and to the VIDEO input on your TV.
2.2 EXTERNAL CONNECTIONS 2.2.1 external av in Your PVR10HD features two rear AV inputs that allow you to hook up any external AV source such as, another set top box, DVD player, Blu-ray player etc. You can view your external video sources directly from the channel list and choose to record to the internal hard drive or an external hard drive attached via USB. See the following diagram for connection options.
2.2.2 Connecting to other devices Your PVR10HD is able to connect to a variety of devices. CABLE NETWORK Power Supply RCA CABLE RF CABLE HDMI CABLE S/P DIFF CABLE Please note: Ethernet Port The ethernet port located on your PVR10HD will allow it to receive MHEG-5 broadcasts once it becomes available in Australia. We have included this to make your PVR10HD as future proof as possible.
2.3 Power On Once you have completed all required connections, you may power on your PVR10HD. ▪▪ ▪▪ ▪▪ ▪▪ Connect one end of the power supply to the 12V 3A input on the PVR10HD Connect the other end of the power supply to the wall outlet Turn on your TV and switch it to the mode you have connected your PVR10HD to (ie. HDMI) Turn on your PVR10HD and wait for the system to initialise. Note: Make sure the PVR10HD is switched on at the back. 2.
3.3 Channel Information Bar The Channel Information bar displays basic and extended information on the currently watched program. ▪▪ Press the Info key once to display the current channel information ▪▪ Press the info key twice to display current program information Note: Switching channels will also bring up the channel information bar.
3.4.1 Favourite Channel List The favourites menu feature allows you to easily access your favourite and frequently watched channels. Press the FAV key on your remote to bring up the favourites list. To add or remote channels from your favourite list: ▪▪ Press the to bring up the channel list ▪▪ Locate the channel you want to add to favourites using the and buttons ▪▪ Press the FAV key You can confirm the operation if a heart has appeared next to the channel name.
3.7 CloseD Captions Closed Captions is an option to display text that provides additional or interpretive information no the currently streaming program. If you have set closed captions to “On” under General Setup, you can press the CC key on your remote to turn closed captions on or off. Note: This function needs your local operator support. 3.8 Picture-In-Picture (PIP) PIP allows the display of two channels simultaneously.
3.8.4 Change position of PIP key, the PIP window changes position. Each time you press the P.MOVE 3.8.5 Switch PIP main channel Follow the instructions to change the main channel while PIP is active. 1. Press the 2. Use the 3. Press the to display the channel list window. and keys to select a channel again to confirm. 3.9 Using the on-screen keyboard Your PVR10HD features an on-screen keyboard that you will wish to use from time to time when renaming files, groups etc.
4. PERSONAL VIDEO RECORDING (PVR) FEATURES You can record programs on to the integrated hard drive or to an attached USB device. Your PVR10HD provides a number of handy PVR functions such as one-touch quick recording, schedule recording, time shift and more. 4.1 Before you begin ▪▪ Radio programs cannot be recorded. ▪▪ For ideal performance, the capacity of the attached USB device should not be less than 8GB and should be high speed USB2.0 or greater.
Press the or keys to select a time from -10 to +30 minutes. Options are: -10m/ -8m/ -6m/ -4m/ -2m/ 0m/ 2m/ 4m/ 6m/ 8m/ 10m/ 30 minutes 4.3.2 REMIND BEFORE SCHEDULE START Before a scheduled recording is about to commence, you will receive a pop up window notifying the start of recording. You can either turn this feature off, or change how many minutes prior to the start of a pre-scheduled recording you’d like to be notified. Press the or keys to make your selection.
4.4 Quick Recording If you want to record current program instantly, you can use this function. 4.4.1 Start Recording When watching program, press the record key to start recording. is displayed in top left corner of screen indicating that a recording has begun. To record a program from another channel, switch to your desired channel while a current recording is in progress and press the RECORD key again. 4.4.
2. Set schedule parameters as follows: Schedule Type: Press the keys to select Rec or or Play . Start Time: Press the Number keys to set your schedule start date and time, or press to display the calendar window. Set your desired schedule start date and time according to screen information. End Time: Press Number keys to input end time. Schedule Mode: Press or keys to select Once , Daily or Weekly . to pop up the weekly window. Select one or more days with the to confirm.
3. To confirm your choices, press the EXIT key choose flagged. OK when prompted to delete the items that have been Note: You can also choose to Delete All which will flag all the items in your scheduled list for deletion. 4.6 Operation while recording 4.6.1 View/ Modify Recording Information While recording a program, you can view recording information, rename files and modify recording duration if needed. key.
4.6.2 Switching channels while recording Because your PVR10HD has twin tuners, you are able to record two channels from two separate transponders (such as Channel 9 and Channel 10). At the same time, you are also able to watch a third sub-channel for Channel 9 or Channel 10 live. For example, if you are recording Channel 9, and Channel 10 simultaneously, then you are able to watch a third sub-channel from either the Channel 9 transponder, or the Channel 10 transponder (ie.
Speed settings are: x2 - x4 - x8 - x16 - x32 key. Resume normal playback with the PLAY 4.7.3 SLOW FORWARD Press the SLOW key to activate slow motion. Speed settings are: x1/2 - x1/4 - x1/8 key. Resume normal playback with the PLAY 4.7.4 Playback Progress Bar If you press the PLAY bar. key or the INFO key during playback, you can bring up the playback progress 1. File Name 2. Current progress (hh:mm:ss) 3. Operation help info 4. Time bar 5. Total playback time 4.7.
2. Press the green SET MARK key to add a bookmark at this point. Note: You can set up to 20 bookmarks per recorded file. Go to Bookmark 1. During playback, press the INFO key to display the progress bar. 2. Press the yellow PLAY MARK key to jump to the next bookmark on the progress bar. Press the icon). PLAY MARK key again to jump through the available bookmarks (identified by the Delete Bookmark 1. During playback, press the INFO key to display the progress bar. 2.
4.8.1 Delete Recorded Files 1. In the recorded files list use the and keys to choose your file. 2. Press 3. Select to bring up a pop-up dialogue box Delete and press 4. You will notice a red cross indicating that the item has been marked for deletion. If you would like to undo at this point, just press on the same item and choose Cancel del . 5. To confirm your choices, press the EXIT key choose flagged. OK when prompted to delete the items that have been 4.8.
Delete a Group With the Group Edit window on-screen, press the key to delete a group. Select on the warning dialogue box and press to confirm your operation. FIRST OK Rename a Group Choose the group you wish to rename in the Group Edit window and press the PLAY MARK key to bring up the on-screen keyboard. Refer to the instructions in section 3.9 “Using the On-screen Keyboard” on page 21 for more information on how to use the on-screen keyboard.
To lock a recorded file: 1. In the recorded files list use the 2. Press 3. Select and keys to choose your file. to bring up a pop-up dialogue box. Lock and press 4. You will notice a lock symbol indicating that the file has been marked for locking. If you would like to undo just press on the same item and choose lock again. You will be prompted to enter the local password. 5. Press the EXIT key to save and exit. 4.8.
5. USB PLAYBACK Your PVR10HD is able to playback MP3 audio files and JPG photos from attached USB devices. Notes: ▪▪ Your USB device should be connected to your PVR10HD before operation ▪▪ Do not abruptly unplug your USB device during playback! ▪▪ You should unmount your USB device before unplugging it from the PVR10HD. Please refer to section 6.2 “Unmount USB” 5.1 MP3 PLAYBACK Insert a USB drive that contains MP3 audio files to either the front or rear USB port.
4. Press the With key to bring up the slideshow slideshow highlighted press Highlight Exit and press and menu. Exit to begin the slideshow. to exit full screen mode and return to thumbnail view. Alternatively, press the EXIT key on your remote. 6. Storage Device Management 6.1 Format storage device IMPORTANT: Formatting your storage device will result in deleting all files. Please take care when choosing this option and make sure you back up any important data. Please refer to section 4.8.
6.2 Unmount USB Device IMPORTANT: Always make sure you unmount your USB device before unplugging it! Failure to do so may result in corrupt data, damage your USB device, or cause your PVR10HD to behave abnormally. Select Menu PVR UNMOUNT USB and press the key. 1. The right hand column lists your currently attached USB devices. If you have more than one USB device key to bring up a pop-up menu to choose the USB drive you wish to unmount. attached, use the 2.
7. TV GUIDE/ Electronic ProgramME Guide (EPG) The built-in EPG functionality provides continuously updated scheduling information for current and upcoming programming from all the available channels. You can view up to a weeks worth of programming via the EPG menu as long as this information has been broadcast by he broadcaster. To enter the EPG screen, Select Menu EPG and press the key. Alternatively just press the EPG key on your remote when in non-menu mode. 7.
7.2 Schedule via EPG You can easily schedule TV shows to be recorded or played back in advance. ▪▪ While in the program list window, use the and keys to highlight the show you wish to record. to bring up the EPG Schedule window. ▪▪ From here you can choose to RECORD or PLAY the selected show, either once, daily, or weekly. Refer to section 4.5.1 Add Schedule on page 24 for more information about the schedule options.
8.2 Auto Search For most applications, AUTO SEARCH is the best option to quickly set up your PVR10HD. Select Menu CHANNEL Auto Search key. and press the As soon as you press the OK key your, PVR10HD will automatically begin to search for all available HD and SD digital channels as well as available radio channels. Once channel scan has completed the PVR10HD will exit from the AUTO SEARCH screen and display the first available channel in full screen. 8.
9. Edit Channel The channel editing functionality in your PVR10HD makes it easy to organise the vast number of available channels by allowing you to lock, move, delete and favourite channels. To enter the channel edit menu, Select Menu CHANNEL Channel Edit and press the key. Enter the local password if prompted (The default password is 0000) 9.1 Lock Channel 1. Use the and keys to select the channel you wish to lock 2. Use key to bring up the edit menu 3.
To continue moving channels, just press to mark the channel with the symbol and follow the instructions from 4-5 above. 9.3 Delete Channel 1. Use the and keys to select the channel you wish to delete 2. Use key to bring up the edit menu 3. Select Delete and press This will mark the channel with a symbol (Once you’ve chosen Delete from the edit menu, you can now mark multiple channels using the key.) 4.
10. SETTINGS To enter the settings screen, select Menu SETTINGS and press the key. 10.1 General Settings Use the and keys to select the setting you would like to change. Pressing will bring up the options available for your selection. EXIT to save your changes. Note: Bold items are the default values. Aspect Ratio : The aspect ratio depends how the picture fits on your TV. Options are: 1. Pan and Scan 4:3 3. Default 4:3 5. Letterbox 16:9 2. Letterbox 4:3 4. Pan & Scan 16:9 6.
10.2 Change Password IMPORTANT: The default password is 0000. For security reasons, it is highly recommended that you change this. Menu SETTINGS Change Password and press the key. The local password is required to change certain settings, view and edit locked channels etc. Input your existing password using the numeric keypad on your remote under Existing Password. Enter your new password in the Input New Password and enter the same password in New Password Again. 10.
10.4 NETWORK SettingS Menu SETTINGS Network and press the key. The ethernet port located on your PVR10HD will allow it to receive MHEG-5 broadcasts once it becomes available in Australia. We have included this to make your PVR10HD as future proof as possible. MHEG-5 provides interactive/hybrid services beyond broadcast TV and also allows for EPG data to be transmitted via the internet. The default DHCP IP mode setting will automatically configure your PVR10HD based on your existing network settings.
10.6 Software Update WARNING: Make sure you do not abruptly switch off power to your PVR10HD during the upgrade process as this may harm your unit. Menu SETTINGS Software Update key and input the local password Press the (The default password is 0000). You can upgrade your PVR10HD via the front or back USB ports or via the RS-232 port. For USB upgrades, make sure you have downloaded the firmware file to the root of your flash drive. Press OK to initiate the upgrade process.
11. Appendix 11.1 Troubleshooting DISPLAY on front panel is off 1. Power adapter is disconnected. Make sure power adapter is plugged into a proper power socket. 2. The receiver is turned off. Turn it on. DISPLAY on front panel is on, but no sound and picture on TV screen The receiver is in stand-by mode. Press PVR POWER key on your remote to turn it on. No signal 1. Antenna cable is not conected. Make sure that there’s a connection between your aerial and the PVR10HD. 2.
11.2 Specification Tuner Input Frequency 47 ~ 858MHz Loop out Frequency 47 ~ 858MHz Input Level -25 ~ 20dBuV Bandwidth 6M, 7M, 8M Input Impedance 75Ω Channel Decoding Standard DMB-T EN300 744 Demodulation QPSK, 16 and 64QAM Audio Decoding Standard ISO/IEC 13818-3 Decoding MPEG-1 & MPEG-2 layer I and II, AC3 Audio Mode Left, Right and Stereo Video Decoding Standard ISO/IEC 13818-2, MPEG-2 MP@ML, MPEG-4 AVC/ H.264 HP@L4 Aspect Ratio 4:3, 16:9 Resolution 1920 × 1080p max.
TOMER CUS CA R E CE N T R E CUSTOMER CARE CENTRE THIS PRODUCT IS WARRANTED FOR 12 MONTHS FROM THE DATE OF PURCHASE. Subject to the conditions of this warranty, the Customer Care Centre will perform necessary service on the product without charge for parts, or labour if, in the opinion of the manufacturer/ manufacturer’s agent, the product is found to be faulty within the warranty period.
W I N TA L P V R10 H D U SE R M A N UA L