Thank you for purchasing STB10HD Digital High Definition Set Top Box. This manual will help you to install, use and maintain the receiver. Please read this manual carefully before operating your unit and keep it for future reference. Warning & Note In this manual, pay special attention to the following marks that indicate hazardous situations.
User’s Manual Safety Instruction Read following items carefully before operating this receiver. Installation This receiver should be installed horizontally. Unbalanced installation may cause damage.
User’s Manual RCU Battery Batteries should be installed in accordance with the (+/-) markings on battery compartment. Remove batteries if RCU not be used for a long time. Replace batteries if there is no enough power and dispose battery waste properly for environmental protection. Others The all-pole power switch of this receiver is on rear panel. Switch it to “I”, related equipment will connect with power supply. Switch it to “o”, related equipment will disconnect with power supply completely.
User’s Manual Contents 1. Before Using the Receiver .................................................................................................. 2 1.1 Main Feature ................................................................................................................. 2 1.2 Front Panel ................................................................................................................... 3 1.3 Rear Panel ............................................................................
User’s Manual 1. Before Using the Receiver 1.1 Main Feature ¾ Dolby 5.
User’s Manual 1.2 Front Panel Name Function 1. STAND BY Switch between operation and standby modes (In standby mode, the receiver is disconnected with power supply.) 2. SENSOR Receive infrared remote control signal 3. DISPLAY Display status 4. USB slot Open the cover to insert specific USB device 5. CH+/- Switch channels or move cursor up/down 6. VOL+/- Adjust volume or move cursor right/left 7. OK Display channel list or confirm operation 8.
User’s Manual 1.3 Rear Panel Name Function 1. VIDEO Output CVBS video signal to TV 2. S-VIDEO Output Y/C video signal to TV 3. Y/Pb/Pr Output Y/Pb/Pr video signal to TV (support high definition output) 4/5. L/R-AUDIO Output left/right audio signal to TV or amplifier 6. COAXIAL Output digital audio signal to amplifier 7. S/P DIF Output digital audio signal to amplifier 8. HDMI Output high definition video and audio signal to TV 9.
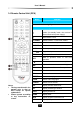
User’s Manual 1.4 Remote Control Unit (RCU) Name Function 1. Learning keys Please refer to Learning Key. 2. The keys of the receiver Switch between operation and standby modes (In standby mode, the receiver is disconnected with power supply.
User’s Manual Learning Key The receiver RCU has some learning keys at the lower part. The keys (except SET key) can be used to memorize corresponding key values of TV RCU. After learning, you can realize remote control for TV with the receiver RCU. The recommended keys are POWER, TV/AV, VOL+ and VOL- of TV RCU. The TV/AV identifier varies with different types of TV RCU. Instruction: 1.
User’s Manual 2. Installation Connect TV and other devices, then you can power on the receiver and scan channels. 2.1 Connect TV Please choose one of following 4 ways to connect TV. 1. Connect TV Using RCA Cable 1. Connect ANT IN port on the receiver to terrestrial antenna with an RF cable. 2. Connect VIDEO port on the receiver to corresponding port on TV. 3. Connect R/L-AUDIO ports on the receiver to corresponding ports on TV. 2. Connect TV Using S-VIDEO Cable 1.
User’s Manual 3. Connect TV Using YPbPr Cable 1. Connect ANT IN port on the receiver to terrestrial antenna with an RF cable. 2. Connect Y/Pb/Pr ports on the receiver to Y/Pb/Pr ports on TV. 3. Connect R/L-AUDIO ports on the receiver to corresponding ports on TV.
User’s Manual 4. Connect TV Using HDMI Cable 1. Connect ANT IN port on the receiver to terrestrial antenna with an RF cable. 2. Connect HDMI port on the receiver to HDMI port on TV. 2.2 Connect other Device For connection of other devices, please refer to following figure: Connect LOOP OUT port on the receiver to ANT IN port on another receiver.
User’s Manual Note: If you encounter any problem during the connections, please contact your local operator. 2.3 Power on 1. Connect the power cord of the receiver to wall outlet. 2. Turn on the receiver, and system initializes. If you turn on the receiver for the first time, an installation guide appears on screen. You can set region, TV type and resolution suitable for your conditions. Notes: • The installation guide will also run after restoring factory default.
User’s Manual 3. Basic Operation This part describes operations such as channel switch, volume control and other basic operations when playing program. 3.1 Channel Switch You can switch channels using the following methods: A. Press or CH+/- keys to switch channels. B. Input channel number with number keys. C. Select channel in channel list. For detailed operations, please refer to 3.4 Channel List. D. Select channel in favorite channel list. For detailed operations, please refer to 3.
User’s Manual 3.4 Channel List Channel list is available for you to browse channels easily and quickly. 1. Press OK key to display channel list. 2. Press TV/RADIO key to switch between TV and radio modes. 3. Press keys to select a channel. 4. Press OK key to play it in full screen. 3.5 Favorite Channel List 1. 2. 3. 4. Press FAV key to display favorite channel list. Press keys to select a group. Press keys to select a channel. Press OK key to play it in full screen. 3.
User’s Manual 4. Electronic Program Guide (EPG) In this guide, you can view program information based on date and time. In addition, the guide can help to schedule future programs. 4.1 Full Guide The full guide displays detailed EPG information. Select Main Menu → Guide → Full Guide and press OK key to enter. If “Guide Default” is set to “Full” in 8.1 System Setting, press GUIDE key to enter directly in non-menu mode. 1. 2. 3. 4. 5. 6.
User’s Manual 4.3 Remind List All the scheduled programs are displayed in this window. You can cancel or restore schedules. Select Main Menu → Guide → Remind List and press OK key to enter. 1. Press keys to select a schedule. 2. Press OK key to cancel or restore it. 3. Press EXIT key to save and exit. Note: System will remind you near the play time of the scheduled programs. 5. USB Application You can play MP3 files and browse pictures. Press USB key to display USB partition in non-menu mode.
User’s Manual 6. Channel Scan Note: Don’t turn off the receiver during scanning. 6.1 Auto Scan For beginners, auto scan is the best choice. System will scan channels according to default frequency parameters. Select Main Menu → Scan → Auto Scan and press OK key to enter. Press OK key to scan channels. 6.2 Manual Scan If you are familiar with relevant channel or frequency parameters, you can choose manual scan. 1.
User’s Manual 7. Channel Edit You can set favorite channels. In addition, you can rename, sort, add, delete, move and search channels. Select Main Menu → Channel → TV/Radio Channel List and press OK key to enter. 7.1 Set Favorite Channel 1. Press number key 1 to enter favorite mode. 2. Press keys to select a favorite channel group. 3. Press keys to select a channel. 4. Press OK key to add the selected channel to this group, and mark this channel with “ ”.
User’s Manual 7.4 Add/Delete Channel 1. Press number key 4 to enter add/delete mode. 2. Press keys to select a channel. 3. Press OK key to delete this channel, and “CH Deleted” is displayed in top left corner of screen. If you want to resume this channel, press OK key again. 4. Press EXIT key to save and exit. Note: When you switch channels, the deleted channels will be skipped. 7.5 Move Channel 1. Press number key 5 to enter move mode. 2. Press keys to select a channel, and press OK key to confirm. 3.
User’s Manual 8. Setup 8.1 System Setting Select Main Menu → Setup → System Setting and press OK key to enter. 1. Set parameters as follows: OSD Language: The default is “English”. OSD Theme: Press keys to select a color for menu. Audio Track: Press keys to select Stereo, Left or Right. Optical Output: The receiver can output two types of digital audio signal via S/P DIF port. If your digital amplifier has Dolby digital decoder, set it to “AC3 Bypass” to output encoded signal.
User’s Manual 1. Lock Channel You can set channel lock to restrict viewing of some channels. Highlight “Lock Channel” and press OK key to display lock channel window. Lock a Channel 1. Press keys to select a channel. 2. Press OK key to lock this channel, and mark it with “ ”. If you want to cancel this setting, press OK key again. 3. Press EXIT key to save and exit. Lock all Channels 1. Press arrow keys to highlight “Lock All”. 2. Press OK key to confirm, and all channels are locked with “ ”. 3.
User’s Manual 1. 2. 3. Allow all Programs Press arrow keys to highlight “Allow All”. Press OK key to confirm, and all ratings are unblocked. Press EXIT key to save and exit. Note: The system lock password is required to view programs beyond set rating. 3. Change Password The default system lock password is “1234”. You can change this password if necessary. 1. Highlight “Change Password” and press OK display change password window. 2. Press number keys to input new password. 3.
User’s Manual 10. Software Upgrade by USB Warning: Don’t turn off the receivers during software upgrade. Select Main Menu → Setup → Upgrade by USB and press OK key to display upgrade by USB window. Note: USB device should be connected to USB port on front panel before operation. 1. Highlight “Upgrade File” and press keys to select an upgrade software. 2. Highlight “Start” and press OK key to upgrade. During software upgrade, upgrade progress bar is displayed on screen. 3.
User’s Manual 11. Appendix 11.1 Trouble Shooting DISPLAY on front panel is off 1. Power cord is disconnected. Make sure power cord is plugged into a proper power socket. 2. The receiver is turned off. Turn it on. DISPLAY on front panel is on, but no sound and picture on TV screen The receiver is in standby mode. Press key to switch it to operation mode. No signal 1. Signal cable is disconnected. Connect signal cable correctly. 2. Program parameters are set wrongly. Set correct parameters. No sound 1.
User’s Manual 11.2 Specification Tuner Frequency 174 ~ 860MHz UHF & VHF Bandwidth 7 or 8MHz Level -72 ~ -20dBm Impedance 75Ω Channel Decoding Demodulation QPSK, 16QAM, 64QAM FEC 1/2, 2/3, 3/4, 5/6, 7/8 Mode 8K or 2K Guard Band 1/4, 1/8, 1/16, 1/32 Demultiplexer Standard ISO/IEC 13818-1 Input Max. Bit Stream Rate 60Mbps (Serial)/7.5Mbps (Parallel) Audio Decoding Standard ISO/IEC 13818-3 Channel Mute, Left, Right and Stereo Sampling Frequency 32, 44.
User’s Manual 11.