Table of contents Part 1 Product introduction 2 Part 2 Features 3 Part 3 Safety notes 4 Part 4 User ’s guide 5 Part 5 Operation notes 10 Part 6 Access Tool 12 Part 7 Trouble shooting 27 1
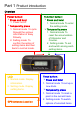
Part 1 Product introduction Overview Power button: Ø Press and hold 1. Power on/off. Ø Temporarily press 1. Normal mode To cycle through the various information of Easy Showily. 2. Setting mode To confirm the option of setting items and then back to normal mode. Function button: Ø Press and hold 1. Normal mode To enter the setting mode. Ø Temporarily press 1. Normal mode To reset the accumulation of Kilometer and Counter. 2. Setting mode To set and switch among each setting items.
Part 2 Features Easy Showily is a Autoshow Track Logger with internal antenna. ublox ATR0625 used in its core is hightech component and included function of autolog record of journey. USB interface ensures easy linking with computer to read the log data or programming it any where without install any driver or software. The GPS acquisition status, the last record of time and position could all be stored in nonvolatile memory.
Part 3 Safety notes GPS (Global Positioning System) is provided by the United States government. Its accuracy may varies depending on special conditions (area at war or if it is blocked). Any control by USA will affect this system and its accuracy. If installed on the transportation device, driver must not operate this while driving. GPS performance is affected when satellite coverage is degraded as near a highrise building, in the tunnel or under a cover.
Part 4 User’s guide Package: Easy Showily (Autoshow Track Logger) AAA alkaline battery *2 USB extensive cable (15cm) *1 User’s manual. Easy Showily Operation: Press and hold “Power” button to power on it. The LCD will show up the main screen to confirm it is in the normal mode and GPS start acquisitioning. After power on, press and hold “Power” button to turn the power off. “FIX” show up in the upper right of main screen indicates GPS acquisition is done. If not, the GPS acquisition fails.
avoiding worse GPS performance or unworking. In the normal mode, temporarily press “Power” button to change the information showed on LCD. A Heading and speed information (after positioning) Press “Function” button to change the information from speed to altitude. B Kilometer accumulated at present C Counter accumulated at present Press “Function” button to switch the following 3 accumulative value of counter. Total amount of counter. Amount counter. Amount of nonmotion counter.
D Average speed at present E latitude and longitude at present (after positioning) or last positioning (before positioning) (When the first time use or after cold start) F Local time at present: (Based on the zone set by user) (When the first time use or after cold start) In the normal mode, press and hold “Function” button will enter the setting mode and then the LCD will show up setting information.
In the setting mode, temporarily press “Track” button to switch setting value showed on the second line of the screen. The setting value would be confirmed when you skip to the other setting category or back to normal mode. 1. LOG Mode Setting: Walk mode, Bicycle mode, Car mode, User define mode. 2.Shake mode (power saving) function 3.
minutes, its power will be turned off (that interval can be set by yourself), until the device with movement again. The Easy Showily will not auto power on/off while shake mode is disable. And if you turn it off manually while shake mode is enable, then the shake mode will be disabled simultaneously. When the USB is used as interface: Turn the Easy Showily power off. Connect Easy Showily to USB port of computer.
Part 5 Operation notes Easy Showily will do selfcheck once it is powered. GPS start to work when LCD shows up the main screen. GPS automatically starts acquisition and autologs. If sky is clear overhead, it requires only 34 sec for acquisition. (If the data in its memory is still valid, it needs only 4~33 sec). After acquisition, Easy Showily starts record the track. For the first time if it is placed at the area well exposed to the satellite signal, this device requires approx 13 min (theoretically 12.
The earliest (oldest) data will replaced by the latest (newest) one when memory space is full (when data excesses 94000 maximum). The exact operating time would be a little difference by the situation, environment condition and the type of battery.
Part 6 Access Tool 1. Connect Easy Showily with computer via USB interface. The access tool will execute automatically. If not please find the device in the “My Computer”, and then click on its icon to execute it.
2. Key in the password and click “Log in”. If you don’t enable password protect, this step will be omitted. 3. Win_Tool will read log data and transfer it to Google Maps format automatically, and execute it. User also can transfer the log data to another format, such as Google Earth or TimeMachineX formats.
At the same time, Win_Tool will become minimum and hide in the system tray. Click the icon, Win_Tool will appear.
4. More Setting or function. 4.1 Clear all LOG Data: Click “Clear LOG” to delete all LOG data in the device. Note: If select delete all LOG data, it will spend 30 sec to delete all LOG data while next time the device is power on. Also the LCD on the device will show the message as below, until delete process completely.
4.2 Detail Setting: Click “Detail>>” to open detail setting dialog.
Click “<
4.2.2 GPS setting: .G PS Cold Start: Click “Cold Start” in Win_Tool or just press and hold the function and track buttons simultaneously, and then power on the device, it will be restarted by cold start mode. .G PS parameters setting: .1 Fi x Mode: Select the GPS positioning mode. .2 2D Fi x Altitude: Set the “fixed altitude” used when the fix mode is 2D. .3 Ini tial Min. SVs: Set how many GPS satellites used for the initial positioning. .
4.2.3 Language selection of operation interface: Support English, Chinese Traditional, Chinese Simplified. 4.2.4 Shake mode (power saving) setting: To enable the Shake mode, the device will be power off when there is no movement after 5 minutes (default); and the device will be power on automatically when it moves. To disable Shake mode, device will be never power off automatically. And if you turn it off manually while shake mode is enable, then the shake mode will be disabled simultaneously.
4.2.5 LOG Mode Setting: LOG mode supports “Walk mode”, “Bicycle mode”, “Car mode” and “User define mode”. In user define mode, there is 5 preset saving intervals can be selected by slide switch, including Time, Range, Heading, Speed and Mix (Time & Range) Note: 1. “Valid Speed for Record” means that if speed exceeds this range will not record any points. 2. “Factory Setting” means that recover all parameters to factory setting at user define log mode.
4.2.6 Transfer LOG data to another export format: Easy Showily support multi translate formats, such as Google Maps, Google Earth, Virtual Earth, OziExplorer, PaPaGO, GPX format, and TimeMachineX format. Note: 1. User could download TimeMachineX free software from the website http://www.wintec.com.tw to integrate photo to your trajectory. 2. In the export file list box, click the right key of mouse, it could copy or delete the export file.
4.2.7 Total LOG points Total LOG points indicate how many points are stored in the device. 4.2.8 Change device ID: The device ID could be changed by User. 4.2.9 LCD Contrast: Set the LCD Contrast; LCD Contrast depends on the temperature. The higher temperature is, the darker for contrast, in another word, the lower temperature is, the lighter for contrast.
4.2.10 Zone: The Zone value could be set to fit in with your trajectory. The default value is the same as the PC you used. You could click ”Get device Zone” to catch the zone value from the device (same as device), also you could adjust the Zone value by yourself and click ”Set device Zone” to save the modification. Note: The zone setting will affect the presentation of local present time on the LCD of device. 4.2.
4.2.12 Google Maps with Panoramio: . View all nearby public photos on the Panoramio of the selected track points. .1 Keep the “Panoramio User ID” as blank. .2 Click “Google Maps” button to convert LOG data to Google Maps format. .3 Select a trajectory with Google Maps format and double click it to open. .4 Just click any track point icon on the Google Maps. .5 All nearby photos on the Panoramio of the selected track point will show up.
25
. View all nearby photos held by yourself on the Panoramio of the selected track points. .1 Click “Upload photo to Panoramio” button, it will link to Panoramio Website, upload your photos and geotag those photo by the geographic data of your trajectory. PS. Before you upload the photos, please register and login Panoramio at first. .2 Back to Win_Tool and key in your Panoramio user number (you can find that in the url of your Panoramio personal page. Ex: ) in the blank of “Panoramio User number”. .
. Share your Google Maps format trajectory with your friend. .1 Copy and email it to your friend via your mail client such as outlook. .2 Or click the button of “Mail to friend” send it out.
Part 7 Trouble shooting If the vehicle enters the tunnel. The GPS signal transmits linearly down to earth and its signal is blocked out in this situation. GPS satellite coverage gets poor because of highrise building or thick forest. Even though Easy Showily can receive reflected weak GPS signal, the data might be less accurate. The sun shade in the vehicle can partially block out GPS signal and effect good reception.