Table of contents Contents Part 1 Product introduction 2 Part 2 Features 3 Part 3 Safety notes 4 Part 4 Quick user guide 5 Part 5 Operation notes 7 Part 6 USB driver installation guide 9 Part 7 Using with PDA 17 Part 8 Trouble shooting 28 1
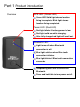
Part 1 Product introduction Overview GPS LED: (Green LED) Green LED Solid light shows location fixing incomplete .Blink light shows location fixing completed. Power LED: (Red LED) Red light blinks if battery power is low. Red light solid on while charging. After fully charged red light will snuff out. Bluetooth LED: Light turns off when Blue tooth connection is off. Blue light solid on when Blue tooth connection initiates. Blue light blinks if Blue tooth connection succeeds.
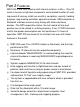
Part 2 Features WBT-200 is the GSP receiver with internal antenna. u-Nav + iTrax 03 used in its core is high-tech component and included function of autolog record of journey, which are useful in navigation, security tracking purpose, map making and other agricultural needs. USB connector or Bluetooth interface ensures easy linking with other electronic devices .The GPS acquisition status, the last record of time and position can all be stored in unfailing memory.
Part 3 Safety notes GPS (Global Positioning System) is provided by the United States government. Its accuracy may varies depending on special conditions (area at war or if it is blocked). Any control by USA will affect this system and its accuracy. If installed on the transportation device, driver must not operate this while driving. GPS performance is affected when satellite coverage is degraded as near a high-rise building, in the tunnel or under a cover.
Part 4 Quick user guide Package :WBT-200(bluetooth GPS with logger)+USB cable+ sticker +car cigarette lighter power adapter , installation Disk, Quick use guide. WBT-200 Operation: Temporarily press power button to turn it on. The bluetooth and GPS status LED will glow to confirm it is in GPS mode. GPS LED glows green to show GPS acquisition is done (1 Hz). But if this LED is solid on, the GPS acquisition fails. Temporarily press on power button. Bluetooth will turn off after bluetooth LED goes off.
can best receive GPS signal for acquisitioning. Activate the software of paired device. WTB 200 starts to provide GPS data. Battery charging: Connect WBT-200 with USB cable and turn on power source. To charge it, power source can be supplied from USB host that from computer, power adapter, or car cigarette lighter adapter.
Part 5 Operation notes WBT-200 will do self-check once it is powered. Bluetooth and GPS start to work when both Bluetooth LED (glows blue) and GPS LED (glows green ) turns on. GPS automatically starts acquisition and auto-logs. If sky is clear overhead, it requires only 40 sec for acquisition. (If the data in its memory is still valid, it needs only 8~35 sec). After acquisition, WBT-200 starts output data of position, speed and time in NMEA0183 format.
After positioning, if auto-log function is activated, WBT-200 begins to auto-log the following way. Maximum data up to 25360 Points (or more than). Recording in a circular way. Auto-logging goes on without the need of any device. Log-data can be read out using the G-Tool software included. Data can be read out thru USB or Bluetooth. Data includes latitude, longitude, altitude and time in yearmonth-date-hour-min-sec.
Part 6 USB driver installation guide 1、 Execute installation and click “Install”.
2、 Installation is done when this screen displays.
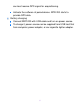
3、 Use USB cord to connect WBT-200 to the USB port of computer. Computer will automatically check it and seek driver software by itself. If PC asks for “device manager” for adding the new USB device following USB device connection, take the procedure below. Click “next”.
4、 The screen will display as below. Click “continue anyway”.
5、 Installation completed.
6、 Immediately afterwards, PC will ask again to install “GPS Receiver Virtual Com Port” driver. Click “ next ”.
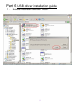
7、 Installation completed. To check the installation status, go to the “device manager” .
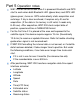
8、 As in the illustration, the USB device (marked in red circle) is correctly installed to PC. The illustration also shows USB being transferred to Com Port assigned as COM4. In the future, whenever the USB device is connected to USB port on the computer, the COM 4 acts as the interface for data communication.
Part 7 Using with PDA Use of this with PDA for location check. It is necessary to install GTOOL(PPC) first in your PDA. Follow the following steps. Step 1:Turn WBT-100 Bluetooth device Power on and then create Bluetooth connection with PDA. Step 2:Supported by GTOOL(PPC), location can be viewed on PDA . Step 1:Bluetooth connection to PDA. 1、Tap the Bluetooth icon on PDA’s taskbar to view the Bluetooth menu. Tap the” Turn Bluetooth ON” to enable Bluetooth.
2、Tap the Bluetooth icon again and select the ”Bluetooth Manager”. 3、From Bluetooth Manager toolbar, tap ”New” to search for any other Bluetooth devices in its vicinity.
4、Tap “Explore a Bluetooth device” to view Bluetooth devices services and create a shortcut to them. Click“Next” to continue. 5、Tap “BT-GPS” icon to view the device services.
6、Select “SPP slave” services and tap “Next” to create a shortcut to it. 7、Tap “Finish” to complete procedure.
8、From the “My Shortcuts” tab, tap the “BT-GPS: SPP slave” icon and select the “Connect” option to connect to it. 9、When a connection is successfully established, the shortcut icon turns green.
Step 2:Using GTOOL(PPC) for locating . The GTOOL(PPC) enables you to view your position by latitude and longitude, speed, heading, and altitude. Make sure that the GTOOL(PPC) had been installed on your PDA as described in GPS CD. 1、Tap“Start” and select the“ File Explorer ”item from the start menu. OR click the “GTool” item, then jump to step 4.
2、At “My Device” tab, tap the “Program Files”, then select “GTool” case. 3、In the “GTool” case, tap the GTool icon to start it.
4、At “Connect Setting” tab, select Bluetooth com port on your PDA at “Select GPS Port” item and click Connect ,than select BT-GPS icon. (Connect successfully) 5、In the “GPS Data” tab, location data is displayed as below.
6、Feature in other tabs : “Log Mode Setting ”:Log mode setting. “Read Log”:Read or clean the Log data. LOG File (*.tks) default path save as “...\My Documents\*.tks”.
“NMEA Setting”: Set the NMEA output. “Init. Mode”: Reboot, Factory Reset, Cold Start, and the firmware version.
“Satellite”:View Satellite Information. “Sky Plot”:View Satellite Distribution in the sky.
Part 8 Trouble shooting The GPS signal will become weak under the following conditions. If the vehicle enters the tunnel. The GPS signal transmits linearly down to earth and its signal is blocked out in this situation. GPS satellite coverage gets poor because of high-rise building or thick forest. Even though WBT-200 can receive reflected weak GSP signal, the data might be less accurate. The sun shade in the vehicle can partially block out GPS signal and effect good reception.
Bluetooth connection takes 5 seconds for self-check. Each time the device is switched on; it needs 5 seconds before connection. It is normal if the Bluetooth coverage might become short sometimes due to environmental interferences. USB driver must be installed first before connecting the device to the USB port of computer. Make sure of the right COM PORT being used. If disconnection between PDA and GPS is done in a abnormal way, PDA will halt. Try to disconnect Bluetooth connection in a standard method.