
User Guide

WINTERS INSTRUMENTS Tel: 1-800-WINTERS / www.winters.com 3
Installation of a Pressure Gauge
Location
Vibration and extreme ambient temperatures can affect the dial reading of the pressure gauge. These areas should
be avoided as much as possible.
Mounting
A suitable thread sealant is required for NPT threads such as pipe dope or Teflon
®
tape. Never use any part of the
pressure gauge other than the wrench flats that is on the gauge socket. Always tighten with an open end or
adjustable wrench on the wrench flats. Failure to do so will severely damage the pressure gauge.
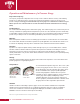
Venting Procedures
Due to pressure build up, some gauges (usually lower pressure ranges such as vacuum, up
to 100 psi) may reflect a reading that is slightly "off zero". To properly "vent" the pressure
gauge, cut off the tip of the fill plug after you have installed the instrument. This allows the
gauge to be equal to the atmospheric pressure.
Recalibration Procedures
Inspect the pressure gauge for "zero reading" when there is no applied pressure. In many cases, the gauge pointer
can simply be adjusted for the gauge to work within specifications. However, if the gauge requires calibration, then
follow the procedures below*.
1. Remove the ring and lens
2. Slowly pressurize the gauge to its full scale and slowly release the pressure back down to zero
3. Check the gauge at a minimum of four equal pressure intervals against a certified test gauge*
4. Adjust the movement accordingly by removing the pointer with a pointer extractor. Be careful not to bend
the pointer shaft
5. Remove the dial plate by loosening the holding screws
6. When adjustments are completed, replace the dial plate and pointer
7. Re-check the gauge for accuracy
8. Check lens assembly gasket for any deformation, tears or cracks. If there are any visual defects, contact
Winters to get a replacement gasket
9. Re-assemble the lens assembly
*Winters can recalibrate and provide test certificates that are traceable to NIST
Replacing the lens
To replace a broken lens, check to see if the lens is held on by a bayonet or snap-on ring. To remove a bayonet
ring, unscrew using a rubber belt wrench. To remove a snap-on ring, remove any screws holding the ring in place.
Then pry off the ring with a small screwdriver. Remove all glass chips, insert new lens and re-insert the bayonet or
snap-on ring. With snap-on rings, locate the ring joint at the bottom of the gauge. Crimp-on rings cannot be
replaced once removed. If you would like to replace the lens or remove/replace crimp-on rings, please contact
Winters.
Replacing the pointer
Remove bayonet or snap-on ring as previously described above. Remove old pointer with pointer extractor or two
small screwdrivers opposite each other under pointer hub. Pry off evenly, being careful not to bend the pointer
shaft. Install new pointer on zero. NOTE: Gauges with a zero stop pin must have the pointer set at a reference
pressure (preferable mid-scale) to offset the preload against the stop pin. Re-install the lens.
Teflon
®
is a registered trademark of DuPont Corporation
Cut