
User's Manual


TM
www.wireless-computing.com
HANDHELD
MOUSE
RF-150
INSTRUCTIONS
1. Install Battery. Insert one AA alkaline
battery (included) in the handheld’s battery
compartment.
2. Connect Receiver. Plug the black receiver
into your computer’s USB port. If you see a
series of dialog boxes about USB drivers,
press Enter repeatedly to accept the
standard USB drivers in Windows.
Tip: Do not place receiver in an equipment
cabinet or near other strong EMI sources.
3. Set Address. Press and release the
address button on the bottom of the
receiver. While the green LED blinks,
simultaneously press the handheld’s left
and right buttons. Repeat until the green
LED on the handheld blinks. This matches
the address in the handheld to the address
in the receiver.
OPERATION
The RF-150 will operate PowerPoint
slideshows and other mouse-controllable
computer applications. When you press the
mousedisk or click a button, both the handheld
and receiver’s green LEDs should blink.
The RF-150 is designed to transmit reliably at
a distance of 100 feet (31 meters). Operating
.
range will vary depending on receiver and
handheld positioning, nearby sources of
interference, and other factors.
To protect the battery from accidental discharge,
the handheld stops transmitting if a mouse button,
or the mousedisk, is held down for more than 60
seconds.
TO USE MORE THAN ONE HANDHELD OR
KEYBOARD ON A COMPUTER
If desired, you can set multiple RF-150s and RF-
250 Wireless Keyboards to operate the same
computer.
1. Connect one receiver to the computer.
2. Press and release the address button on the
bottom of the receiver.
3. While the green LED on the receiver blinks, on
every RF-150, simultaneously press the left and
right mouse buttons to set their addresses.
Next, press the Addr key
on each RF-250 to set its
address. After a
handheld or keyboard
retrieves an address, the
receiver LED continues
blinking for another 30
seconds.
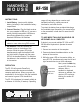
Left Click
Ri
g
ht Click
Mousedisk