
User's Manual


11
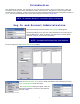
Procedure to Create a New Test Bank:
• Set up a Test Bank
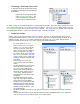
o Click on the New button on the Test Banks toolbar. A blank checkbox and a highlighted file
entitled New Test Bank* appear. Notice the Edit pane has changed from Edit Classes to Edit Test
Banks and in that pane the new file name also appears with and asterisk (*). The asterisk
indicates the file has not been saved.
o Right click on the new file name and select Rename from the drop-down dialog. Edit the file
name as desired and then press enter. The new file name appears in both panes. At this point,
the Session Setup screen looks similar to the one on the previous page.
o Proceed to the Edit Test Banks pane to enter a test.
•
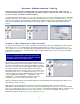
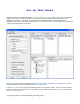
Enter / Edit a Test Bank
In the Edit Test Banks pane, ensure the file name is highlighted and then click the New Question button, or right
click on the test bank name and select New Question from the dialog. In either case, the New Question dialog
appears. This dialog lets you define question Type, Template (True/False) enter the Question, associated
Responses (mark the correct response), Objective, and Remediation.
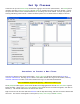
o Properties. Select the question Type from the drop-down menu. Choices are Multiple Choice,
Multiple Answer, and Fill – In. The Template drop-down choice will only need to be changed if a
True/False question is desired.
o Question. In the Question box, left click the mouse and a cursor appears. Enter a question.
o Responses.
o For multiple choice questions, click the checkbox to the left of response A and enter the
response in the area provided. To enter the remaining responses, follow the same
procedure. To indicate which response is correct, click the corresponding checkbox
again and the checkmark changes to green.