
User's Manual

5
Introduction
After installing the software, it is necessary for you to set up user accounts, enter your class rosters, enter your
test banks, and set up the remote units before a session can be started. This guide is a step-by-step procedure
through those set up dialogs. Toolbar menu selection names and dialog names described in this guide are shown in
green. Text entries and toolbar button clicks required by you are shown in bright blue.
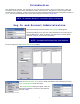
Log In and Account Administration
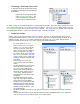
Launch the iRespond software and the iRespond Login dialog appears.
This dialog prompts you for your user name and password. First-time log in is
done as administrator. Enter the default user name admin, and the default
password changeme, and click the Login button.
Successful login opens the iRespond Session Setup window.
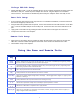
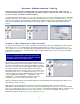
From the iRespond Session Setup screen, change the administrator password by selecting
Tools/Change Password from the toolbar.
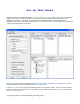
The Change Password dialog will appear. Enter the
old and new passwords, confirm the new password,
and click Change.
NOTE: All standard Windows™ conventions apply to iRespond.
NOTE: Username and Password are case sensitive.