
User's Manual

6
Account Administrator Dialog
The sole function of logging in as administrator is to create or edit your user accounts. When your user
account has been set up, log out as administrator and then log back in using your user name. Then you can
set up your Classes, Test Banks, and Remote Devices.
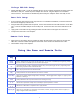
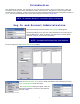
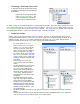
From the main toolbar menu, select Tools/Accounts, and the Account Administrator dialog will pop up. This dialog
displays a table of all user accounts. You may add, edit, and delete user accounts. To edit the Name, Username,
and Home Path fields in the accounts table, right-click on the name of the account you would like to edit. Click
Edit from the drop-down menu and the Edit Account dialog appears. Complete the required fields and click
Accept.
Create a New Instructor User Account
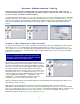
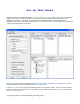
To create a new instructor user account, click the New User button on the Account Administrator toolbar. When
selected, the New Account dialog appears. This dialog prompts the user to enter a Username, Password, Full
Name, and a Profile Pathname. The path name entered specifies the folder in which iRespond stores the account
information for the new user. Unless you wish to specify a different directory for your files, accept the default
entry in Profile Pathname.
Alternatively, clicking on the Browse button launches an Open
dialog (not shown) in which an existing folder may be selected for
your files. A new folder can be created in this dialog by clicking
the Create New Folder button on the dialog's toolbar. New folders
can also be created in your operating system, then browse to
them when setting up your accounts. The Properties button near
the bottom of the New Account dialog brings up the User Account
Properties dialog (not shown), which allows you to export session
results automatically to Edmastery
TM
, GradeQuick
TM,
, and
GradeBook2
TM
. For more detailed information on account
properties, refer to the User Manual in the Help files.
When all information has been entered and accepted, the Account Administrator dialog appears as above. If all
information is correct, click Exit.
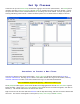
Now that the account administration is complete, proceed to setting up a class. To do this, logout as
administrator and then log back in as a user. From the File drop-down menu on the Session Setup screen toolbar
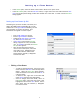
select Logout and click Yes in the Logout Confirmation dialog. The iRespond Login dialog appears. Enter your new
user name and password and then click Login. When the Session Setup screen re-appears, your user name
automatically appears in the Session Properties pane as Instructor.
Note: If a nonexistent path is entered in the text box,
iRespond will create the folder(s) specified in the path,
provided the path is free of syntax errors.