
User's Manual

8
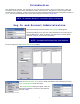
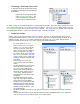
Setting up a Class Roster:
o In the Classes pane, select the name of then Class in which to set up the roster.
o In the Edit Classes pane, click the New User button, or right click on the class name and select New
User from the drop-down dialog to add a new student user to the class. In either case the New User
dialog appears.
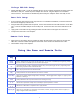
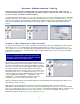
Setting up Class Roster By PIN
This dialog lets you enter the PIN, Last Name, First
Name, MI (middle initial) and Student ID of a new
student user. The Login Enabled checkbox gives the
user permission to log into the session. This
information will appear in various reports.
o Enter a PIN number for the user
o Ensure Login Enabled is checked
o Complete the Last Name, First Name,
MI, and Student ID of the user.
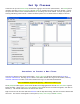
o If Next User is selected the New User
dialog re-appears for entry of another
user. If Finished is selected, the Session
Setup screen appears.
o After all users have been entered,
return to the Classes pane, ensure the
class name is still highlighted, and
click the Save button. Notice after
saving that the asterisk (*) disappears
from the file name.
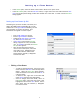
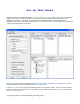
• Editing a Class Roster
o To edit an existing username, right click on the
name and select Edit User from the drop-down
dialog. When the New User dialog appears,
make the desired corrections and click OK to
close the dialog.
o To delete a user, right click on the name and
select Delete from the drop-down dialog.
o After all changes have been made, return to
the Classes pane, ensure the class name is still
highlighted, and click the Save button. Notice
after saving that the asterisk (*) disappears
from the file name.