
Installation manual


24
WPS-565-DOM-A Installation Manual
6.4.7.6. COMM ADJ. — RS485 Setup
Set up remote control of the camera’s OSD SETUP menu from a PTZ controller or
DVR through RS485.
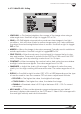
COMM ADJ
CAMERA ID 001
BAUDRATE 4800
PROTOCOL PELCO-D
DISPLAY ID OFF
ID POS
RETURN RET
• CAM ID — Scroll left or right to select a unique ID number from 0 to 225 to
identify the camera on the RS485 loop.
Note: Each device in the RS485 connection MUST be set to a unique address
number for proper RS-485 communication.
• BAUD RATE — Scroll left or right to choose a baud rate for RS485
communication between the camera and controller. Baud rate options
include 4800, 9600, 19200, 38400, and 57600.
Note: ALL devices in the RS485 connection must be set to the same baud rate
for proper RS-485 communication.
• PROTOCOL — Scroll left or right to select a communication protocol - PELCO-D
or PELCO-P. Wirepath devices use Pelco-D.
• DISPLAY ID — Scroll left or right to set DISPLAY ID to ON and show the CAMERA
ID on the screen. This feature is useful when needing to know the ID of a
camera simply by viewing a picture.
• ID POS — Scroll left or right to set the position for the CAMERA ID on the display
screen.
6.4.8. Exit Menu — Save and Reset
After making changes, settings should be saved either in the sub-menu, or, by
using the SAVE function in the EXIT menu. If adjustment to the camera’s settings
results in poor picture quality, settings may be discarded (NOT SAVE) or RESET:
6.4.8.1. SAVE
Save all current settings and exit the SETUP menu.
6.4.8.2. NOT SAVE
Discard all unsaved changes and exit the SETUP menu.
6.4.8.3. RESET
All congurations with the exception of the COMM SETTINGS will be reset back to
factory default settings. This option does not have an “UNDO” feature, so ensure
default settings are desired before selecting this function. The cursor will return to
the top of the SETUP menu after the reset is complete.