
User Guide


Working with captured packets
105
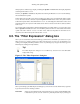
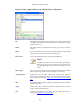
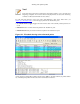
Figure 6.8. The "Capture Filters" and "Display Filters" dialog boxes
New This button adds a new filter to the list of filters. The currently entered values
from Filter name and Filter string will be used. If any of these fields are empty,
it will be set to "new".
Delete This button deletes the selected filter. It will be greyed out, if no filter is
selected.
Filter You can select a filter from this list (which will fill in the filter name and filter
string in the fields down at the bottom of the dialog box).
Filter name: You can change the name of the currently selected filter here.
Note!
The filter name will only be used in this dialog to identify the
filter for your convenience, it will not be used elsewhere. You
can add multiple filters with the same name, but this is not very
useful.
Filter string: You can change the filter string of the currently selected filter here. Display
Filter only: the string will be syntax checked while you are typing.
Add Expression... Display Filter only: This button brings up the Add Expression dialog box
which assists in building filter strings. You can find more information about
the Add Expression dialog in Section 6.5, “The "Filter Expression" dialog
box”
OK Display Filter only: This button applies the selected filter to the current display
and closes the dialog.
Apply Display Filter only: This button applies the selected filter to the current
display, and keeps the dialog open.
Save Save the current settings in this dialog. The file location and format is
explained in Appendix A, Files and Folders.