
User Guide


Customizing Wireshark
145
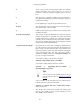
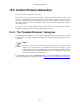
Figure 10.1. The "Coloring Rules" dialog box
Once the Coloring Rules dialog box is up, there are a number of buttons you can use, depending on whether
or not you have any color filters installed already.
Note!
You will need to carefully select the order the coloring rules are listed as they are applied
in order from top to bottom. So, more specific rules need to be listed before more general
rules. For example, if you have a color rule for UDP before the one for DNS, the color rule
for DNS will never be applied (as DNS uses UDP, so the UDP rule will match first).
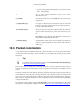
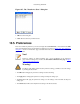
If this is the first time you have used Coloring Rules, click on the New button which will bring up the Edit
color filter dialog box as shown in Figure 10.2, “The "Edit Color Filter" dialog box”.
Figure 10.2. The "Edit Color Filter" dialog box
In the Edit Color dialog box, simply enter a name for the color filter, and enter a filter string in the Filter
text field. Figure 10.2, “The "Edit Color Filter" dialog box” shows the values arp and arp which means
that the name of the color filter is arp and the filter will select protocols of type arp. Once you have
entered these values, you can choose a foreground and background color for packets that match the filter
expression. Click on Foreground color... or Background color... to achieve this and Wireshark will
pop up the Choose foreground/background color for protocol dialog box as shown in Figure 10.3, “The
"Choose color" dialog box”.