
User's Manual


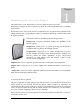


Table Of Contents
- Introducing the 802.11a/g Router
- Installing the 802.11a/g Router
- What’s in the Box?
- A physical look at the back panel
- A physical look at the front panel
- Connecting the Cables
- High Level Configuration Steps Required for the 802.11a/g Router
- Setting up a Windows PC or wireless client as DHCP clients
- Configuring a PC running MS-Windows 95/98/Me:
- Configuring a PC running MS-Windows XP/2000:
- Confirming your PC’s IP Configuration:
- Connecting More Devices Through A Switch/Hub To The 802.11a/g Router
- Basic Configuration of the 802.11a/g Router
- Advanced Settings
- Managing your 802.11a/g Router
- How to View the device Status
- How to View the System Log
- Security Log
- DHCP Client Table
- Wireless Client Table
- Bridge Table
- WAN Status
- LAN Status
- Upgrading Firmware
- How to Save or Restore Configuration Changes
- How to Restore the System Settings to the Factory Defaults
- How to Reboot your 802.11a/g Router
- What if you Forgot the Password?
- Command Line Interface
- Text Configuration
- Specification

802.11a/g Router User’s Guide
A physical look at the back panel
The following illustration shows the rear panel of Wireless Router.
(1) 4 RJ-45 10/100 Switch connectors for connecting to PCs and workstations or connecting
external Ethernet hub, or switch with auto-sensing.
(2) 1 RJ-45 WAN connector for connecting to Internet via ADSL/Cable modem
(3) 1 RJ-45 DMZ connector for connecting to an internal DMZ network or a PC
(4) 1 5V DC/2A power connector for connecting through a DC power adapter (included as part
of the product) to the wall power outlet
(5) 1 Restore button to restore the device back to the factory settings
9