802.11g USB 2.0 Adapter DRUC User’s Guide Version: 2.
Copyright Statement No part of this publication may be reproduced, stored in a retrieval system, or transmitted in any form or by any means, whether electronic, mechanical, photocopying, recording or otherwise without the prior writing of the publisher. Windows™ 98SE/2000/ME/XP are trademarks of Microsoft® Corp. Pentium is trademark of Intel. All copyright reserved.
Regulatory Information Federal Communication Commission Interference Statement This equipment has been tested and found to comply with the limits for a Class B digital device, pursuant to Part 15 of the FCC Rules. These limits are designed to provide reasonable protection against harmful interference in a residential installation.
Table of Contents Regulatory Information ________________________________________________2 1. Welcome __________________________________________________________4 1.1 Kit Contents______________________________________________________5 1.2 Main Features of 802.11g USB 2.0 Adapter ____________________________6 1.3 Wireless Networking Scenarios ______________________________________7 1.4 Advantages for Using Wireless Network_______________________________9 2.
1. Welcome Thank you for purchasing our 802.11g USB 2.0 Adapter, and welcome to Wireless LAN— the easy way to wireless networking. This user’s guide introduces to you the 802.11g USB 2.0 Adapter and describes the most common configurations, which will help you connect to your network easily. Please read this manual to get familiar with the IEEE802.11g Wireless LAN. This manual contains detailed instructions in operation of this product. Please keep this manual for future reference.
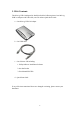
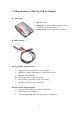
1.1 Kit Contents The 802.11g USB 2.0 Adapter kit should include the following items: One 802.11g USB 2.0 Adapter with USB cable, one CD and one Quick Start Guide. a. One 802.11g USB 2.0 Adapter b. One USB cable c. One Software CD including: 1. Utility & Driver Installation Software 2. Acrobat Reader 3. User Manual PDF File d. Quick Start Guide If any of the items mentioned above are damaged or missing, please contact your distributor.
1.2 Main Features of 802.11g USB 2.0 Adapter A. Status LED l l l Off: Power Off. Blinking: The USB adapter is powered on but no wireless connection is made yet. Steady Green: Wireless connection is linked. B. USB Connector 802.11g USB 2.0 Adapter features: 1. 2. 3. 4. 5. 6. High-speed wireless connection, up to 54 Mbps IEEE802.11g (DSSS) standard for 2.
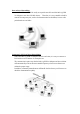
1.3 Wireless Networking Scenarios As our 802.11g USB 2.0 Adapter is interoperable and compatible with other IEEE 802.11g compliant products from other manufacturers, it offers you the most freedom to establish your ideal wireless network. Therefore, after installing 802.11g USB 2.0 Adapter, you can connect your computer to: 1. A Peer-to-Peer Workgroup of 802.11g compliant wireless devices. 2. A LAN (Local Area Network) constructed by Access Point(s) or other 802.11g compliant systems. 3.
Peer-to-Peer Networking: An Ad Hoc Network could be easily set up with some PCs and this 802.11g USB 2.0 Adapter or our other WLAN devices. Therefore, it is very suitable to build a network for temporary use, such as for demonstration in exhibition, for new sales point/branch use and alike. Cooperate LAN (Local Area Networking): With some 802.11g USB 2.0 Adapters and Access Points, it is easy to construct a LAN with access to Internet for enterprise use. The construction is quite easy that the 802.
1.4 Advantages for Using Wireless Network 802.11g USB 2.0 Adapter can wirelessly transmit and receive data, minimizing the need for wired connections, at a speed of up to eleven megabit per second. With the 802.11g USB 2.0 Adapter you can locate your PC wherever you want without wires and cables. The 802.11g USB 2.0 Adapter provides LAN users with an access to real-time information anywhere in their organization.
2. Quick Start to Wireless Networking 2.1 Installation 1. Insert the installation CD. It automatically starts the setup program for software installation. 2. Follow the installation wizard to complete the software installation process and restart your computer if necessary. 3. Connect the 802.11g USB 2.0 Adapter to your laptop PC/desktop PC. Note! Please use USB extension cable to connect the 802.11g USB 2.0 Adapter with your laptop PC/desktop PC during normal operation. 4.
2.2 Connecting to an Existing Network 1. Go to windows Start > Programs > 802.11g USB2.0 adapter Setting > 802.11g USB2.0 adapter Setting to open the utility. The 802.11g USB2.0 Adapter Setting window appears. You can see the wireless configuration icon in Windows System Tray. Double click the shortcut icon or the wireless configuration icon can open the utility. 2. 802.11g USB2.0 adapter automatically searches and connects to an available network (network with security disabled) if there is any.
4. If the chosen network is security enabled, Wireless Network Properties window pops up.
In Authentication tab: Click Properties button in Authentication tab: 13
5. Once connected, the wireless configuration icon appears green and the icon shown in Preferred networks appears connected check the connection status. . You can click Link Status tab to 6. For details of each tab in 802.11g USB2.0 WLAN Utility, please read User’s Guide Chapter 4.
3. Step-by-Step Installation Guide This section will lead you through the installation of 802.11g USB 2.0 Adapter (both software and hardware) in detail. People who are familiar with the installation and settings of wireless device may refer to quick start guide to establish a network in a snap. To establish your wireless network connection, the following steps should be executed: 1. Install the software by using the installation CD. 2. Install the 802.11g USB 2.0 Adapter. 3.
3.1 Installing the 802.11g USB2.0 Adapter Driver / Utility Note! Please install the software before inserting the 802.11g USB 2.0 Adapter. 1. Insert the installation CD. Insert the installation CD into your CD-ROM drive. The setup program automatically starts. 2. Click “Next”. 3. Click “Yes”.
4. Read the destination folder and click “Next”. The default destination folder is displayed in the setup dialog box. You may change the default folder by clicking “Browse” to select the destination folder you prefer. Click “ Next” to go to the next screen. 5. Click “Next”.
6. Click “Yes” to create a shortcut. if necessary. Installation is complete. Restart your computer 7. Connect the 802.11g USB 2.0 Adapter to your laptop PC/desktop PC. To adjust the direction or position of the 802.11g USB 2.0 Adapter, please use the USB extension cable. Laptop PC Note! Desktop PC Please use USB extension cable to connect your 802.11g USB 2.0 Adapter with your laptop PC/desktop PC during normal operation. 3.1.
settings. Select “Install the software automatically” when the window with this option appears, and then click “Next” to continue installation. 4. Windows XP: Select “Install the software automatically” when the window with this option appears, and then click “Next” to continue installation. Note that before using the 802.11g USB2.0 WLAN Utility, please disable the Windows XP Zero-Configuration first. 3.1.2 Disable Windows XP Zero-Configuration In Windows XP, it is recommended that you use the 802.
3.2 Verifying the Driver/Utility 1. Windows 98SE/Me: Step 1. Right-click “My Computer” icon on the desktop and choose “Properties”. Step 2. Select Device Manager tab and open “Network adapters”. You should see your 802.11g USB 2.0 Adapter in the list. Highlight it and click “Properties” button. Step 3. From the “Device status”, you should see the line “This device is working properly”.
3.3 802.11g USB2.0 adapter Setting 802.11g USB 2.0 Adapter has its own management software, named 802.11g USB2.0 adapter Setting, and users can control all functions provided with it. The wireless configuration icon appears in the Windows System Tray. The Utility includes three tabs: Wireless Networks, Link Status and About.
3.4 Connecting to an Infrastructure Network 1. Select the Wireless Networks tab. 2. 3. 4. 5. Click Refresh button to rescan all available networks in vicinity. Choose (click) one network from the list. Click Configure button and then Apply button. If the chosen network is Security Enabled, Wireless Network Properties window pops up. Contact the network administrator for the encryption settings.
3.5 Creating an Ad-Hoc Network If you have more computers and only want to place them in a local area network, or you want to communicate directly without using an Access Point or any connection to a wired network, you can create a new Ad-hoc Network. 1. In Wireless Networks tab, click Add button. Wireless Network Properties window pops up. 2. Select the check box “This is a computer-to-computer (ad-hoc) network: wireless access points are note used.”. 3. Set Encryption and Ad-hoc Channel if necessary. 4.
3.6 Removing your 802.11g USB 2.0 Adapter You can remove the device after you finished the action with the device. However, in Windows XP/ME and Windows 2000, please follow the safe removal procedure. You can find a safe removal icon in your computer’s notification area. 1. Double click the safe removal icon. 2. The “Unplug or Eject Hardware” window will pop up. You can select the device you want to remove. Then, click the “Stop” button. Note! When removing the 802.11g USB 2.
4. Using the Utility 4.1 Wireless Networks Tab 1. Available networks: Lists all available networks (infrastructure or Ad-hoc networks) in vicinity and shows each network’s information such as SSID, Channel, Security and Signal. 2. Preferred networks: The order of preferred networks. It shows one network is 3. 4. 5. 6. 7. connected , disconnected or unavailable . Configure button: Make configuration of the chosen network. Refresh button: Click to rescan all available networks in vicinity.
8. Properties button: Click to configure the chosen network. 9. Show wireless configuration icon in systray: Checked to display wireless configuration icon in Windows System Tray. 10. Advanced button: Click to choose one network access alternative.
4.2 Link Status Tab This tab shows Connection information such as network mode, SSID, Frequency, Signal Strength, etc.
4.3 About Tab This tab shows hardware and software details, such as firmware or driver version.
5. Network Application This section consists of the network applications of 802.11g USB 2.0 Adapter, including: 1. To survey the network neighborhood 2. To share your folder with your network member(s) 3. To share your printer with your network member(s) 4. To access the shared folder(s)/file(s) of your network members(s) 5. To use the shared printer(s) of your network member(s) In fact, the network applications of 802.11g USB 2.0 Adapter are the same as they are in a wired network environment.
5.2 File Sharing 802.11g USB 2.0 Adapter allows the sharing of files between comp uters that are logged onto the same wireless network. If you want to share your folder “My Documents” with other computers of the wireless network, please highlight the folder “My Documents” and drag it to Shared Documents folder. Sharing files in the IEEE802.11g wireless network will be like sharing files on a wired LAN.
5.3 Using the Shared Folder If you would like to access a shared folder stored in other stations of same network, please follow the process below: 1. Double-click the “My Network Places” icon, and then double-click the computer where the shared folder is located. 2. Double-click the folder you want to connect to. 3. Now you may open the needed file(s). Note! If a password is required, the Windows will prompt a password column to you.
6. Product Specifications Item Frequency range Key specifications Ø Ø U-NII: 2.412 ~ 2.484Ghz Europe: 2.412 ~ 2.484Ghz Japan: 2.471 ~ 2.497Ghz Ø Ø 802.11b: DSSS (CCK, BPSK, QPSK) Ø 802.11g: OFDM Host interface Ø USB 2.0 Channels support Ø US/Canada: 11 (1 ~ 11) Ø Major European country: 13 (1 ~ 13) Ø France: 4 (10 ~ 13) Ø Japan: 14 (1~13 or 14th ) Ø Ø 5V +/- 10% Transmission mode Receive mode standby mode Output Ø 13 dBm@ 802.11g mode power(preliminary) Ø 18 dBm@ 802.
7. Glossary CHAP: Challenge Handshake Authentication Protocol. Security feature supported on lines using PPP encapsulation that prevents unauthorized access. CHAP does not itself prevent unauthorized access, but merely identifies the remote end. The router or access server then determines whether that user is allowed access. EAP: Extensible Authentication Protocol.
Authentication Server during the second phase. A certificate is only required at the Authentication Server. PEAP also supports identity hiding where the Authenticator is only aware of the anonymous username used to establish the TLS channel during the first phase but not the individual user authenticated during the second phase. SSID: Name of wireless network. TLS: TLS is an EAP-Type for authentication based upon X.509 certificates.