LT1423pwCA Wide Touch Monitor User's Guide
Product numbers 60AC-UAR2-WW First Edition October 2013 © Copyright Lenovo 2013 . All rights reserved. LENOVO products, data, computer software, and services have been developed exclusively at private expense and are sold to governmental entities as commercial items as defined by 48 C.F .R. 2.101 with limited and restricted rights to use, reproduction and disclosure.
Contents Safety information …………………………………………………………………… iii Chapter 1. Getting started ……………………………….………………………… 1-1 Shipping contents ………………………………………………………………………………………..… 1-1 Product overview ………………………………………………………………………………………..… 1-2 Types of adjustments ……………………………………………………………………………………... 1-2 User controls ……………………………………………………………………………………………… 1-2 LED indicator …………………………………………………………………………………………….. 1-3 Monitor Stylus Pen storage………………………………………………………………………………...
3AFETY INFORMATION General Safety guidelines For tips to help you use your computer safety, go to: http://www.lenovo.com/safety ǰ ¢ ǯ ǰ ³ä ³ǯ Prije instaliranja ovog proizvoda obavezno pročitajte sigurnosne upute.
Safety and Maintenance Guidelines Important Safety Information The power cord is designed for use with your monitor. To use a different cord, use only a power source and connection compatible with this monitor. CAUTION: To protect your monitor, as well as your computer, connect all power cords for your computer and its peripheral devices (such as a monitor, printer, or scanner) to a surge protection device such as a power strip with surge protection or uninterruptible power supply (UPS).
Chapter 1. Getting started This User’s Guide contains detailed information on the ThinkVision ® LT1423pwCA Wide Touch Monitor. For a quick overview, please see the Setup Poster that was shipped with your monitor. Shipping contents The product package should include the following items: Copyright Lenovo 2013.
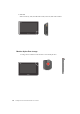
Product overview This section will provide information on adjusting monitor positions, setting user controls, and using the cable lock slot. Types of adjustments Tilt Please see the illustration below for an example of the tilt range.
! 2. Your monitor has OSD control on the top of which is used to adjust the display. USB Cable连接下: Menu Key : 1. To display the OSD menu on the screen. 2. To select the OSD sub-Menu. Minus Key : 1. Back-Forward selection of the OSD menu. 2. Decease the value of sub-menu selection. 3. Auto config hot key. Plus Key : 1. Forward selection of the OSD menu. 2. Increase the value of sub-menu selection. Wi-Fi显示连接成功后: Menu Key:用来打开LT1423pwCA 控制面板的主菜单。 Minus Key:无作用。 Plus Key: 用来旋转显示画面。 LED indicator 1.
2. Wifi LED When connect by 2.4G, the LED will be blue, when 5G, LED will be amber. Monitor Stylus Pen storage A storage slot is available on the monitor to store the Stylus Pen.
Using the Multi-touch screen Your Monitor support multi-touch function on Win7/Win8 32/64bits OS, can support maximum ten point muti-touch function on Win 8 32/64bits OS. Tap the screen to use the controls on the screen including icons, menu items, and the on-screen keyboard. Following provides instructions on how to use the multi-touch screen. Tap Tap gently on the screen with your fingertip to launch an application, select an item, open a menu, orinput text using the onscreen keyboard.
Cable lock slot Your monitor is equipped with a cable lock slot located on the side of your monitor Setting up your monitor This section provides information to help you set up your monitor. Connecting and turning on your monitor Note: Be sure to read the Safety Information located in the Monitor Safety, troubleshooting and Warranty Guide before carrying out these procedures. 1. 1-6 Power on the computer.
2. To install the monitor driver, follow the on-screen instructions. a. Connect the USB cable to the USB port of the side of the monitor and the other two ends to the appropriate USB ports on your computer. b. To install the monitor driver, you can find the driver setup file in the monitor mass storage USB disk. For detailed Setup steps, please see " Chapter 4". Remark: a. To ensure optimal display performance, connect the monitor to your PC using a USB 3.0 and a USB 2.0 port at the same time.
4. Wi-Fi Dongle的使用说明: 附件的WiFI Dongle,提供了一个独立的WiFi设备,用来实现WiFi视频连接。 如果你的笔记本电脑内置WiFi网卡正在用于上网,WiFi Dongle可以同时实现 WiFi的显示连接。 5. Using the convertible simple cover. A simple cover ships with the monitor for added protection when storing and carrying. The case can also be used as a monitor stand as illustrated below. If simple cover is attached: 1) Simple cover for storing.
2) Simple cover as stand. a. Take out monitor from simple cover and raise stand leg. b. Put monitor in the front of stand leg . Chapter 1.
Chapter 2. Adjusting and using your monitor This section will give you information on adjusting and using your monitor. Comfort and accessibility Good ergonomic practice is important to get the most from your personal computer and to avoid discomfort. Arrange your workplace and the equipment you use to suit your individual needs and the kind of work that you perform. In addition, use healthy work habits to maximize your performance and comfort while using your computer.
● ● ● Use adequate lighting for the type of work you are performing. Use the monitor brightness, contrast, and image adjustment controls, if equipped, to optimize the image on your screen to meet your visual preferences. Keep your monitor screen clean so that you can focus on the screen’s contents. Any concentrated and sustained visual activity can be tiring for your eyes. Be sure to periodically look away from your monitor screen and focus on a far object to allow your eye muscles to relax.
Adjusting your monitor image This section describes the user control features are used to adjust your monitor image. Using the On-Screen Display (OSD) controls The display settings can be viewed through the on-screen-display (OSD), as shown below USB视频连接时 WIFI准备就绪时 To use the controls: 1. Press to open the main OSD menu. 2. Use or to move across the icons. Select an icon and press to access that function.
Understanding power management Power management is invoked when the computer goes to stand-by mode. The monitor states are described below. For optimal performance, unplug the USB cable and switch off your monitor by monitor’s power key at the end of each working day, or whenever you expect to leave it unused for long periods during the day. Table2-1.Power indicator of USB mode State Power Indicator On Green Off Normal Saving Green Off Black Off Off Black Off WIFI Indicator Screen Table2-2.
Selecting a supported display mode The display mode the monitor uses is controlled by the computer. Therefore, refer to your computer documentation for details on how to change display modes. The image size, position and shape might change when the display mode changes. This is normal and the image can be readjusted using automatic image setup and the image controls. Unlike CRT monitors, which require a high refresh rate to minimize flicker, LCD or Flat Panel technology is inherently flicker-free.
Chapter 3. Reference information This section contains monitor specifications, troubleshooting information, and service information. Monitor specifications Table 3-1. Monitor specifications Dimensions Height Depth With 225.44 mm (8.87 in) 12.70 mm (0.50 in) 347.96 mm (13.70 in) Stand Tilt range Range: 0°~95° Viewable image size 337.82 mm (13.3 in) Maximum height 165.24 mm (6.51 in) Maximum width 293.76mm (11.57 in) Pixel pitch 0.1836 mm (0.
Troubleshooting If you have a problem with setting up or using your monitor, you might be able to solve it yourself. Before calling your dealer or Lenovo, try the suggested actions that are appropriate to your problem. In a multi monitor situation if the touch response is on a different monitor than the LT1423pwCA then you can set the touch configurationAs below: 1. Open the Control Panel and find the monitor PC Setting which can setting for touch and pen. 2.
Table3-2.Troubleshooting (continued) Problem Possible cause Suggested action LT1423pwCA 控制面板没有 出现所需要的 显示器名称 显示器没有正常 开启无线网络 模式 确保没有连接USB 数据线,按开关键 开启显示器 计算机没有使用 无线网卡 请插入附件的USB网卡, 并确保LT1423pwCA软件 正常安装,设备在系统设 备管理器中正常运行 windows系统没 有更新无线设备 的名称 在windows系统的无线 列表中点击刷新按钮 Reference "Setting up your monitor" on Page 1-6 Na Getting further help If you still can’t solve your problem, please contact the Customer Support Center.
Service parts The following parts are used for Lenovo service, or Lenovo authorized dealers, to support the customer warranty. Parts are for service use only. The table below shows information for model 60AC-UAR2-WW Table 3-3. List of service parts FRU (Field Replaceable Unit) Part number 3-4 Description Color Machine Type Model(MTM) 03T8733 03X794 LT1423p -FRU Monitor_Simple cover (Wireless) Raven Black 60AC-UAR2-WW 03X795 03T8474 USB3.
Chapter 4. Working with LT1423pwCA Wide WIFI monitor This section contains instructions to install the monitor driver and display information settings. Driver Installation PC Requirements Lenovo LT1423pwCA control panel software can be used on PCs, from Netbooks, Notebooks/Laptops to Desktops. The driver will run on processors ranging from Atom N270 based PCs, basic single Core CPUs, and of course the latest Dual, Quad Core and Core i3/i5/i7 CPUs.
1GB memory For 6 screens where 1 screen can run full screen DVD video: 1.8GHz Core Duo 1GB memory At least one USB 3.0 port. 150 megabytes (MB) of free disk space. Computer screen for use with the Lenovo LT1423pwCA wireless monitor device, if it is not integrated. Network access for software downloads, or access to a CD-ROM drive. Graphics Card Support (Windows 7) On Windows 7, Lenovo LT1423pwCA control panel software interacts closely with the primary graphics card.
Installing the Lenovo DisplayLink USB Graphics Software The following section shows you how to install the LT1423pwCA control panel software on different operating systems. Note: If you have v3.x, R4.1 or R4.2 DisplayLink software installed you must uninstall it, using the Windows Add/Remove Programs feature, before installing this release. Devices will continue working after this release is installed.
! !! 4-4 LT1423pwCA Wide Touch Monitor User’s Guide
Chapter 4.
! 设置网卡工作模式 为保证无线显示的效果,请在Windows系统中进入控制面板>>系统>>设备管理器>>网络适配器, 查找无线网卡设备,设备名称一般带有WIFI字样,双击进入“属性”页面,确认802.11n工作模式 并将其开启,并点击确认。请注意无线网络设备会切换工作模式并重新开启,如果无线网卡有 连接网络设备,会出现短时间的网络中断。 Note: The screen may flash or go black during the install. On some machines you may reboot before you can use your DisplayLink enabled device. Wireless monitor using 1. After Lenovo LT1423pwCA control panel software installation, the software will be auto-started with Windows® system.
2. You can change settings by favor and click into the Connection Management to found the SSID of LT1423pwCA monitor. You can power up the LT1423pwCA monitor without USB cable, the SSID name and password shows on the screen of the monitor, or you can press menu key to resume the information.The DisplayLink software end user licence agreement window opens. Click connect button under the monitor SSID name you want to connect. Chapter 4.
Windows system will install device driver to finish the connection for a few minutes. The status will changed and monitor is ready for using. The options item is working after connection, you may need to change the Turn off display after … item for energy saving.
Disconnect button under the SSID name is for disable wireless monitor from current connection, and the monitor will not power off. 3. Press power key shortly within one second will bring monitor into energy saving mode,display and touch function are off but monitor still powered on to recall normal usings. To power off the wireless monitor you can press power button and hold 3 seconds at least to pop up the host and monitor control OSD, and select shut down monitor.
5. LT1423pwCA 控制面板使用详细说明,请点击帮助提示按钮“ ” USB Monitor Display Information settings The language shown in pictures below is decided by your operating system : (Unsupported languages default to English) Using the DisplayLink Software This section describes how to use DisplayLink’s Software. The section is divided into sub-sections relating to your operating system. Note: The terminology for mirror mode, can vary between operating systems and the DisplayLink GUI.
Setting the Display Follow these procedure to set the display. To set the display 1. Open Screen Resolution. 2. Set the display options. Refer to the table below for details on each option. Table 4-1. WDP Options Menu Display Sub-Menu Resolution Orientation Landscape Portrait Landscape (flipped) Portrait (flipped) Multiple displays Duplicates these displays Extend these displays Show Desktop only on 1 Shows Desktop only on 2 Description Uses the drop down list to select a display to be configured.
The DisplayLink Icon Application You can configure the behaviour of the DisplayLink Graphics through the DisplayLink icon applications on the taskbar, where present. To show the DisplayLink Manager menu 1. From the taskbar, click the Show hidden icons arrow to show all available icons. 2. Click the DisplayLink icon . A menu appears with several options, as described in the following table.
2. Select an option from the menu, using the following table for the options available. Table 4-3 DisplayLink menu Menu Option Screen Resolution Sub-menu Option Screen Rotation Normal Rotated Left Rotated Right Upside-Down Extend To Right Left Above Below Extend Set as Main Monitor Notebook Monitor Off Mirror Off Optimize for Video (Windows 7 Only) Advanced Configuration Description Displays a list of available resolutions. Some resolutions may be enclosed by [ ]. Please see, Inferred Modes.
Additional Information The following section provides additional information on the use of the DisplayLink Graphics software. Monitor Calibration DDC/CI is not supported on displays with integrated DisplayLink technology, for example mini monitors. Media Playback On Windows 7, Windows 8 (in extend modes), the DisplayLink USB Graphics device can display media files and DVDs using the following media players: Windows Media Player 11 (http://www.microsoft.com/windows/windowsmedia/default.
Error Messages DisplayLink Graphics software occasionally displays user messages in a bubble in the notification area. The table below lists the user messages and their descriptions. Table 4-4 DisplayLink menu Message Insufficient system resources exist to complete the requested service The requested allocation size was too large Description This can occur when entering extend mode with low system resources. The PC does not have enough memory to start an extend display.
This product is unable to enter full screen DOS mode when using the Lenovo LT1423pwCA Wide USB monitor. Problem show Solution(s) Problem The monitor does not turn on USB connection using: Check the connections. Make sure the USB cable is firmly connected to the monitor. Disconnect and reconnect the USB cable. Check the condition of the USB cable. If the cable is frayed or damaged, replace the cable. If the connectors are soiled, wipe them with a clean cloth.
Appendix A . Service and Support The following information describes the technical support that is available for your product, during the warranty period or throughout the life of your product. Refer to the Lenovo Limited Warranty for a full explanation of Lenovo warranty terms. Registering your option Register to receive product service and support updates, as well as free and discounted computer accessories and content. Go to: http://www.lenovo.
Date and time Update to be Visible on the Website Country or Regions 17-May-2012 1000 GMT +4:00 RUSSIA 30-Jul-2012 0900 GMT +9:00 JAPAN Language Old Telephone Number(s) New Telephone Number(s) Hours of Operation Russian, 8-800-555-0317 10 am - 7 pm Monday - Saturday 8 800 100 7888 9AM - 6PM Monday - Sunday (Exception : Third Sunday of the month (due to maintenance activities) and December 30th and 31st and January 1st, 2nd, and 3rd) Japanese, English 0120-20-5550, 0570-064-600 For International
Date and time Update to be Visible on the Website Country or Regions 3-Dec-12 0900 GMT -3:00 3-Dec-12 1000 GMT -2:00 PARAGUAY Spanish, English URUGUAY 5-Dec-12 0900 GMT +8:00 HONG KONG Language Old Telephone Number(s) 009-800-52-10026 000-411-005-6649 New Telephone Number(s) Hours of Operation 0098004410084 or 009-800000 411 0026332 9 am - 11 pm Monday - Sunday 10 am - 12 pm Monday - Sunday (852) 3071-3561 9 AM - 8 PM Monday - Friday 9AM - 1 PM Saturday Cantonese, Mandarin, English Yes 5-Dec-
Language Old Telephone Number(s) New Telephone Number(s) Hours of Operation English 131-426 Think Branded Products 1300-880-917 ThinkServer 1800041267 24 hours/day 7 days/week 01-Sep-12 0000 GMT +10:00 New Zealand 0800-733-222 Think Branded 0508 770 506 24 hours/day 7 days/week 14-Sep-12 0830 GMT +7:00 VIETNAM For Northern Area and Hanoi City: +84-4-3 7367625/+84-4-3 7367626 For Southern Area and Ho Chi 12011072 Minh City: +84 8 3 8243504/ +84 8 3 8243503 Date and time Update to be Country or
Date and time Update to be Country or Visible on the Website Regions Old Telephone Number(s) New Telephone Number(s) Hours of Operation 30-Nov-12 0000 GMT -5:00 Bahamas 30-Nov-12 0000 GMT -4:00 Barbados English 30-Nov-12 0000 GMT -4:00 Bermuda British Virgin 30-Nov-12 0000 GMT -4:00 Islands 30-Nov-12 0000 GMT -5:00 Cayman Islands 30-Nov-12 0000 GMT -4:00 Curacao 30-Nov-12 0000 GMT -4:00 Grenada 30-Nov-12 0000 GMT -4:00 Guyana 30-Nov-12 0000 GMT -5:00 Jamaica 30-Nov-12 0000 GMT -4:00 Montserrat Spanish,
Appendix B. Notices Any reference to a Lenovo product, program, or service is not intended to state or imply that only that Lenovo product, program, or service may be used. Any functionally equivalent product, program, or service that does not infringe any Lenovo intellectual property right may be used instead. However, it is the user’s responsibility to evaluate and verify the operation of any other product, program, or service. This information could include technical inaccuracies or typographical errors.
Collecting and recycling a disused Lenovo computer or monitor If you are a company employee and need to dispose of a Lenovo computer or monitor that is the property of the company, you must do so in accordance with the Law for Promotion of Effective Utilization of Resources. Computers and monitors are categorized as industrial waste and should be properly disposed of by an industrial waste disposal contractor certified by a local government.
Turkish statement of compliance The Lenovo product meets the requirements of the Republic of Turkey Directive on the Restriction of the Use of Certain Hazardous Substances in Electrical and Electronic Equipment (EEE). Türkiye EEE Yönetmeliğine Uygunluk Beyanı Bu Lenovo ürünü, T.C. Çevre ve Orman Bakanlığı'nın “Elektrik ve Elektronik Eşyalarda Bazı Zarar lıMaddelerin Kullanımının Sınırlandırılmasına Dair Yönetmelik (EEE)” direktiflerine uygundur. EEEYönetmeliğineUygundur.
Appendix C. Wifi dongle Statement Federal Communication Commission Interference Statement This equipment has been tested and found to comply with the limits for a Class B digital device, pursuant to Part 15 of the FCC Rules. These limits are designed to provide reasonable protection against harmful interference in a residential installation.
SAR compliance has been established in typical laptop computer(s) with USB slot, and product could be used in typical laptop computer with USB slot. Other application like handheld PC or similar device has not been verified and may not compliance with related RF exposure rule and such use shall be prohibited. The USB dongle transmitter is approved for use in typical laptop computers.
Industry Canada statement: This device complies with Industry Canada license-exempt RSS standard(s). Operation is subject to the following two conditions: (1) this device may not cause interference, and (2) this device must accept any interference, including interference that may cause undesired operation of the device. Le présent appareil est conforme aux CNR d'Industrie Canada applicables aux appareils radio exempts de licence.
puissance sont désignés utilisateurs principaux (c.-à-d., qu’ils ont la priorité) pour les bandes 5 250-5 350 MHz et 5 650-5 850 MHz et que ces radars pourraient causer du brouillage et/ou des dommages aux dispositifs LAN-EL. Radiation Exposure Statement: The product comply with the Canada portable RF exposure limit set forth for an uncontrolled environment and are safe for intended operation as described in this manual.
Europe – EU Declaration of Conformity This device complies with the essential requirements of the R&TTE Directive 1999/5/EC.
This product complies with EU requirements regarding restriction of exposure of persons to radio-frequency energy (RF) emitted by telecommunication and radio devices as it is designed and manufactured in such a way as not to exceed the exposure limits indicated by the European Union Commission. The permitted SAR limit for the general population is 2.0 W/Kg. This limit guarantees an ample safety margin that protects all persons regardless of age and health condition.
Latviski [Latvian] Lietuvių [Lithuanian] Nederland s [Dutch] Malti [Maltese] Magyar [Hungarian] Polski [Polish] Português [Portuguese] Slovensko [Slovenian] Slovensky [Slovak] Suomi [Finnish] 1999/5/CE. Ar šo [name of manufacturer / izgatavotāja nosaukums] deklarē, ka [type of equipment / iekārtas tips] atbilst Direktīvas 1999/5/EK būtiskajām prasībām un citiem ar to saistītajiem noteikumiem.
Taiwan 警語 第十二條→經型式認證合格之低功率射頻電機,非經許可,公司,商號或使用者均不得擅自變更頻 率、加大功率或變更原設計之特性及功能。 第十四條→低功率射頻電機之使用不得影響飛航安全及干擾合法通信;經發現有干擾現象時,應立 即停用,並改善至無干擾時方得繼續使用。 前項合法通信,指依電信法規定作業之無線電通信。 低功率射頻電機須忍受合法通信或工業、科 學及醫療用電波輻射性電機設備之干擾。 無線傳輸設備 (UNII) 在 5.25-5.35 秭赫頻帶內操作之無線資訊傳輸設備,限於室內使用。 (4.7.5) 無線資訊傳輸設備忍受合法通信之干擾且不得干擾合法通信;如造成干擾,應立即停用,俟無干擾 之虞,始得繼續使用。 (4.7.6) 無線資訊傳設備的製造廠商應確保頻率穩定性,如依製造廠商使用手冊上所述正常操作,發射的信 號應維持於操作頻帶中。(4.7.
Appendix D. FR Statement FEDERAL COMMUNICATIONS COMMISSION INTERFERENCE STATEMENT This equipment has been tested and found to comply with the limits for a Class B digital device, pursuant to part 15 of the FCC Rules. These limits are designed to provide reasonable protection against harmful interference in a residential installation.
Canada, avis d'Industry Canada (IC) Cet appareil numérique de classe B est conforme aux normes canadiennes ICES-003 et RSS-210. Son fonctionnement est soumis aux deux conditions suivantes : (1) cet appareil ne doit pas causer d'interférence et (2) cet appareil doit accepter toute interférence, notamment les interférences qui peuvent affecter son fonctionnement.