oCamS-1MGN-U™ Getting Started 2021. 4. WITHROBOT Inc.
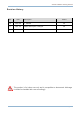
oCamS-1MGN-U Getting Started Revision History Rev Date Description Author 1.0 2019. 08 1st Release PD 1.1 2021. 04 Viewer Description Changed PD This product is for indoor use only and is susceptible to electrostatic discharge. It should be handled with care accordingly. www.withrobot.
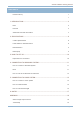
oCamS-1MGN-U Getting Started CONTENTS Revision History 1 1 1. INTRODUCTION ....................................................................................................................... 4 Parts 4 Features 6 Additional Technical Information 7 2. SPECIFICATIONS ...................................................................................................................... 8 Camera Specifications 8 Frame Rates for Each Resolution 8 PCB Dimension 9 LED Display 9 3.
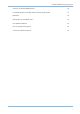
oCamS-1MGN-U Getting Started Accuracy of Distance Measurement 20 Coordinate System of the IMU Sensor and the Image Sensor 21 IMU Data 22 Specification of the Default Lens 24 Lens Holder Dimension 25 How to Update the Firmware 26 Contact for Technical Support 26 www.withrobot.
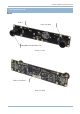
oCamS-1MGN-U Getting Started 1. INTRODUCTION Parts Board Lens Lock Ring Changeable Standard M12 Lens Picture 1. Front USB 3.0 Connector Picture 2. Back www.withrobot.
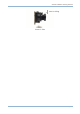
oCamS-1MGN-U Getting Started Lens Lock Ring Picture 3. Side www.withrobot.
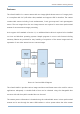
oCamS-1MGN-U Getting Started Features The oCamS-1MGN-U is a stereo camera with two image global shutter sensors of 1 mega pixels. It is compliant with UVC (USB video class) standard and supports USB 3.0 interface. The camera contains IMU sensors including 3-axis accelerometer, 3-axis gyroscope and 3-axis geomagnetic sensor. The two images from the two image sensors are acquired in exact time-synchronized manner for accurate stereo image processing. As it supports UVC standard of version 1.
oCamS-1MGN-U Getting Started and the posture data stream are separated easily as they are recognized as two different USB devices. The oCamS-1MGN-U supports the ROS (Robot Operating System) so that those freely available abundant ROS packages can be used for various applications. Further details can be found at the ROS site (http://www.ros.org/).
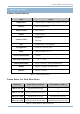
oCamS-1MGN-U Getting Started 2. SPECIFICATIONS Camera Specifications Item Value Image Sensor ⚫ OnSemi AR0135 CMOS Image Sensor, 1/3 Type Interface ⚫ USB 3.0 SuperSpeed Output Format ⚫ Monochrome Shutter ⚫ Global Shutter ⚫ Brightness ⚫ Exposure Lens ⚫ Standard M12, Exchangeable OS Supported ⚫ Windows 7 and 10, Linux Power ⚫ USB Bus Power, DC 5V Current Comsumption ⚫ 250 mA Operating Temperature ⚫ Field of View (FOV) ⚫ 50˚(V) x 92.
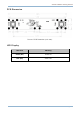
oCamS-1MGN-U Getting Started PCB Dimension Picture 6. PCB Dimension (unit: mm) LED Display LED Color Meaning Green (D5) Power On Red (D6) Video Out www.withrobot.
oCamS-1MGN-U Getting Started 3. HOW TO SET-UP Preparation for Connection The oCamS-1MGN-U is connected to a host system with a USB cable. Both of USB 2.0 and USB 3.0 cables can be used, however USB 3.0 should be used for higher resolution images. The connectors for USB 2.0 and USB 3.0 are different on a host system, so that the right connector should be selected for optimal operation. USB 3.0 Cable USB 2.0 Cable Picture 7. Supported USB Cable Types www.withrobot.
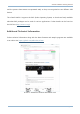
oCamS-1MGN-U Getting Started 4. CONNECTION TO WINDOWS SYSTEM How to Connect to Windows System After connecting the oCamS-1MGN-U, the connection can be checked by reviewing the device manager. On successful connection, the oCamS-1MGN-U should be appeared under the camera devices, and the IMU should be appeared as USB serial device with the assigned COM port number under the COM & LPT port. Picture 8.
oCamS-1MGN-U Getting Started How to Use the oCamViewer for Windows A viewer program for Windows is provided as a sample source code along with an executable binary file at the following site. https://github.com/withrobot/oCam/tree/master/Software/oCam-viewer_Win A user manual for oCamViewer is available at the following site. http://withrobot.com/en/technical-data/?uid=87&mod=document&pageid=1 www.withrobot.
oCamS-1MGN-U Getting Started 5. CONNECTION TO LINUX SYSTEM How to Connect to Linux System After connecting the oCamS-1MGN-U, the connection can be checked by using the "lsusb" command. On successful connection, "Cypress Semiconductor Corp" should appear as follows: $ lsusb Bus 004 Device 026: ID 04b4:00f9 Cypress Semiconductor Corp. The ID of “04b4:00f9” signifies the connection is made as USB 3.0, and the ID of “04b4:00f8” signifies USB 2.0. For Linux system of Ubuntu16.
oCamS-1MGN-U Getting Started How to Install the ROS 1. Install Ubuntu 16.04 LTS Version following the instruction at: https://tutorials.ubuntu.com/tutorial/tutorial-install-ubuntudesktop?_ga=2.268754162.2070293869.1505711601-305972367.1479833539 Note: This instruction assumes only one disk is created on the disk where the Linux is installed. 2. Install the ROS Kinetic Version following the instruction at: http://wiki.ros.org/ROS/Tutorials/InstallingandConfiguringROSEnvironme nt 3.
oCamS-1MGN-U Getting Started 6. Configure the Virtual COM Port for IMU using the following commands: $ sudo vi /etc/udev/rules.d/99-ttyacms.rules ATTRS{idVendor}=="04b4" ATTRS{idProduct}=="00f9", MODE="0666", ENV{ID_MM_DEVICE_IGNORE}="1" ATTRS{idVendor}=="04b4" ATTRS{idProduct}=="00f8", MODE="0666", ENV{ID_MM_DEVICE_IGNORE}="1" $ sudo udevadm control –R 7. Start the package using the following command: $ roslaunch ocams ocams_ros.launch www.withrobot.
oCamS-1MGN-U Getting Started How to Use ROS Packages • Calibration Use the following command to start the calibration: $ roslaunch ocams calibration.launch Further details can be found at the following site to use the ROS camera_calibration package: http://wiki.ros.org/camera_calibration • SLAM Package Use the following command to start the SLAM: $ roslaunch ocams RTAB-Map_slam.launch Further details can be found at the following site to use the ROS RTAB-MAP package: http://wiki.ros.
oCamS-1MGN-U Getting Started 6. NOTES Due to the lens changeable structure of the oCamS-1MGN-U, the focus can be changed unintentionally. To prevent unwanted change of focus, the lens should be tightened using the lens lock ring, especially in the vibration environment. The video out speed, frames per second (FPS), can be affected by the exposure time. If the exposure time is excessively long, the FPS is reduced accordingly.
oCamS-1MGN-U Getting Started APPENDIX Stereo Image Output Format The two time-synchronized images from the two sensors of the oCamS-1MGN-U is multiplexed frame-by-frame to be sent through one USB interface to a host system. The image data from each image sensor is sent through 8 bits data bus and the multiplexed image data from the two image sensors are sent through 16 bits data bus by the USB controller.
oCamS-1MGN-U Getting Started Time Stamp For numerous applications, it is crucial to have a time-synchronized data from various sensors. On the oCamS-1MGN-U, the time stamp information of the onboard IMU sensor is imposed on the image data. The time stamp value is generated using an onboard 32 bit counter which counts up on receiving a pulse with 1 millisecond period. This time stamp value is sent using the first four pixel data as shown below: Picture 11.
oCamS-1MGN-U Getting Started Accuracy of Distance Measurement The accuracy of distance, or depth, measurement using a stereo camera depends on many factors such as image sensor, lens and the distance between the two cameras, i.e., baseline of the stereo camera. Also, the absolute error grows as the distance to the target objects. For the oCamS-1MGN-U with the default lens set, the theoretical measurement error is shown as follows: Picture 12.
oCamS-1MGN-U Getting Started Coordinate System of the IMU Sensor and the Image Sensor The position of the image sensor with respect to the IMU sensor. Picture 13. Image Sensor Positon with respect to the IMU Sensor Image Sensor Image Sensor Positon w.r.t the IMU Sensor (unit: mm) Left 2.4, -28.9, 0.6 Right 2.4, 91.1, 0.6 www.withrobot.
oCamS-1MGN-U Getting Started IMU Data On Linux system of Ubuntu16.04, the oCamS-1MGN-U and the IMU appear as “/dev/video*” and “/dev/ttyACM*” respectively. To access to the ttyACM device, a super user privilege is required and it can be obtained following the procedure describe below. 1. Use a text editor (such as vi or gedit) to create a rule file with the name of “99ttyacms.rules”. $ sudo vi /etc/udev/rules.d/99-ttyacms.rules 2.
oCamS-1MGN-U Getting Started The units of each IMU data are shown as below: Data Unit Expression Accelerometer m/s2 1 m/s2 = 100 LSB Magnetometer µT 1 µT = 16 LSB Gyroscope Rps 1 Rps = 900 LSB Euler Angle Radians 1 radian = 900 LSB Quaternion Quaternion 1 Quaternion = 2^14 LSB 4. The default mode is set as $LMGQUA. The mode can be changed by sending a command to the IMU serial device, COM port or ttyACM, in the following procedure. • Send the command ”@(MODE)\r\n” where (MODE) can be on
oCamS-1MGN-U Getting Started Specification of the Default Lens www.withrobot.
oCamS-1MGN-U Getting Started Lens Holder Dimension www.withrobot.
oCamS-1MGN-U Getting Started How to Update the Firmware The latest firmware can be downloaded from the following site: https://github.com/withrobot/oCamS/tree/master/Firmware The firmware update tool (UpdateFW.exe) can be downloaded from the following site: https://github.com/withrobot/oCamS/tree/master/ Firmware/Update_FW Further details about how to use the UpdateFW.exe can be found at the following site: https://github.