Tested and Listed by: C US Portland Oregon USA OMNI-Test Laboratories, Inc.
TABLE OF CONTENTS 1. INTRODUCTION .................................2 Safety and Environmental Testing.................... 3 Features and Items Included......................... 3 2. INSTALLATION .................................3 Precautions and Specifications...................... 3 Set up and Installation............................. 5 Chimney............................................. 6 3. SENSIBLE WOOD BURNING ........................7 Proper wood burning.................................
Safety and Environmental Testing The H530 Inserts have been tested by OMNI-Test Laboratories, Inc. of Portland, Oregon and are listed to UL 1482 and ULC S628. They are also EPA certified. Features and Items Included Your H530 has a built in convection system, so it creates air circulation in the room to spread the heat faster and more evenly.
Specifications UL 1777 Listed chimney liner (with a 6” (15cm) diameter) up through the block off plate of an existing masonry chimney, a zero-clearance chimney, or Class A, UL-103 HT, 6” (15cm) diameter chimney Dimensions (h x w x d) – 21 ” x 28 ” x 18 ” (53cm x 70cm x 45cm) Firebox Dimensions (h x w x d) – 14” x 24 ” x 12 ” (35cm x 60cm x 30cm) Thermal Output – 20,000 BTU (6 kW); range is 11,100-28,800 BTU Approximate heating area – 600-1,500ft2 Minimum stove pressure at above output – 15 Pascals Efficienc
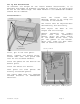
Set up and Installation To minimize the weight of the insert before installation, it is possible and simple to dismount the door by lifting it up and pulling it out of the lower hinge. The wood holder in the combustion chamber should not be removed. Illustration I: Place the insert into the opening. Adjust it by using the 3 screws at the bottom. Door adjustments The insert must be adjusted both horizontally and vertically. Also adjust the door hinges and the fittings.
Chimney The H530 insert must be installed using a code-approved masonry chimney with a 6 ” (15cm) diameter flue liner, a zero-clearance chimney, or a Class A UL-103 HT approved factory-built chimney system. The chimney must extend through the roof at least 3’ (1m), and 2’ (.6m) above any structure within 10’ (3m). The condition of the chimney and height is very important. We suggest a total minimum height of 10’ (3m). Consult a chimney expert with any questions. Do not connect this another appliance.
To fit the insert into the zero-clearance items may be removed: damper, ember catches, viewing screen or curtains. The smoke shelf removed if done without cutting the material the fireplace structure. firebox, the following fire grate, doors, and or baffle can also be or permanently altering When installing into a masonry opening, it is suggested that you wrap the insert with fiberglass or other non-combustible insulation for better heat retention.
conditions that produce an extra-strong draft in the chimney. Never fill the stove completely with wood. It is better to heat a stove up slowly. This will prevent damage to welds and annealing of the iron. Overfilling the firebox also substantially reduces the useful life of the vermiculite panels, as cracks are more easily caused. The log size should be about 2” (5cm) less than the width of the firebox. Start slowly with a “ normal ” fire from the bottom, and slowly build it up to a maximum of three logs.
Fuel Recently-felled wood contains 60-70% water and must therefore be seasoned before it can be used in a wood burning stove. It must be cut, split and air dried, and must contain no more than approx. 25% water before use. This equates to the wood being left in the open for approx. 1 year covered only to protect against rain. It is very important to always use dry wood. Damp wood requires a lot of air for combustion, as extra energy in the form of heat is needed to dry it out.
Lighting the stove 1. Make sure the air vent is in the fully open position (move the handle to the left as shown by the wide end of a triangle). 2. Add crumbled paper / firelighters and kindling wood to the bottom of the fire box (combustion chamber). 3. The kindling (about 3 lbs or 1.5 kg) is to be built up crosswise. 4. Light the fire. 5. The door should be ajar for a couple of minutes during the lighting phase. 6. Once the flames have taken a good hold of the kindling, the door can be shut. 7.
5. TROUBLESHOOTING Combustion problems can arise if the combustion conditions are not optimal. This can be corrected by following the advice given below. Lighting and burning problems are usually due to wet wood or insufficient draft.
6. MAINTENANCE Gaskets and vermiculite panels are parts which need to be replaced from time to time – depending on how much you use your stove. In some cases, you may need to replace them every year, while in others, replacement every second or third year will suffice. As a rule of thumb, gaskets need to be replaced when it has become flattened and the door no longer fits tightly against the front of the stove. You can purchase gaskets – with adhesive – from your local dealer.
soil or otherwise locally dispersed, they should be retained in the closed container until all cinders have thoroughly cooled. Creosote – formation and need for removal Refer to the Section on Fuel on Page 9. Insure there is sufficient air supply to avoid incomplete combustion and formation of creosote. Interior cleaning Make sure it is possible to access the chimney for sweeping and cleaning. 7. WARRANTY New wood-burning inserts from Jydepejsen A/S come with a 5-year warranty.
Version: 10/09 Page 14