
User's Manual


64 Furniture Wizard CPT-8061 Wireless Scanner Use and Installation v10
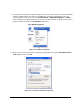
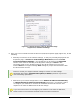
11. When in the menu, enter 1 to configure Access Point. The following menu is then displayed
(Figure 58):
Figure 58: Access Point Configuration Settings
12. You must enter the correct network configuration settings for your Access Point receiver into
this menu. Press any key to enter the following parameters; refer back to the original
network settings you recorded in Section 1 of the Settings Worksheet (back in Step 4) when
doing so:
As you enter each of these settings into Access Point, manually record them in
Section 2 of the Settings Worksheet (entitled “Access Point Settings”). You will
need to enter some of these settings into each CPT-8061 wireless scanner when
configuring them later in the chapter!
New IP: Enter an IP address in the same range as used in your local area network;
however an unused one must be specified. For example, if 192.168.254.40 was
used in the original setting, enter 192.168.254.205.
New Subnet Mask: Enter the original Subnet Mask setting recorded in Step 4.
New Router IP: Enter the original Default Gateway setting recorded in Step 4.
New Name: Enter a user-assigned name (for example, FurnWiz) for the Access
Point receiver.
New PIN Code: Enter a unique five digit number (no alpha characters) to password
protect the IP Address and Subnet Mask settings for the Access Point. Write the PIN
down and don’t loose it!
Authentication: Set this to 1 (Enable).
After completing all entries, press <Exit> to exit the Configuration menu, then close
the Telnet session.
13. Reset the Internet Protocol (TCP/IP) Properties page for your local area network back to the
original network settings you recorded in Section 1 of the Settings Worksheet. Refer
to steps 4 through 6 for details on how to do this.