SuperPen Operation Manual, Version 2.34 Table of Contents Part 1: Introducing the SuperPen 4 How to Use this Manual ................................................................................... 5 Conventions...................................................................................................... 5 Package Contents ............................................................................................ 5 Registration...................................................................
SuperPen Operation Manual, Version 2.34 Translation Screen........................................................................................ 30 Dictionary Entry Screen ................................................................................ 31 Using the Quicktionary Menu........................................................................ 34 Dictionary ...................................................................................................... 34 Preferences.......................
SuperPen Operation Manual, Version 2.34 Selecting an Application................................................................................ 80 Managing Files.............................................................................................. 81 Editing Files .................................................................................................. 82 Searching for Text in a File ........................................................................... 84 Printing a File ............
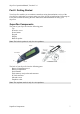
SuperPen Operation Manual, Version 2.34 Part 1: Introducing the SuperPen Congratulations on your choice of a state-of-the-art WizCom SuperPen. Inside its tip, your SuperPen contains a sophisticated electronic eye mounted above two rollers. This eye enables you to scan different types of printed information, such as notes, addresses, business cards, Internet links, and tables, directly into your SuperPen. The Quicktionary application enables you to scan printed text and view its translation.
SuperPen Operation Manual, Version 2.34 How to Use this Manual The SuperPen Operation Manual is designed to help you get the most out of the varied and sophisticated functions of the SuperPen and its accompanying QuickLink Desktop application. Each section explains one or more functions in full, and the index at the end of the manual helps you find particular options or steps in a procedure. The manual is divided into the following sections: Part 1: Introducing the SuperPen, p.
SuperPen Operation Manual, Version 2.34 Two “AAA” batteries Registration card Operation manual SuperPen CD-ROM. For information on the contents of the CD-ROM, see Part 3: The SuperPen CD-ROM, on p. 18. Registration Before you begin using your SuperPen and QuickLink Desktop application, register your SuperPen product by filling out and mailing in the registration card, or by registering online at the WizCom website.
SuperPen Operation Manual, Version 2.34 Part 2: Getting Started Your SuperPen enables you to translate scanned text using the translation services of the Quicktionary application or scan text using one of the QuickLink applications. Following are a few short sections describing the basic instructions and information for using your SuperPen.
SuperPen Operation Manual, Version 2.34 Setting Up the SuperPen Step 1. Insert Batteries 1. Remove the battery compartment cover from the back of the SuperPen. 2. Insert two “AAA” batteries (included in packaging) in the correct direction. 3. Replace the battery compartment cover. Step 2. Remove Protective Cover When scanning, remove the protective cover from the tip so that the electronic eye is exposed. Always replace the cover when you are done scanning.
SuperPen Operation Manual, Version 2.34 Basic SuperPen Commands The SuperPen Buttons and their Functions The keypad has seven buttons, as shown in the figure below. The functions of each button are listed below. Button Function Turns the SuperPen on and off. Enters a menu option or a command. Switches the SuperPen to scan or edit mode. Toggles a checkbox on or off. A checkmark (√) is displayed when it is on. Returns you to the previous menu. Closes a pop-up alert or message box. Exits the Edit Menu.
SuperPen Operation Manual, Version 2.34 Scrolls to the left within an option, a line of text or a table. Toggles a checkbox on or off. A checkmark (√) is displayed when it is on. In Edit mode: When double-clicked, jumps to the beginning of the line. In the View Addresses list, displays the Addresses menu. In the View Links list, displays the Links menu. In Tables: When long-pressed, jumps to the beginning of the row. Shows Scanning Options in New Address/Link. Resets the default file name in Notes/New File.
SuperPen Operation Manual, Version 2.34 Converters To use the QuickLink communications cable or an external infrared device, you must connect it to a 9-pin serial port on your computer. If your computer does not have a 9-pin serial port available, use one of the following types of converters: USB to 9-pin serial converters: Some computers, especially laptops, may have a USB port instead of a serial port.
SuperPen Operation Manual, Version 2.34 Note: The CD-ROM contains additional options, see Part 3: The SuperPen CD-ROM on p. 18. Install the QuickLink Desktop on your PC While the SuperPen can be used as a stand-alone device, having the QuickLink Desktop up and running on your computer enables you to scan directly to the computer and transfer information between the SuperPen and the computer. To install the QuickLink Desktop: 1.
SuperPen Operation Manual, Version 2.34 9. After the program files are installed, a dialog box appears, and asks “Would you like the QuickLink Desktop to launch each time you start your computer?” If you select Yes, you will be able to use the QuickLink Desktop to initiate communications between your SuperPen and any of the applications on your computer whenever the computer is turned on.
SuperPen Operation Manual, Version 2.34 The speller is used to enhance the scanning capabilities of your Pen, when scanning in the selected scanning language. Note: To view the list of Scanning Languages available on your Pen, from the Pen Main Menu select Preferences and select Scanning Language. When selecting one of the languages, a message will appear - if that language does not have a supporting speller. You will be able to scan in this language regardless. Press to continue.
SuperPen Operation Manual, Version 2.34 use the CD-ROM packaged with the SuperPen. For more information on using the CD-ROM, see Part 3: The SuperPen CD-ROM on p. 18. To scan text using the Quicktionary application: Note: To use the SuperPen buttons, refer to The SuperPen Buttons and their Functions, on p. 9. 1. Remove the protective cover. Press to turn the SuperPen on. The Main Menu appears. If the Main Menu does not appear, press to access it. 2.
SuperPen Operation Manual, Version 2.34 3 4 The rollers should touch the page firmly but lightly. Experiment by holding the SuperPen at different angles, between 75° and 90°, to find the optimal angle for the font you are scanning. 5 Experiment by changing the speed at which you roll the SuperPen when you scan. Slower scanning generally provides better results. Try scanning from right to left instead of from left to right. Wait until the Reading message disappears before scanning again.
SuperPen Operation Manual, Version 2.34 or by pressing while using the Translation screen. The Dictionary Entry screen is displayed below. Homonym number Word List sign Headword Phonetics Part of speech (e.g., noun) Scroll arrow Translation Dictionary Entry screen For more information on how to use the Dictionary Entry screen, see Understanding Dictionary Entries, on p. 31.
SuperPen Operation Manual, Version 2.34 After Scanning into a QuickLink Application If the highlighted scanned text contains errors, press to erase it, and then rescan. If the scanned text is OK, rescan to practice the technique. Note: To add a new paragraph in Notes, press before you scan. When you are done scanning, press three times to return to the Main Menu. QuickLinking from the SuperPen to the Computer You are now ready to “quicklink” the scanned information from your SuperPen to your computer.
SuperPen Operation Manual, Version 2.34 An installation program for installing the free add-on Image Capture application to your Pen and PC. The Add\Remove Pen Components dialog (this is an advanced feature). Documentation. Starting the SuperPen CD-ROM: 1. Close any open Windows applications. 2. Insert the SuperPen CD-ROM into the CD drive of your computer. The CD-ROM’s opening screen appears. Note: If the opening screen does not appear automatically: Click the Windows Start button and select Run.
SuperPen Operation Manual, Version 2.34 only if you are adding a new version of that component to the SuperPen at the same time, otherwise your SuperPen will not operate properly. Note: If your Pen is not functioning as expected after adding or removing Pen components, your Pen may be missing interdependent components. In such cases it is recommended to use the Pen Customization Wizard from the SuperPen CD-ROM to reinstall all the necessary components for the default SuperPen.
SuperPen Operation Manual, Version 2.34 Part 4: SuperPen Main Menu Options The SuperPen Main Menu options enable you to access the QuickLink and Quicktionary applications, configure the communication and default settings, and view important information regarding your SuperPen. Simply turn on the SuperPen to access the Main Menu and navigate the Main Menu list of options. Note: The first time you turn on your SuperPen, it opens in the Main Menu.
SuperPen Operation Manual, Version 2.34 Note: The QuickLink Desktop must be running in the background to enable the transferal of data to the Windows application. QuickLink Activates the QuickLink process, which exchanges information between your SuperPen and the computer. For more information on using the QuickLink function, see Using the QuickLink Function on p. 62. Note: The QuickLink Desktop must be running for the QuickLink process to be completed successfully.
SuperPen Operation Manual, Version 2.34 SuperPen in order to perform functions other than quicklinking data or scanning from the SuperPen to the computer. Select the PC-Controlled Communications menu option to: Add and remove SuperPen components. Compact flash memory space on your SuperPen. Rearrange the applications on your SuperPen. View information about the components on your SuperPen. To activate the communications mode on the SuperPen: 1.
SuperPen Operation Manual, Version 2.34 2. Scroll to the desired language and press . Communications Settings The Communications Settings option contains two submenus for setting up communications between your SuperPen and computer: Connection Device and Baud Rate. The settings for these options should always be the same as their settings on the QuickLink Desktop (see Communications Settings on p. 86).
SuperPen Operation Manual, Version 2.34 Pitch Select this option to adjust the pitch of the speaker. 1. Select Pitch. 2. Scroll to the pitch you want, using pitch. 3. Press or . The higher the number, the higher the . Note: The Pitch option is only available for the Quicktionary application on voice-enabled SuperPens. Reading Speed This option enables you to adjust the speed at which the Quicktionary application pronounces words. 1. Select Reading Speed. 2.
SuperPen Operation Manual, Version 2.34 1. Select Menu Type. 2. Scroll to the menu type you prefer and press . Long-Press Interval Select this option to adjust the amount of time you need to keep a button pressed when you perform a long press, i.e., press the key for longer than a click. This enables you to use additional SuperPen commands. For example, a long press on pronounces a highlighted word where this feature is included. 1. Select Long-Press Interval. The adjustment bar appears. 2.
SuperPen Operation Manual, Version 2.34 The Memory Status option is especially useful when adding components to your SuperPen, as it enables you to determine whether the flash memory card contains enough free memory. Note: You can also use the Add/Remove Components dialog box of the QuickLink Desktop to check the memory status of your SuperPen. See p. 91. Compact Memory Maximizes free space on the SuperPen's flash memory card by compacting components on your SuperPen.
SuperPen Operation Manual, Version 2.34 Part 5: Working with the Quicktionary The Quicktionary application allows you to scan either a single word or full line of text in English and view definitions of the text according to the English dictionary (American Heritage Concise) or its translation to one of the following languages: Note: An updated list can be viewed at http://www.wizcomtech.com/super.
SuperPen Operation Manual, Version 2.34 To install a dictionary onto your SuperPen: 1. Close any applications that are running on your computer. It is especially important to close applications that use the serial port of your computer, like PDAs or digital camera applications. (Check for their icons in the System Tray.) 2. If you are working on Windows NT or XP, log on as an NT administrator, and make sure you are not on a network. 3. Insert the SuperPen CD-ROM into the CD drive of your computer.
SuperPen Operation Manual, Version 2.34 Scan in the text you want to translate according to the scanning instructions in Learning to Scan using the Quicktionary Application, on p. 14. The Quicktionary application processes the text you have scanned and displays its translation in one of two screens, i.e., the Translation screen or the Dictionary Entry screen. Both are explained in detail below. Translation Screen The Translation screen appears whenever you scan in more than one word at a time.
SuperPen Operation Manual, Version 2.34 You can scan again while in the Dictionary Entry screen. The current text is overwritten. Dictionary Entry Screen The Dictionary Entry screen displays the dictionary entry and translations for a single word. If the scanned word is not a dictionary entry, but a derivative of one, the corresponding dictionary entry appears. If you scan in a single word, the Quicktionary application jumps automatically to the Dictionary Entry screen.
SuperPen Operation Manual, Version 2.34 the symbol appears to the right of a translation, continue scrolling downward to view additional translations of the entry. Idioms** – Expressions, phrasal verbs, and multiple-word nouns containing the headword. These are listed below the translations of the headword.
SuperPen Operation Manual, Version 2.34 2. Press 3. Scroll to the word you want and press appears. 4. To return to the word list, press 5. To exit the list without making a selection, press . The word list for the selected word appears. . The dictionary entry for the selected word . . Homographs∗ A homograph is a word that has more than one pronunciation with a corresponding separate meaning. If, when Auto Speak is activated (see the section Quicktionary Menu Options, on p.
SuperPen Operation Manual, Version 2.34 Compound Words∗∗∗ If you scan a word that is not a dictionary entry, but is a compound word consisting of existing dictionary entries (e.g., in German), the Quicktionary application separates the compound word into its respective entries. The translation of the primary word in the compound word appears first, with the word list sign next to it. To display the dictionary entry for another part of the compound word: 1.
SuperPen Operation Manual, Version 2.34 Adjacent Entries This option displays a list of all headwords in the current dictionary, placing you on the last word you translated or the last History word you selected. If you haven’t translated a word or selected a History word during the current session, it places you on the first word in the dictionary. You can then scroll through the list to find a different word in order to view its translation. 1. Select Dictionary, then select Adjacent Entries. 2.
SuperPen Operation Manual, Version 2.34 Inverse Select this preference if you are scanning inverse text (light-colored text on a dark background). To toggle Inverse on or off, press , or . 9 = on, an appears in the upper-right corner of the Input screen, indicating that the device is in inverse mode. When inverse text mode is selected, the red light in the tip of Quicktionary blinks rapidly.
SuperPen Operation Manual, Version 2.34 Abbreviations Guide∗∗∗ This option displays a list of abbreviations used in the current dictionary, and displays the or . word to which each abbreviation in the list refers. Scroll through the list, using Dictionary Guide∗∗∗ The Dictionary Guide displays information about the dictionary, such as which elements are and . hidden in reduced display mode.
SuperPen Operation Manual, Version 2.34 Part 6: Scanning Information into the QuickLink Applications The QuickLink applications are accessed via the SuperPen Main Menu and include the following applications: Notes Address Book Internet Links Tables Scan to PC Also appearing in the QuickLink Main Menu is the QuickLink function, which enables transmission of data already scanned or stored in the Notes, Address Book, Internet Links, and Tables applications. If you added additional applications, e.g.
SuperPen Operation Manual, Version 2.34 Edit the text manually using the Character Bar. Press , or to de-highlight the text, and then press to display the Character Bar. For instructions on how to use the Character Bar, see p. 70. Edit the text manually using the Opticard. Scan the Opticard key on the Opticard and begin scanning Opticard keys as needed. For instructions on how to use the Opticard, see p. 73. 4. To insert a new paragraph before scanning the next line of text, press 5.
SuperPen Operation Manual, Version 2.34 Delete File Deletes a Notes file: 1. Select Delete File. 2. Select the file you want to delete. 3. Select Yes when the confirmation message appears. Beaming Sends and receives Notes files using infrared communications. You can use this option to send a Notes file to an IrOBEX-compliant device like a PDA or a cell phone, or to receive a note from such a device and save it in a Notes file on the SuperPen. Sending a Note 1.
SuperPen Operation Manual, Version 2.34 Editing Notes To edit an open Notes file, either press to access the Edit Menu, press Character Bar, or scan the Opticard key to activate the Opticard. to access the Note: If some of the text in a Notes file is highlighted, press , or to de-highlight the text before you begin editing it. Otherwise, the highlighted text will be deleted when you begin editing the file. The Notes Edit Menu In addition to the standard Edit Menu options (see p.
SuperPen Operation Manual, Version 2.34 Double-click this button To move the cursor to The first line of the current paragraph. The last line of the current paragraph. The left edge of the current line. The right edge of the current line. Using the Address Book Application In the Address Book application you can store names, addresses, phone numbers, and other contact information. The Address Book consists of a database of Address entries.
SuperPen Operation Manual, Version 2.34 Note: By default, the Address and Notes fields are in Multiple Lines mode (see Field Settings on page 45). 5. If a field is inaccurate, press the following tasks: to scroll back up to the field, and then perform one of Scan it again. Edit it manually using the Character Bar. Press or to de-highlight the text, and then press to display the Character Bar (see p. 70). Edit it manually using the Opticard.
SuperPen Operation Manual, Version 2.34 Scroll Screen When Scroll Screen is selected, the display scrolls, rather than jumps, to the following field each time you finish scanning a line. This is the default. To toggle Scroll Screen on or off, press it is on. , , or . A checkmark (√) is displayed when Auto Advance When Auto Advance is selected, the display moves automatically to the next field when you finish scanning a line. This is the default.
SuperPen Operation Manual, Version 2.34 Field Settings Select the Field Settings option to change the default scanning options for each type of field. Adjusting these settings can increase scanning accuracy. For example, you might choose the Numeric field setting for the Business Phone field, because all of the characters that you scan into this field are numerals. The following scanning options are available for each field. You can select any or all of these settings for each field.
SuperPen Operation Manual, Version 2.34 To manually enter the file name, press twice to access the Character Bar, or scan the Opticard key of the Opticard to activate the Opticard. The file name field will then be in Edit mode. 3. Select OK. Note: You cannot delete the mainadd file from your SuperPen. Open File Select this option to open an existing file if you have created your own Address Book files. 1. Select Open File. 2. Select the file you want to open.
SuperPen Operation Manual, Version 2.34 3. Send the Address from the device. When the SuperPen receives the Address, it displays the message "Received successfully." Note: To use the Beaming feature, you must align the IR ports of the two devices. The IR feature is located at the bottom of the SuperPen. Selecting and Sending your Business Card You can select one Address as your Business Card, and always have it ready to send immediately. The Address you choose must be in the mainadd Address Book file.
SuperPen Operation Manual, Version 2.34 The Addresses Menu The Addresses menu contains options for finding, deleting, viewing, and editing Addresses in the current file. To display the Addresses menu: 1. Select View Addresses. 2. Press to open the menu. To search for an Address, press from anywhere in the list of addresses. To delete, view, or edit a particular Address in the list, scroll to that Address, and press .
SuperPen Operation Manual, Version 2.34 View Address Select this option to view an Address. 1. Select View Addresses. 2. Scroll to the Address you want to view. 3. Press . 4. Select View Address. The Address is displayed in View mode. You can scroll through the Addresses but you cannot make any changes. Editing Address Book Files To edit an open Address Book file: 1. Press to switch to Scan Only mode. The First Name appears, highlighted in black. 2. Scroll to the field you want to edit. 3.
SuperPen Operation Manual, Version 2.34 Navigation Shortcuts Double-clicking the arrow buttons on you SuperPen quickly moves the cursor around the current field of an Address Book entry. Double-click this button To move the cursor to: The beginning of the field The end of the field Using the Internet Links Application The Internet Links application is a database of Internet Links.
SuperPen Operation Manual, Version 2.34 2. Select the Link you to want to view. The Link appears in View mode. You can scroll through the entry to view it, but cannot make any changes. To edit the selected Link: 1. Press to switch to Scan Only mode. 2. Scroll to the field you want to edit. 3. Scan new text to replace the highlighted text, or press 4. Once in Edit mode, press to switch to Edit mode. to access the Edit Menu. 5.
SuperPen Operation Manual, Version 2.34 Next Link Language Next Link Language enables you to temporarily change the scanning language for the next Internet Link you scan. The change in language only affects the description. To change the language prior to creating the new Link: 1. Select Next Link Language. 2. Select the language you want. New File The Internet Links application comes with a main file, called mainlnk.
SuperPen Operation Manual, Version 2.34 1. Select Delete File. 2. Select the file you want to delete. 3. When the confirmation appears, select Yes. Note: If you delete the current file from your SuperPen, you must open an existing file prior to adding Links. Exit Select this option to return to the Main Menu. About Select this option to view information about the Internet Links application, including the current version number.
SuperPen Operation Manual, Version 2.34 To edit the selected Link: 1. Press to switch to Scan Only mode. 2. Scroll to the field you want to edit. 3. Scan new text to replace the highlighted text, or press 4. Once in Edit mode, press to switch to Edit mode. to access the Edit Menu. 5. Press to display the Character Bar, or scan the Opticard key on your Opticard to begin using the Opticard. Edit Link Select this option to display a Link to edit. 1. Select View Links. 2.
SuperPen Operation Manual, Version 2.34 Double-click this button To move the cursor to: The beginning of the field The end of the field Using the Tables Application The Tables application is used to store information in the form of tables. Each Table file has rows, columns, and cells. To use the application, scan text into cells in the file. After you have scanned text into a cell, you can edit it by using the Character Bar or the Opticard.
SuperPen Operation Manual, Version 2.34 Edit it manually using the Character Bar. Press to remove the highlighting from the text, and press again to display the Character Bar. Press to close the Character Bar. Press twice to continue entering text into the table. Edit it manually using the Opticard. Scan the Opticard key on the Opticard and twice to begin scanning Opticard keys as needed. When you are done, press continue entering text into the table. 4. Press to scroll to the next cell in the row. 5.
SuperPen Operation Manual, Version 2.34 When the Multiple Lines option is activated, a prompt appears in the upper right corner of the cell, indicating how many lines are in the cell and which is the current line. For example, 2/3 indicates that this is the second line of three. Add a single line before the current line by selecting Insert Line from the Edit Menu. Right-to-Left Tables By default, tables are built in a left-to-right direction, with the first cell of the table in the upper left corner.
SuperPen Operation Manual, Version 2.34 Adding Columns: To add columns to the Table after the total number of Table columns was defined: 1. At the end of the current row, press prior to scanning text into the last cell in the row. An additional column is added to the Table. to return to the previous cell and continue scanning in text. 2. Press Correcting inaccurate text: Press to return to the previous cell to rescan or edit it. To toggle Auto Advance on or off, press it is on. , , or .
SuperPen Operation Manual, Version 2.34 Exit Select this option to return to the Main Menu. About Select this option to view information about the Tables application, including the current version number. Editing Tables An open Tables file can be edited cell-by-cell, as follows: 1. Scroll to the cell you want to edit using , , , or 2. Press . to go into Edit mode. 3. Use the arrow buttons to move the cursor to the text you want to modify.
SuperPen Operation Manual, Version 2.34 Remove Row Removes the current row from a Table. Remove Column Removes the current column from a Table. Insert Line Inserts an additional line in the current cell, after the current line. Note: To add a line at the end of a cell when the Multiple Lines option is activated for a Table, scroll to the last line in the cell and press . Delete Line Deletes the current line from the cell.
SuperPen Operation Manual, Version 2.34 3. If you are using serial port communications, attach your SuperPen to the computer. If you are using an external infrared device, make sure the device is attached to the serial port on your computer. 4. On your computer, select Scan to PC Settings from the Pen Communications menu of the QuickLink Desktop window or from the pop-up menu of the QuickLink Desktop icon (see p.75). The Scan to PC Settings dialog box appears. 5.
SuperPen Operation Manual, Version 2.34 When Send Immediately is de-selected, each line you scan appears on the SuperPen display. Press to send the scanned text to the computer. This is the preferred setting when your SuperPen and computer are communicating via infrared technology. When Send Immediately is de-selected you can also: Scan again to overwrite the current scan prior to sending. Press to abort the scan. Press to save the line and continue scanning. Press after each line you scan.
SuperPen Operation Manual, Version 2.34 Host Applications The QuickLink process can format data for other applications on your computer. For example, it can save copies of your Notes files in Microsoft Word format, add your Internet Links to the “Bookmarks” folder of Netscape Navigator, or copy the addresses in your Microsoft Outlook Address Book to the SuperPen Address Book mainadd file. Applications on your computer for which data is formatted in this way are called host applications.
SuperPen Operation Manual, Version 2.34 Step 3. Open the Host Settings Dialog Box The current host application for each QuickLink application is listed in the QuickLink Settings dialog box. If you want to change any of the host application settings, click the Host Settings button. The Host Settings dialog box appears. The dialog box displays a table in which the QuickLink applications on your SuperPen and their host settings are listed: Application: A list of the QuickLink applications on your SuperPen.
SuperPen Operation Manual, Version 2.34 Step 5. Select QuickLink Settings for Each Application The QuickLink settings for each QuickLink application are listed in the Mode and Flush columns of the QuickLink Settings dialog box. QuickLink Modes Four QuickLink modes are defined. Only some of these modes are available for each application. Synchronize Pen and PC The records on the SuperPen and computer are synchronized, resulting in identical data files on the SuperPen and the computer.
SuperPen Operation Manual, Version 2.34 4. If, after copying data from the SuperPen to the computer or synchronizing data between the two, you want all of the data files of that application to be erased from the SuperPen, click the Flush checkbox. 5. Click OK. Step 6. Close the QuickLink Settings Dialog Box 1.
SuperPen Operation Manual, Version 2.34 Part 7: Viewing, Editing, and Manually Entering Text in the SuperPen The SuperPen has a number of features that help you view and edit text that is already on your SuperPen, and manually enter text. You can use these features to add or delete characters, lines, or paragraphs. Editing Modes Text fields on the SuperPen are always in one of three modes: Scan Only, Edit, or View. Each text field opens in one of these modes.
SuperPen Operation Manual, Version 2.34 enter text, overwrite or insert characters (see p. 70). You can also use the Opticard to enter words manually, overwrite or insert characters (see p. 73). Use the SuperPen’s double-click feature to jump to the edge of the scanned text. Doubleclick to jump to the beginning of the text or press to jump to the end. Press to open the Edit Menu. For instructions, see Accessing the Edit Menu on p. 68.
SuperPen Operation Manual, Version 2.34 Insert Mode.) The SuperPen returns to Insert mode when you move the cursor to a different field, finish editing an entry, or exit from the current file. Scanning Options Scanning options enable you to specify temporary scanning settings. The scanning options return to their default settings when you go to another field, exit from the application, or turn off the SuperPen. The following scanning options are available: Numeric: For a string of numbers.
SuperPen Operation Manual, Version 2.34 Entering Text Manually The SuperPen has two facilities for manual entry of characters, the Character Bar and the Opticard. The services these features provide are essentially identical. In certain situations, you may find it more convenient to use the Character Bar to edit text. In other situations, you may prefer to use the Opticard.
SuperPen Operation Manual, Version 2.34 If you switch the scanning language of your SuperPen to a language that uses non-Latin characters (e.g., Hebrew), the Character Bar displays an additional Alphabet symbol for returning to the Latin character set. A Hebrew Character Bar with a Latin Alphabet button Multiple Characters The Multiple Characters symbol indicates that you are in Multiple Characters mode. In this mode, you can use the Character Bar to enter more than one character at the cursor.
SuperPen Operation Manual, Version 2.34 8. If you are in Multiple Character mode, you can add additional characters. To do so, repeat steps 6 and 7. When you are done, press to close the Character Bar. If you are in Single Character mode, the Character Bar automatically closes. Entering Character Variations To enter a variation of a character (e.g., in upper-case or with an accent): 1. Scroll to the letter in the Character Bar. or . The Character Bar is replaced by a list of variations for the selected 2.
SuperPen Operation Manual, Version 2.34 Deleting Characters To delete a character: 1. Scroll to the character you want to delete. 2. Press to access the Character Bar. 3. Make sure you are in Multiple Characters mode if you want to delete more than one character. 4. Scroll to the Delete symbol and press . 5. If you are deleting more than one character, press sequence that you want to delete.
SuperPen Operation Manual, Version 2.34 4. Slowly scan the key of a letter, from right to left or from left to right, or touch the key gently with the tip of your SuperPen. The letter appears in the SuperPen display. You can use the following keys or combinations of keys to enter the letters you want: Lower-Case Letters: To enter a lower-case letter, scan the key of the letter. Upper-Case Letters: To enter an upper-case character, scan the Shift key and then scan the letter key.
SuperPen Operation Manual, Version 2.34 Part 8: Using the QuickLink Desktop Application Installing the QuickLink Desktop To install the QuickLink Desktop - use the option Install the QuickLink Desktop from your SuperPen CD-ROM. For detailed instructions, see Install the QuickLink Desktop on your PC on p. 12.
SuperPen Operation Manual, Version 2.34 Wizard from the SuperPen CD-ROM for customizing the Pen, rather than using the Add/Remove Pen Components option on the QuickLink Desktop. You can also add components from WizCom’s website (http://www.wizcomtech.com/). Perform a variety of other management functions, such as converting SuperPen data files into other file formats (see p. 81), printing SuperPen data files (see p. 84), rearranging the list of applications in the SuperPen’s Main Menu (see p.
SuperPen Operation Manual, Version 2.34 The QuickLink Desktop Window The QuickLink Desktop window is composed of the following sections, as shown in the figure below: Toolbar The Toolbar is a series of buttons located beneath the Menu bar. These buttons allow fast access to some of the menu options. Click a button to select the desired toolbar option. If you place the mouse over the button, a tool tip pops up that displays the button’s name.
SuperPen Operation Manual, Version 2.34 Turn Pen Communications Off/On – Toggles communications with the SuperPen off and on. Current Pen – Specifies the current Pen selected on the QuickLink Desktop. Help - Accesses QuickLink Desktop Help. To open or close the Toolbar, select Toolbar from the View menu. When a checkmark (√) appears beside the option, the Toolbar is open. Status Bar A Status bar appears at the bottom of the QuickLink Desktop window.
SuperPen Operation Manual, Version 2.34 Changing Text Size in the QuickLink Desktop The Text Size option in the View menu enables you to change the text size in the Files and Current File panes. To change the text size: 1. Select Text Size from the View menu. 2. Click the desired text size, i.e., small, medium, or large. Note: This option only effects the display in the QuickLink Desktop window.
SuperPen Operation Manual, Version 2.34 Turn Pen Communications On/Off - Enables or disables communications between the QuickLink Desktop and the SuperPen. QuickLink Settings - Displays the QuickLink Settings dialog box so that you can view and modify the QuickLink settings. Scan to PC Settings - Displays the Scan to PC Settings dialog box so that you can select the character to be inserted after each line of text you scan. Log - Displays the QuickLink log.
SuperPen Operation Manual, Version 2.34 Managing Files You can use the QuickLink Desktop to manage files that you have quicklinked from or that you would like to copy to your SuperPen. Before you begin, select the application you want to work with. Opening a File To open an existing file, select Open from the File menu. A file selector dialog box opens. Select the file you want to open. Its contents are displayed in the right pane of the QuickLink Desktop window.
SuperPen Operation Manual, Version 2.34 4. Click the arrow at the right of the Save as type field. A drop-down list of available file types appears. 5. Select the type of file you want from the list. 6. Click Save. Deleting a File To delete a Notes or Tables file: 1. Right-click the name of the file in the middle pane of the QuickLink Desktop window. A pop-up menu appears. 2. Select Delete File. A confirmation dialog box appears. 3. Click Yes. The file is deleted. To delete any file: 1.
SuperPen Operation Manual, Version 2.34 3. When you are finished editing the paragraph, left-click outside of the paragraph to exit Edit mode. To add a paragraph before a paragraph of a Notes file: 1. Right-click on the paragraph. A pop-up menu appears. 2. Select Add New Paragraph from the menu. A blank new paragraph is displayed in Edit mode. 3. Type text into the new paragraph. 4. When you are finished editing the paragraph, left-click outside the paragraph to exit Edit mode.
SuperPen Operation Manual, Version 2.34 Editing Tables To edit cells in a Tables file: 1. Click the cell to activate Overwrite mode, or double-click the cell to activate Insert mode. 2. Edit the cell. 3. In Insert mode, you can open a pop-up editing menu by right-clicking the cell. 4. When you are finished editing the cell, click outside the cell to exit Edit mode. To add or remove a column or row to a Tables file: 1. Right-click the column head or row number. A pop-up menu appears. 2.
SuperPen Operation Manual, Version 2.34 Adding a Pen When you install the QuickLink Desktop, it automatically assigns the name "MyPen” to the first Pen on the QuickLink Desktop. Ideally, you should add a Pen to the QuickLink Desktop for each Pen you own. It is best to create only one name for each Pen. To add a Pen: 1. Select Pens from the File menu. 2. Select Add. The Add Pen dialog box appears. 3. Type in a name for your Pen. 4. Click OK.
SuperPen Operation Manual, Version 2.34 3. Click Set as Current. 4. Click OK. Communicating between the SuperPen and the Computer QuickLink Desktop gives you the option of working online or offline. When you are working online, communications with the SuperPen are enabled. The QuickLink Desktop occupies a serial port on your computer and is in a state of readiness to receive communications from the SuperPen.
SuperPen Operation Manual, Version 2.34 between the QuickLink Desktop and your SuperPen. To run the Communications Wizard, select Communications Wizard from the Help menu of the QuickLink Desktop. Manually Changing Communications Settings To manually change the communications settings on the QuickLink Desktop: 1. Select Communications Settings from the Pen Communications menu. The Communications Settings dialog box appears. 2.
SuperPen Operation Manual, Version 2.34 Available Components When opening the dialog from the QuickLink Desktop: If you opened the Add/Remove Pen Components dialog box from the QuickLink Desktop, the Available list displays everything in the “Pen Components” folder on your computer’s hard drive which can be found under the directory where the QuickLink Desktop has been installed (e.g., C:\Program Files\QuickLink Desktop\Pen Components).
SuperPen Operation Manual, Version 2.34 2. Click the checkbox next to each type of component to select/deselect it. A checkmark (√) indicates the component is selected. The following types of Pen components are available: • Applications (software programs for your SuperPen) • Dictionaries (for use in the Quicktionary product. See p.
SuperPen Operation Manual, Version 2.34 3. If you change your mind about deleting a component, click the component in the On Pen list, then click Undelete. Warning: In order for one specific feature or application to work, a whole group of components may need to be located on your SuperPen. Therefore, be very careful when deleting components.
SuperPen Operation Manual, Version 2.34 Rearranging SuperPen Applications The App Order button in the Add/Remove Components dialog box enables you to change the order in which the applications appear in the Main Menu of your SuperPen. To rearrange the applications: 1. Turn your SuperPen on and select PC-Controlled Communications from the SuperPen Main Menu. 2. In the QuickLink Desktop, select Add/Remove Pen Components from the Pen Communications menu or the toolbar (or press CTRL+A). 3. Select App Order.
SuperPen Operation Manual, Version 2.34 3. Click Compact. A bar appears on the SuperPen that displays the progress of the compaction process. When the process is completed, the compactable area is converted into free area on the SuperPen. 4. Click Exit. Note: You can also view your SuperPen’s flash memory status and compact the memory directly on the SuperPen. To do so, select Memory Status and/or Compact Memory from the Information submenu. (See Information on p. 26.
SuperPen Operation Manual, Version 2.34 Part 9: Maintaining and Troubleshooting the SuperPen Maintaining Updating and Upgrading Software WizCom frequently makes updates available for SuperPen software. These updates may be for the SuperPen operating system, for the QuickLink Desktop, or for other SuperPen components or features. Support for additional languages may also available. It is a good idea to check the WizCom website (http://www.wizcomtech.
SuperPen Operation Manual, Version 2.34 The data on the QuickLink Desktop can usually be found in C:\Program Files\QuickLink Desktop\PenData\MyPen, where MyPen is the name of your SuperPen. Troubleshooting The following are suggested solutions for problems that may arise when you use your SuperPen. If these solutions fail to solve the problem, or you experience other difficulties, please contact Technical Support.
SuperPen Operation Manual, Version 2.34 Problem: The text in the SuperPen display appears upside down. Solution: Adjust the SuperPen for right-handed or left-handed scanning (see p. 25). Problem: The error message, "Excessive Lighting," appears on the SuperPen display when you try to scan. Solution: Move the SuperPen away from the strong light source (such as sun, lamp, etc.) shining directly on the tip.
SuperPen Operation Manual, Version 2.34 A better scan may be achieved by scanning from right to left rather than left to right. Scanning from left to right does not display the words in the reverse direction. The scanned text will appear at the top of the screen. The first word scanned will appear as light text on a dark background. The translation appears beneath the scanned words. To translate the following word, press the right arrow. To translate the previous word, press the left arrow.
SuperPen Operation Manual, Version 2.34 Problem The SuperPen displays a Flash Format error. Solution A Flash Format error is an upgrade error that rarely appears after an upgrade has been performed, and means that there is faulty or incomplete data in flash. To fix this error: Turn on your SuperPen and press for three seconds. The screen will display: Format Flash Cancel Press . Either run the Pen Customization Wizard from the SuperPen CD-ROM (see p.
SuperPen Operation Manual, Version 2.34 Problem: How can I hear the pronunciation of the scanned text? Solution: Note: Not all SuperPen products contain the voice option. To hear the English pronunciation of scanned text, your SuperPen must be one that supports the voice option and “Auto Speak” must be selected. To select Auto Speak: Select the Quicktionary option from the Pen Main Menu. Press from the Input scanning screen. Scroll down to Preferences and press . Scroll down to Auto Speak.
SuperPen Operation Manual, Version 2.34 Problem: How can I scan a hyphenated word in the Quicktionary application? Solution To scan a hyphenated/divided word (where the first part of the word is on one line and the second part is on the next line): From the Input scanning screen, press to enter edit mode. The black line will disappear and a blinking cursor will appear. Scan the first part of the word, including the hyphen. Scan the second part of the word. The two parts will form a single word.
SuperPen Operation Manual, Version 2.34 Touch the barcodes associated with the letters you wish to scan in order to create the word you wish to translate. The letters appear on the SuperPen screen. To enter a space, scan the spc key. To delete the previous character, scan the Shift key and then the Delete key. When you have created the desired word, scan the Opticard barcode again to exit the Opticard mode. Press the down arrow until Go is selected. Press to view the translation.
SuperPen Operation Manual, Version 2.34 Solutions: Run the QuickLink Desktop and make sure that Pen Communications are on. Run the Communications Wizard from the Help menu (see p. 86). Make sure that the QuickLink communications cable or external infrared device is attached properly to both the SuperPen and computer (see p. 10). Make sure that the same communications settings are defined on both the SuperPen and computer (see p. 86). Your computer may not support the baud rate that is selected.
SuperPen Operation Manual, Version 2.34 you may be able to use it to correct these problems. Otherwise, please contact Technical Support for guidance. Open the Windows Device Manger: right-click My Computer, select Preferences, and click the Device Manager tab. To change the properties of the device, select the device from the list and click Properties. The Properties dialog box opens. To disable a device, select “Disable in this hardware profile” in the General tab.
SuperPen Operation Manual, Version 2.34 Solution: Your Pen does not contain a full set of required components. To correct this problem: a) Make sure that the SuperPen’s batteries have at least 2.5 volts of power left (see p. 27). If they do not, replace them before continuing. b) Run the Pen Customization Wizard from the SuperPen CD-ROM (see p. 13). Problem: The message “Compacting flash memory” appears on the SuperPen display during an update, and the display remains frozen with this message.
SuperPen Operation Manual, Version 2.34 Solution: There may be an Interrupt conflict with another device. See p. 100 for information about dealing with hardware conflicts of this sort. Contact Us WizCom Web Site The WizCom website is located at http://www.wizcomtech.com/. Check the site frequently to stay up-to-date about updates, applications, dictionaries, and other components for your SuperPen.
SuperPen Operation Manual, Version 2.34 Appendix: SuperPen Technical Data Processor ARM 7 TDMI RAM memory 64 to 256KB ROM memory 2MB - 8MB Flash memory 2MB Socket for flash memory cards 2MB/4MB/6MB/8MB (upgradeable) Communications RS232 serial cable and IrDA (including OBEX) Optical head 128 pixels linear array image sensor 400 DPI resolution Display dimensions 61mm x 20mm/2.4”x .8” 122 x 32 pixel resolution Supply voltage Two 1.5v “AAA” batteries Weight 90 grams/3 oz.
SuperPen Operation Manual, Version 2.34 Glossary Term Explanation Baud rate The speed (bits per second) at which data is transmitted. Beam To transfer data between a SuperPen and a PDA by means of an infrared connection. Character set A comprehensive series of characters used to represent a language (e.g., Latin character set for English). Current Pen/file etc. The SuperPen, file, etc., that is currently displayed and accessible for adding data, editing, etc.
SuperPen Operation Manual, Version 2.34 QuickLink To transfer data between the SuperPen and a computer. Record A unit of related data, such as an Address or an Internet Link. ROM Read-Only Memory: Memory that cannot be changed or erased, containing the Operating System. Scanning Language The language that the SuperPen is set to recognize when text is scanned into it. Serial Port A socket at the back of a computer for attaching communication devices.
SuperPen Operation Manual, Version 2.34 Index The following abbreviations are used in this index: def.: Definition (glossary entry) illus.: Illustration .bak file extension, 66 .doc file extension, 82 .qad file extension, 65 .qlk file extension, 65 .qnt file extension, 65 .
SuperPen Operation Manual, Version 2.34 Numerals sequence, 71 Punctuation sequence, 71 Single Character button, 72 Space character, 72 Character set def., 107 Character sets, 72 Characters Deleting, 72, 74, 75 Cleaning the Pen, 94 Colored backgrounds, 18 Colored text, 18 Column Adding to Table, 60 Adding to Table on the Desktop, 85 Deleting from Table, 61 Deleting from Table on the Desktop, 85 Columns, table Adding, 59 Number of, 57, 58 COM port. See Serial port Communications, 87.
SuperPen Operation Manual, Version 2.34 Version number, 81 View menu, 104 View mode, 83 Window illus., 78 Dictionaries, 90 Dictionary entry, 31, 32 Dictionary Entry screen, 16, 31, 35, 34 Dictionary Guide, 38 Disabled functions, 104 Display illus., 7 Don't QuickLink...
SuperPen Operation Manual, Version 2.34 Outlook, 21, 46, 64, 107 QuickLinking with, 64–65 Word, 21, 64 Host folder, 65 Host settings, 64–65 Host Settings button, 64 Icon, Desktop, 76, 80 Icons Add/Remove Components dialog box, 89 Desktop applications, 81 Pen menus, 26 Icons Only menu type, 26 Idioms, 33 Information menu, 22, 28 Infrared communications Beaming, 41, 47–48 Beaming def., 107 Communications settings, 87 Driver, 88 IrComm def., 107 IrDA def., 107 OBEX def., 107 Infrared screen illus.
SuperPen Operation Manual, Version 2.34 Inserting in Tables, 57, 61 Line(s) Per Scroll, 37 Lines, Multiple. See Multiple Lines (scanning option) Links, Internet.
SuperPen Operation Manual, Version 2.34 PC to Pen mode, 66 PC-Controlled Communications, 14, 22, 23, 87, 88, 92, 93 Missing from Main Menu, 103 Problems with, 102 PDA, 4, 41, 47 def.
SuperPen Operation Manual, Version 2.34 Colored text, 18 Fonts, 18 Limitations, 18 On colored backgrounds, 18 Pen angle, 16 Problems with, 95 Right/Left-Handed, 26, 96, 97 Speed, 16 Text size, 18 Tips, 15, 16, 18 Too fast, 18 Scanning language Changing, 24, 42, 45, 53, 60 def.
SuperPen Operation Manual, Version 2.34 Toolbar, Desktop, 78 Transferring data.