
Technical data
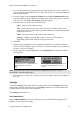
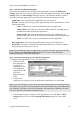
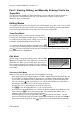

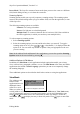
Table Of Contents
- Part 1: Introducing the SuperPen
- How to Use this Manual
- Conventions
- Package Contents
- Registration
- Part 2: Getting Started
- SuperPen Components
- Setting Up the SuperPen
- Basic SuperPen Commands
- Connecting the SuperPen to a Computer
- Using the SuperPen CD-ROM
- Connecting the SuperPen to a PDA or Cellular Phone
- Part 3: The SuperPen CD-ROM
- Part 4: SuperPen Main Menu Options
- Main Menu Overview
- General Main Menu Options
- Part 5: Working with the Quicktionary
- Installing a Dictionary
- Using the Dictionary
- Using the Quicktionary Menu
- Editing Scanned Text in the Quicktionary Application
- Part 6: Scanning Information into the QuickLink Applications
- Using the Notes Application
- Using the Address Book Application
- Using the Internet Links Application
- Using the Tables Application
- Using the Scan to PC Application
- Using the QuickLink Function
- Part 7: Viewing, Editing, and Manually Entering Text in the SuperPen
- Editing Modes
- Entering Text Manually
- Part 8: Using the QuickLink Desktop Application
- Installing the QuickLink Desktop
- Running and Exiting the QuickLink Desktop
- QuickLink Desktop Elements
- Working with QuickLink Applications on the QuickLink Desktop
- Managing Pens on the QuickLink Desktop
- Communicating between the SuperPen and the Computer
- Rearranging SuperPen Applications
- Reallocating Flash Memory
- Part 9: Maintaining and Troubleshooting the SuperPen
- Maintaining
- Troubleshooting
- Contact Us
- Appendix: SuperPen Technical Data
- Glossary
- Index

SuperPen Operation Manual, Version 2.34
4. If, after copying data from the SuperPen to the computer or synchronizing data between
the two, you want all of the data files of that application to be erased from the
SuperPen, click the Flush checkbox.
5. Click OK.
Step 6.
Close the QuickLink Settings Dialog Box
1. If you want the QuickLink Settings dialog box to appear before each QuickLink
operation (to verify the QuickLink options), click the Show this Dialog before each
QuickLink checkbox prior to closing the dialog box.
2. When you are satisfied with the QuickLink settings that are defined for each
application, click Close.
QuickLinking
Once the QuickLink settings are set, quicklinking is a simple process.
Step 1.
Set up communications between your SuperPen and Computer.
1. Make sure that the QuickLink Desktop application is installed and running.
2. Make sure that the communications settings on your SuperPen and computer were set
correctly. If you have run the Pen Customization Wizard (see p. 13) or the
Communications Wizard (see p. 86), these settings should be correct.
3. If you are using serial port communications, attach your SuperPen to the computer. If
you are using an external infrared device, make sure the device is attached to the serial
port on your computer.
Step 2.
Start the
QuickLink
Process.
On your SuperPen, select QuickLink from the Main Menu. The QuickLink process begins.
A QuickLink dialog box appears on your computer screen and provides progress reports.
When the process is complete, a new dialog box appears and says “QuickLink completed
successfully.”
Notes:
QuickLinking to Outlook: If you are quicklinking Notes or Addresses to Microsoft
Outlook, make sure Microsoft Outlook is running before you start quicklinking. This will
speed the quicklink process.
QuickLinking to Netscape Navigator: If you are quicklinking Internet Links to
Netscape Navigator, make sure it is closed before you start quicklinking. You cannot
quicklink to Netscape when it is running.
Using the QuickLink Function
66