CONFIDENCE IS EVERYTHING.
© 2009 Wohler Technologies, Inc. and PANORAMA. All rights reserved. This publication is protected by federal copyright law. No part of this publication may be copied or distributed, stored in a retrieval system, or translated into any human or computer language in any form or by any means electronic, mechanical, manual, magnetic, or otherwise, or disclosed to third parties without the express written permission of Wohler Technologies.
AMP1A Series User Guide Introduction Overview The AMP1A Series of audio monitors provides self-powered, fullfidelity stereo monitoring in the smallest rack space possible.
A M P 1 A S e r i e s U s e r G u id e S a f e t y I n s tr u c ti o n s Safety Instructions IMPORTANT: 1. Read, keep, and follow all of these instructions; heed all warnings. 2. Do not use this equipment near water. 3. Use only a dry cloth to clean the equipment. 4. Do not block any ventilation openings. Install only in accordance with the instructions in the section entitled, “Installation Recommendations” on page 3. 5.
AMP1A Series User Guide I n s ta l la t i o n R e c o m me n d a t io n s Installation Recommendations Unpacking Unpack the AMP1A Series monitor from the shipping container and inspect all components for shipping damage. If you find any damage, notify the shipping carrier for claims adjustments. Compare the shipping box contents to the packing slip. Contact Wohler’s customer support personnel about any discrepancies. (Wohler’s contact information in on the copyright page ii, of this manual).
A M P 1 A S e r i e s U s e r G u id e D e s c r ip t i o n Power Each unit comes with a standard 24VDC/3.0A internal power supply and connects an A/C mains power source (65W, 100 to 240 VAC, 50/ 60Hz) to the IEC connector provided on the rear panel of the unit. Electrostatic Discharge (ESD) As with most electronic equipment, static discharges can damage components within the unit. Take precautions to ensure your installation environment is not subject to ESD.
AMP1A Series User Guide Features Features • 98 dB SPL at two feet • Only one rack space high • Excellent high frequency response for positive detection of background whine and noise • Audible indication of phase/polarity problems • Thorough magnetic shielding for placement next to video monitors • Numerous control and input options • Quick and easy installation: simply slide in the rack and connect audio and AC power Specifications The AMP1A Series monitors meet the following specifications.
A M P 1 A S e r i e s U s e r G u id e S p e c if i c a ti o n s Table 1–1 Specification Distortion, Electrical Distortion, Acoustic Hum and Noise Magnetic Shielding Power Consumption (Average Maximum) AC Mains Input Dimensions Weight AMP1A Series Monitors Specifications AMP1A-30 AMP1A-106 AMP1A-LP10S AMP1A Plus < 0.
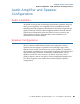
AMP1A Series User Guide Audio Amplifier and Speaker Configuration Audio Amplifier and Speaker Configuration Audio Amplifiers All AMP1 Series models contain high performance speakers driven by three power amplifiers; two amplifier/driver combinations handle midrange and high frequency information in the left and right (stereo) speaker channels, while the third amplifier channel sums the left and right channel information below the 500 Hz crossover point in the woofer (bass) speaker(s).
A M P 1 A S e r i e s U s e r G u id e O p t io n a l F e a t u r e s Figure 1–1 Audio Amplifier and Speaker Configuration Optional Features Wohler Technologies, Inc. offers by far the broadest range of standard production audio monitors.
AMP1A Series User Guide Front Panel Controls Front Panel Controls Common Controls • Speakers: The AMP1A internal speaker system is comprised of two mid-range tweeter speakers (left and right) and two woofer speakers (left and right). The two mid-range speakers reproduce, in stereo, only the mid and high frequencies, while the two woofer speakers monaurally reproduce the low frequencies. • Volume Control: This controls the loudness of the audio reproduced by the internal speakers or connected headphone.
A M P 1 A S e r i e s U s e r G u id e Front Panel Controls Example If an audio signal of a voice speaking English is fed to the "A" (left) input and a voice speaking Spanish is fed to the "B" (right) input, then the left speaker channel will reproduce the mid-range and high-range frequencies of the English speaking voice, the right speaker channel will reproduce the mid-range and high-range frequencies of the Spanish speaking voice, and the woofer speaker channel will reproduce the summed (combined) low-
AMP1A Series User Guide Front Panel Controls AMP1A-106-Specific Front Panel Controls Figure 1–3 AMP1A-106 Front Panel Volume Power Balance Level Meters Headphones Level Meter Brightness Speakers • Level Meters: The AMP1A-106 features two, 30-segment, bar graph audio meters. • Level Meter Brightness: This control is recessed into the front panel and can be accessed using a small flathead screwdriver. Turning it clockwise will increase the relative brightness of the bar graph LED segments.
A M P 1 A S e r i e s U s e r G u id e Front Panel Controls • Phase (LEDs): These three LEDs indicate the instantaneous and average phase (polarity) conditions between the sources) assigned to the left speaker channel and the source(s) assigned to the right speaker channel. The larger LED labeled AVG indicates the average phase condition between the left and right speaker channels. The two smaller LEDs labeled Φ+ and Φ- indicate the instantaneous phase relationships.
AMP1A Series User Guide Rear Panel Connectors Rear Panel Connectors Common Connectors • Power (IEC-320): Attach the included power cord between this connector and mains power (100 to 250VAC, 50 to 60 Hz). The front panel Power LED will glow green to indicate operating voltages are present. • Balanced Analog Audio Input (on XLR-F): These two 3-pin female XLR connectors (left and right) accept standard analog audio signals and are configured for 50K Ω balanced connections.
A M P 1 A S e r i e s U s e r G u id e R e a r P a n e l C o n n e ct o r s AMP1A-30 and AMP1-106 Rear Panel Connectors Figure 1–8 AMP1A-30 and AMP1-106 Rear Panel Analog Audio Loop-Through (Left & Right METER CALIB Wohler Technologies Tel +1-510-870-0810 Fax +1-510-870-0811 www.Wohler.com SERIAL NO. MONTH CH A(L) CH B(R) +8 VU/VU CALIBRATE +6 VU/PPM +4 PPM 253840 0 123456 YEAR Power DISPLAY MODE OPERATE Analog Audio In (Left & Right) 23 CH A(L) 100-240 VAC 50/60 Hz 1.
AMP1A Series User Guide Rear Panel Connectors Figure 1–9 Note: DIP Switch Settings Switch position 6 is not used. Calibration Instructions 1. Turn on the power. 2. Apply the desired reference level (nominal 0) signal to all channels. 3. Make sure the reference level DIP sections (2 and 3) are set to the nearest level of the input signal being applied for calibration (i.e., 0, +4, +6 or +8).
A M P 1 A S e r i e s U s e r G u id e R e a r P a n e l C o n n e ct o r s AMP1A-LP10S-Specific Rear Panel Connectors Balanced Inputs (Channels 1-10, Left and Right, 3-Pin Male Phoenix): These balanced (90K Ω) 3-pin Phoenix connectors accept standard analog audio signals. The two banks of inputs, Channel A (Left) and Channel B (Right), are comprised of ten connectors each for a total of twenty inputs (ten stereo pairs).
AMP1A Series User Guide I n te rn al S wi t ch S e t t in g s Internal Switch Settings After removing the top cover, you can access DIP switches that control level meter settings and/or calibration settings. AMP1A-30 and AMP1-106 Internal Switch Settings This 10-position DIP module is located on the 919174 PCB. Refer to Figure 1–12 below for a complete list of settings and functions. (Switch positions 1 and 10 are not used and should be left at the factory set position.
A M P 1 A S e r i e s U s e r G u id e In te r n a l Sw i tc h S e t ti n g s Figure 1–13 18 Internal DIP Switch Location © 2 00 9 Wo h le r Te ch n ol og ie s , I n c . A l l r i g h t s r e s e rve d .
AMP1A Series User Guide I n te rn al S wi t ch S e t t in g s Scale Selection The standard scale used on the 30-segment bar graph display for the AMP1A-30 is the Extended VU scale. However, if alternative scale characteristics are selected for the level meters by setting the Alternate Scale DIP switches (Figure 1–12 on page 17), it is recommended that a label with the appropriate scale be applied to the front panel LED bar graph level meters. Alternate scales include the VU, BBC, Nordic, and DIN scales.
A M P 1 A S e r i e s U s e r G u id e In te r n a l Sw i tc h S e t ti n g s Peak Hold The Peak Hold - Manual setting allows the bar graph display meters to indefinitely maintain the peak hold value until you reset it, either by pressing a reset button (a special option specified at time of order) or by removing power and then reapplying power to the unit (unplug/ replug power cord). Contact Wohler Technologies for more information about this feature.
AMP1A Series User Guide I n te rn al S wi t ch S e t t in g s Figure 1–16 AMP1-30 Phase Correlation Labels Figure 1–17 AMP1A-106 Phase Correlation Labels Positive amounts of correlation are indicated by an ascending amber bar in the lower (right channel) bar graph; negative correlation is shown when a red bar ascends in the top (left channel) bar graph.
A M P 1 A S e r i e s U s e r G u id e Technical Functional Overview Figure 1–18 Meter Input Gain Calibration and Display Mode DIP Switch Settings Meter Input Gain Calibration Settings DIP switch sections S1 and S2 set the meter input gain calibration, which determines the level of the input signal that will result in a "0" reading on the meter bar graphs. The factory setting is +4 dBv, but can instead be set for -6 dBv, 0 dBv, or +8 dBv by the user.
AMP1A Series User Guide T e c h n i c al F u n c ti o n al O v e r v ie w Figure 1–19 AM1A-30 Block Diagram 30-Segment High-Visibility Level Meters Left Right Volume Balance Loop-Thru Left Analog Input (A) Loop-Thru Headphone Left Stereo Analog Amplifier Right Right Analog Input (B) Phase Indication Left Speaker Woofer Speaker Woofer Speaker Right Speaker © 2 0 0 9 Wo h l e r Te c h n o l o g i e s , I n c . A l l r i g h t s r e s e r v e d .
AMP1A Series User Guide Technical Functional Overview Figure 1–20 AMP1A-106 Block Diagram Left 106-Segment High-Resolution Level Meters Right Volume Balance Loop-Thru Left Analog Input (A) Loop-Thru Left Stereo Analog Amplifier Right Right Analog Input (B) Phase Indication 24 © 2 0 0 9 Woh le r Te c h n o l o g i e s , I n c . A l l r i g h t s r e s e r v e d .
AMP1A Series User Guide T e c h n i c al F u n c ti o n al O v e r v ie w Figure 1–21 AMP1A-LP10S Block Diagram Right Input 1 2 3 4 5 Analog Inputs 6 7 8 9 10 Left Input 4 3 2 5 6 1 10 7 8 9 Source Pair Select Headphone 10-Segment Level Meters Left Right L R Stereo Output of Selected Source Volume Balance Stereo Analog Amplifier Phase Indication Left Speaker Woofer Speaker Woofer Speaker Right Speaker © 2 0 0 9 Wo h l e r Te c h n o l o g i e s , I n c . A l l r i g h t s r e s e r v e d .
AMP1A Series User Guide Technical Functional Overview Figure 1–22 AMP1A Plus Block Diagram Headphone Stereo Source Select 1 Left Input (Chan. A) 2 Right Input 1 (Chan. B) 2 26 Volume Balance Left Speaker 1 2 Left 1 Right 2 L R Selected Source Output © 2 0 0 9 Woh le r Te c h n o l o g i e s , I n c . A l l r i g h t s r e s e r v e d .