SDC-10
SDC-10 Preface ABOUT THIS MANUAL This manual is designed for use with the Wolf Cinema SDC-10 Home Cinema Projector. Information in this document has been carefully checked for accuracy; however, no guarantee is given to the correctness of the contents. The information and specifications in this document are subject to change without notice. COPYRIGHT © Copyright 2012 Wolf Cinema. This document contains proprietary information protected by copyright. All rights are reserved.
SDC-10 1080p D-ILA 3D Front Projector User’s Manual ® Notices WARNING! To meet FCC requirements, a shielded power cord is recommended in order to prevent interference. It is essential that only the supplied power cord is to be used. Use only shielded cables to connect I/O devices to this equipment. You are cautioned that changes or modifications not approved by the party responsible for compliance could void your authority to operate the equipment. WARNING! High-brightness light source.
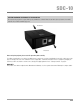
SDC-10 CAUTION REGARDING THE EXHAUST OF THE PROJECTOR Do not place the projector in a space that is poorly ventilated or confined. Allow at least 20 in. (50 cm) clearance from walls and have free air flow around the projector. ➟ Air Intake Vent ➟ ➟ Exhaust Vents Before using the projector, please read this operation guide carefully.
SDC-10 1080p D-ILA 3D Front Projector User’s Manual ® Contents Preface.................................................................................................................................................................................1 Notices .................................................................................................................................................................................2 Introduction ..............................................................
SDC-10 Menu .................................................................................................................................................................................38 Menu Settings and Adjustments..........................................................................................................................................38 Menu Button...........................................................................................................................................
SDC-10 1080p D-ILA 3D Front Projector User’s Manual ® Introduction System IR Remote PIC. ADJ. COLOR P.FILE COLOR TEMP GAMMA 3D INFO USER C.M.D. STAGE NATURAL BACK ANIME CINEMA PICTURE MODE MENU FILM LIGHT LENS AP. LENS MEMORY LENS. CONTROL HIDE 3D SETTING 3D FORMAT COMP. HDMI 2 HDMI 1 ON INPUT STAND BY ANAMO.
SDC-10 Thank you for purchasing the Wolf Cinema SDC-10 – a next-generation stereoscopic (3D) home cinema projector. Suitable for home theater screens up to 12’ in width, the SDC-10 is built around a three-chip, D-ILA® [Direct Drive Image Light Amplifier] light engine for ultra-high-fidelity 1080p viewing.
SDC-10 1080p D-ILA 3D Front Projector User’s Manual ® Getting Started Safety Precautions IMPORTANT INFORMATION This product has a High Intensity Discharge (HID) lamp that contains mercury. Disposal of these materials may be regulated in your community due to environmental considerations. For disposal or recycling information, please contact your local authorities or for USA, the Electronic Industries Alliance: http://www.eiae.org.
SDC-10 – Slots and openings in the cabinet are provided for ventilation. These ensure reliable operation of the product and protect it from overheating. These openings must not be blocked or covered. (The openings should never be blocked by placing the product on bed, sofa, rug, or similar surface. It should not be placed in a built-in installation such as a bookcase or rack unless proper ventilation is provided and the manufacturer’s instructions have been adhered to.
SDC-10 1080p D-ILA 3D Front Projector User’s Manual ® – Unplug this product from the wall outlet and refer service to qualified service personnel under the following conditions: a) When the power supply cord or plug is damaged. b) If liquid has been spilled, or objects have fallen on the product. c) If the product has been exposed to rain or water. d) If the product does not operate normally by following the operating instructions.
SDC-10 – When affixing the unit to the ceiling, please note that we do not take any responsibility, even during the warranty period, if the product is damaged due to use of ceiling mounts other than our own or if the installation environment of said ceiling fixtures is not appropriate. If the unit is suspended from the ceiling during use, please be careful with regard to the ambient temperature of the unit.
SDC-10 1080p D-ILA 3D Front Projector User’s Manual ® POWER CONNECTION For USA and Canada only Use only the following power cord. The power supply voltage rating of this product is AC110V – AC240V. Use only the power cord designated by our dealer to ensure Safety and EMC. Ensure that the power cable used for the projector is the correct type for the AC outlet in your country. Consult your product dealer.
SDC-10 Accessories/Optional Accessories Check your Accessories Remote Control 1 piece AAA size Batteries 2 pieces Power Cord For the US market (2 m) 1 piece Power Cord For the EU market (2 m) 1 piece Power Cord For the UK market (2 m) 1 piece • Instruction manual, warranty card and other printed material are also included. Optional Accessories Please check with your authorized Wolf Cinema dealer for details on all accessories, including the optional 3D glasses and emitter.
SDC-10 1080p D-ILA 3D Front Projector User’s Manual ® Controls & Features Main Body - Front Exhaust Vent Lens Exhaust Vent Lens This is a projection lens. Please do not look inside during projection. Remote Receiver (front) Please aim the remote control at this area when using it. • There is also a remote receiver at the rear. Indicator Please see “Status indicator lights display” for details. (Reference page: 17) Exhaust Vent Warm air flows out in order to cool the interior of the projector.
SDC-10 Main Body - Rear Remove the rear perforated door panel by turning the thumb screws in a counter-clockwise direction. Air Intake Vent Input Terminal Power Input Terminal Lamp Cover Air Intake Vent Operation Panel Remote Control IR Window (rear) Input Terminal These are the main system interconnect terminals – 2 HDMI inputs, 1 DB15 terminal for PC connection, 1 Component Video input, and so forth, plus ports to connect the optional 3D signal emitter.
SDC-10 1080p D-ILA 3D Front Projector User’s Manual ® Status Indicator Lights LED indicators are present during normal operation mode of this unit, and are displayed with the indicators for [STAND BY / ON], [LAMP], and [WARNING]. Meaning of the indicators: The indicator light in a steady state. The indicator light is “flashing” to alert the user to a state change. Operation Mode Displays the color and lighting/flashing of the [STAND BY / ON] indicator.
SDC-10 Front panel indicator lights inform you of various operating conditions with the projector. Certain warning notices are provided by the repeated flashing of the [WARNING] and [LAMP] indicators. Moreover, the [STAND BY / ON] indicator, which shows the operating mode of the unit, may also be displayed simultaneously with either indicator lights. During any [WARNING] mode indication, the light output is interrupted for about 60 seconds and the cooling fan is turned on.
SDC-10 1080p D-ILA 3D Front Projector User’s Manual ® Main Input Terminal HDMI 2 HDMI 1 LAN LAN 1 HDMI 2 Component RS-232C RS-232-C CR/PR CB/PB Y Remote 3D SYNCHRO PC TRIGGER REMOTE CONTROL 3D Synchro PC IR Trigger HDMI 1 Terminal You can connect any source component equipped with an HDMI output. There is also a M3 locking hole (hole depth 3mm). HDMI 2 Terminal You can connect any source component equipped with an HDMI output. There is also a M3 locking hole (hole depth 3mm).
SDC-10 Remote Control Remote Control Features ON STAND BY To Turn OFF the Projector To Turn ON the Projector INPUT This button sequentially switches 3D formats (*) This function cannot be used when inputing 2D and frame packing 3D singles HDMI 1 HDMI 2 COMP. 3D FORMAT 3D SETTING ANAMO. LENS. CONTROL LENS MEMORY LENS AP.
SDC-10 1080p D-ILA 3D Front Projector User’s Manual ® About Installation Important Points Concerning Installation Please read the following carefully before installation of this projector Installation Environment CAUTION This unit is a precision device. Therefore, please refrain from installation or usage in the following locations, otherwise, fire or serious malfunction may occur: • • • • • Dust, wet and humid locations. Sooty or cigarette smoke filled locations.
SDC-10 Please Be Careful During Use CAUTION This unit uses a projection lamp, which will get hot when in use. Please refrain from projecting in the following circumstances, otherwise, fire or serious malfunctions may occur: • Projection while lying on its side. Avoid projection if the installation of the unit is done at an excessive angle of more than ± 30 °. This may reduce life of the lamp and cause unwanted color shading.
SDC-10 1080p D-ILA 3D Front Projector User’s Manual ® Installing the Projector and Screen While installing, please place this unit and the screen perpendicular to each other. Failing to do so may increase trapezoidal distortion. Set Angle The angle range which can be set for this projector is ±30°. • Malfunctions may occur if the angle is not set within the above range.
SDC-10 Projector Mounting Measures to prevent the unit from toppling or dropping should be used for safety reasons and accident prevention. When mounting this unit on a pedestal or ceiling, use all the 4 screw holes provided (M5 screws) to mount. Ceiling Bottom Surface Air Inlets 4 x M5 Screws Mounting Precautions • Special expertise and techniques are required when mounting this unit. Be sure to ask your Wolf Cinema dealer to perform all desired mounting.
SDC-10 1080p D-ILA 3D Front Projector User’s Manual ® Screen Size and Projection Distance Determine the distance from the lens to the screen to achieve your desired screen size. This projector features a 2.0x power zoom lens.
SDC-10 Making the Connection Types of Possible Input Signals (PC Compatible) HDMI No. Designation Resolution fh [kHz] fv [Hz] dot CLK [MHz] Total No. of dots [dot] Total No. of lines [line] No. of effective dots [dot] No. of effective lines [line] 1 VGA 60 640 X 480 31.500 60.000 25.200 800 525 640 480 2 VGA 59.94 640 X 480 31.469 59.940 25.175 800 525 640 480 3 SVGA 60 800 X 600 37.879 60.317 40.000 1,056 628 800 600 4 XGA 60 1024 X 768 48.363 60.004 65.
SDC-10 1080p D-ILA 3D Front Projector User’s Manual ® Connecting Video Sources to the Projector • Do not turn on the AC power until all connections are completed. • The connection procedures vary according to the device(s) used. For specific details, refer to the instruction manual of the device(s) to be connected. • This unit is used for image projection only. Connect video source gear to audio processing devices (such as AV receivers, used with speakers) for proper sound output.
SDC-10 Connecting via HDMI Cable • For a video signal in compliance with the HDMI standard, a 340MHz cable is recommended. In case a cable is used with a reduced bandwidth of 75MHz, it is recommended to reduce output to 1080i or less from the video source. • If the video is not displayed properly, try an alternate cable, reduce the length of the HDMI cable, or lower the output resolution of the video source.
SDC-10 1080p D-ILA 3D Front Projector User’s Manual ® Connecting via Component Video Cable • Set “COMP.” in the setting menu to “Y Pb/Cb Pr/Cr”. (Reference page: 54) LAN 1 HDMI 2 RS-232-C 3D SYNCHRO BD/DVD Player CR/PR CB/PB PC Y TRIGGER REMOTE CONTROL Component Video Output Terminals CR/PR (red) To Component Video Input Terminals CB/PB (blue) Component Video Cable (sold separately) Y (green) Connecting via RGB Video Cable • Set “COMP.” in the setting menu to “RGB”.
SDC-10 Connecting a 3D Emitter • 3D emitter: This is a dedicated terminal for an optional 3D signal emitter (sold separately). • 3D glasses are optional devices, used in conjunction with the 3D emitter. CAUTION • 3D image quality may vary depending on the ambient room temperature and lamp usage. Stop using the projector in 3D modes if images cannot be projected correctly. • Before you watch 3D video images, make sure to read “3D Viewing” (Reference pages 59 to 61).
SDC-10 1080p D-ILA 3D Front Projector User’s Manual ® Connecting the Trigger Cable CAUTION • Do not supply power to the other devices. • Do not connect audio terminals of other devices using similar connectors such as headphones etc. Otherwise, this may cause a serious malfunction to the other devices and/or injury. • Usage beyond the rated values will cause system malfunctions. • Exercise caution to prevent short circuits, as the trigger terminal outputs a voltage of 12V.
SDC-10 Connecting LAN Terminal • The LAN network is used to control the unit. It is not used for transmission of the video signal. • Please contact your Wolf Cinema installer for questions regarding the network connection.
SDC-10 1080p D-ILA 3D Front Projector User’s Manual ® Connecting the AC Power Cord (provided) Once you have connected all video source equipment, connect the projector AC power cord.
SDC-10 Basic Operation Basic Operation Procedures Once you have completed all source component connections, the projector can be used with the following basic steps. 6 1 Turn On Power 1 ON STANDBY/ON Light on (Green) ON STAND BY • You can also press the INPUT HDMI 1 HDMI 2 COMP. 3D FORMAT 3D SETTING ANAMO. LENS. CONTROL LENS MEMORY LENS AP. HIDE 2 • Remove the lens cover [*] Be sure to remove the lens cover prior to use.
SDC-10 1080p D-ILA 3D Front Projector User’s Manual ® MEMO About Cool Down Mode • The Cool Down mode is a procedure to cool the lamp for approximately 60 seconds after turning off the projector. This function prevents the internal parts of the unit from deformation or damage due to lamp overheating. It also prevents lamp failure and premature shortening of lamp life.
* Need to address “A” input SDC-10 Setting the Screen Size ON STAND BY INPUT HDMI 1 HDMI 2 COMP. 3D FORMAT 3D SETTING ANAMO. LENS. CONTROL LENS MEMORY LENS AP. Image Sizing and Aspect Ratio [Refer also to page 36 of the SDC-15 User’s Manual] You can quickly change the screen size (aspect ratio) of the projected image, or mask image borders as desired if the surrounding edges of the image area are distorted.
SDC-10 1080p D-ILA 3D Front Projector User’s Manual ® ON STAND BY B Masking the Borders of an Image Images where the borders have deteriorated, or image quality reduced can be masked (hidden) from the main body of the projected image. Project an Image INPUT HDMI 1 HDMI 2 COMP. 3D FORMAT 3D SETTING ANAMO. LENS. CONTROL LENS MEMORY LENS AP. HIDE LIGHT 1 Select Menu Picture Adjust Picture Mode Color Profile Color Temp.
SDC-10 ON STAND BY C Temporary Turning-Off Video You can temporarily hide the projected image. INPUT C HDMI 1 HDMI 2 COMP. 3D FORMAT 3D SETTING ANAMO. LENS. CONTROL LENS MEMORY LENS AP. HIDE LIGHT • Press the HIDE button again to display the image. • AC power cannot be turned off when the image is hidden. D Keystone Adjustment Keystone adjustment may be used if the projector is installed at an angle that is not parallel to the screen (horizontal or vertical).
SDC-10 1080p D-ILA 3D Front Projector User’s Manual ® Menu Menu Settings and Adjustments Structure of the Menu Hierarchy (summary) The projector’s Menu “tree” is organized generally as follows. As this is only a brief outline, certain controls in your projector may be different due to software and/or feature changes; also there will likely be certain menu items which might not be displayed or made readily accessible depending upon model.
SDC-10 3 Installation 4 Display Setup Installation Display Setup Lens Control Back Color Pixel Adjust Menu Position Installation Style Keystone Anamorphic Front Menu Display Line Display Off Source Display Screen Adjust Black Level Select Back BACK Continued from the Previous Page On English Operate Exit MENU On 5 sec On Language Operate Exit MENU Logo Black Select Back BACK Continue to the Next To “3 Layers and organization of the installation submenu” 39
SDC-10 1080p D-ILA 3D Front Projector User’s Manual ® 6 Information 5 Function Information Function Trigger Off Input : HDMI-2 Off Timer Off Source : 1080p60 High Altitude Mode Off Deep Color : 10bit Communication Terminal LAN Lamp Time : 160H Network Lamp Reset Operate Exit MENU Back BACK Select Operate Exit MENU Back BACK Select Continued from the Previous Page Information Function Trigger Off Off Timer Off High Altitude Mode Off Lamp Reset Operate Exit MENU Back
SDC-10 1 Layers and Organization of the Picture Adjust Submenus 1 Picture Adjust 1-1 Color Temperature Picture Adjust Picture Adjust 1-1 1-2 Picture Mode Film Color Profile Color Temp. Gamma Film Tone Contrast Brightness Color Tint Film1 Preset Xenon1 Custom1 Custom2 Custom3 Color Temp.
SDC-10 1080p D-ILA 3D Front Projector User’s Manual ® 2 Layers and Organization of the Input Signal Submenu 2 Input Signal 2-1 HDMI Input Signal 2-1 2-2 2-3 Input Signal HDMI HDMI COMP. Input PC Level Check Picture Position Enhanced Color Space Auto Aspect(Video) 16:9 Control with HDMI Off Mask Off 3D Format Auto Progressive Auto Operate Exit MENU Back Select BACK Operate Exit MENU Select Back BACK 2-2 COMP. Input Signal 2-1 2-2 Input Signal COMP. HDMI Color Space COMP.
SDC-10 Layers and organization of the submenus 3 installation and 5 function 3 Installation 3-1 Lens Control Installation 3-1 3-2 Installation Lens Control Lens Control Pixel Adjust Focus Installation Style Front Keystone Anamorphic Zoom Shift Off Lens Cover Screen Adjust Black Level Operate Exit MENU Back Select Auto Image Pattern On Lock Off Operate Exit BACK MENU Select Back BACK 3-2 Pixel Adjust Installation Pixel Adjust Horiz. Red 3 Horiz. Green 3 Horiz. Blue 3 Vert.
SDC-10 1080p D-ILA 3D Front Projector User’s Manual ® Menu Button Operate the menu by use of the buttons on the projector body or on the remote control. STANDBY/ON INPUT OK Button Projector Function IR Remote Menu Operation Button Menu is Displayed While the menu is displayed, the menu screen is turned off. While showing “Main menu” (Layer 1) selected items are confirmed, and “Submenus” (Layer 2) will be displayed.
SDC-10 Menu Operation Procedures STANDBY/ON 1 Press MENU The main menu is displayed on the screen. INPUT OK 3 3 Picture Adjust 5 2 MENU 4 BACK 1 6 Picture Mode Film Color Profile Color Temp. Gamma Film Tone Contrast Brightness Color Tint Film1 Xenon1 Film1 0 0 0 Reset Operate Exit MENU ON HDMI 2 COMP. 3D FORMAT 3D SETTING ANAMO. LENS. CONTROL LENS MEMORY LENS AP.
SDC-10 1080p D-ILA 3D Front Projector User’s Manual ® Menu Item Descriptions All numbers for the items within [ ] are default settings. • It is possible to operate all items displayed in the menu display by pressing OK/BACK or the cursor (up, down, left, right arrows). • Displayed items vary depending on the selected item in the menu and type of input signal (or absence of any signal). 1 Picture Adjust Picture Mode Please refer to the description of each mode, and then use the mode best suited for you.
SDC-10 [Table 1] The Settings and Default Values of the Picture Mode Color Profiles Picture Mode Color Profile Film Film 1 Film 2 Cinema Cinema 1 Cinema 2 Standard Anime Anime 1 Anime 2 Standard Natural Video Vivid Adobe Standard Stage Stage Standard 3D 3D Standard Vivid User 1-5 Everything is displayed except for Film 1 and Film 2 This is the default value according to the picture mode. Color Temp. Adjust color temperature. To “[1-1] Color Temp.” of the submenu Gamma Adjust gamma curve.
SDC-10 1080p D-ILA 3D Front Projector User’s Manual ® Contrast Adjusts the contrast (white level) of the image. Settings: (darker) -50 to 50 (whiter) Brightness Adjusts the brightness (black level) of the image. Settings: (dark) -50 to 50 (bright) Color Adjusts the color intensity of the image. Settings: (less saturated), -50 to 50 (saturated) Tint Adjusts the image tint (hue) of the image.
SDC-10 1-2 Advanced Sharpness Adjust sharpness and detail enhancement via “[1-2-1] Sharpness” of the submenu. NR Reduces unwanted noise in the video image. Adjust to preference. RNR MNR BNR Color Space Standard Wide 1 Wide 2 Adjusts the intensity of random noise elimination of the image. Values: (Low) 0 to16 (strong) [0] Adjusts the intensity of mosquito noise elimination of the image. (*) It is not possible to set when the “Picture Mode” is set to “3D”.
SDC-10 1080p D-ILA 3D Front Projector User’s Manual ® Clear Motion Drive Off Mode 1 Mode 2 Mode 3 Mode 4 Inverse Telecine CMD Demo Left Right Top Bottom Off This setting improves scenes with fast motion, helping to produce clearer images with little residual image retention. For PC and 3D signals, the “Clear motion Drive” cannot be used. On occasions the image may appear distorted in some scenes, or light and dark flashes might occur. In this case, please choose “Off”, and then a setting of your choice.
SDC-10 1-2-1 Sharpness Sharpness Emphasizes the outline sharpness of all images. Adjust to your preference. Values: 0 to 50 (sharper) Detail Enhance This control makes minute details of the image “stand out.” Adjust to your preference. Values: 0 to 50 (strong) 1-2-2 Custom Gamma Custom 1~3 Correction Value Gamma Adjustment White Red Green Blue Reset [1] Create custom gamma curves and save in the Custom 1, 2, and 3 memory settings. Please adjust to your preference.
SDC-10 1080p D-ILA 3D Front Projector User’s Manual ® 2 Input Signal HDMI Select the available HDMI input signal via the submenu “[2-1] HDMI”. COMP. Component video input selection via the submenu “[2-2] COMP.”. Picture Position An adjustment may be enabled if the edges of the picture are partially missing due to the timing of horizontal and vertical synchronization signals. The value of the picture position depends on the input signal.
SDC-10 2-1 HDMI Sets the dynamic range of the input video images (scale). Dark and bright areas, which are not matched correctly, might get brighter or darker. If you are unsure of the input signal dynamic range, please review “Level Check”. Settings: Standard, Enhance, Super White Input Standard This is most commonly used when the input signal is standard video, and the resulting dynamic range levels fall between 16-235.
SDC-10 1080p D-ILA 3D Front Projector User’s Manual ® Parallax This function enables fine adjustment of any misalignmemt of the left and right 3D video images. Adjust these settings to your preference by using the [LEFT]/[RIGHT] keys. Press the [OK] key to display the adjustment window. The [BACK] key returns you to the previous screen. (*) Cannot be adjusted when the “2D/3D” feature is ON. Settings: -15~15 Crosstalk Cancel This reduces cross-talk within 3D image content.
SDC-10 Anamorphic A B Off The video images are enlarged [stretched] in the vertical direction of the panel resolution. This setting is used when one uses the anamorphic lens to enlarge them in the horizontal direction. (*) Anamorphic modes cannot be set when there is a 3D signal input. If a 3D signal is fed in whenever the Anamorphic modes are set to A or B, the Anamorphic modes are automatically turned Off. Settings: A, B, Off [Off] Video with an aspect ratio of 2.
SDC-10 1080p D-ILA 3D Front Projector User’s Manual ® All Clear Use this to delete ALL characters. Move the select cursor to the desired location and press the [OK] button. A delete confirmation message will appear. OK Use this function to save the entered name information. Select [OK] and a saved confirmation message will appear.
SDC-10 4 Display Setup Back Color Blue Black Menu Position Menu Display 15 sec On Line Display 5 sec Off Source Display On Off Sets the background color when no input signal is detected. Settings: Blue, Black Sets the background color to blue. Sets the background color to black. Sets the position of the on-screen menu. By pressing the [OK] button, an image illustration appears at the position of the menu. The highlighted position in the illustration can be moved via the left and right keys.
SDC-10 1080p D-ILA 3D Front Projector User’s Manual ® Off 1 Hour 2 Hour 3 Hour 4 Hour High Altitude Mode On Off Communication Terminal RS-232C LAN Power is not turned off. Power is turned off automatically after 1 hour. Power is turned off automatically after 2 hours. Power is turned off automatically after 3 hours. Power is turned off automatically after 4 hours. Used when the projector is installed at higher elevations (appx. 3000 feet , or 900m above sea level). Settings: On, Off [Off] Set. Not set.
SDC-10 Operation Guide 100% THE LIGHT OUTPUT Operation Guide Glossary 0% 0% 100% INPUT SIGNAL VALUE THE LIGHT OUTPUT 100% Gamma Curve Gamma encoding of images is required to compensate for properties of human vision - to maximize the use of the bits or bandwidth [in digital devices] relative to how humans perceive light and color. Human vision under common illumination conditions (not pitch black or blindingly bright) follows an approximate gamma or power function.
SDC-10 1080p D-ILA 3D Front Projector User’s Manual ® 3D [Stereoscopic] Viewing This is a brief description of the 3D methodology available from this projector. You will need 3D-glasses, a 3D emitter that synchronizes the active shutter glasses with the projected images (3D glasses and emitter sold separately), plus appropriate content from a 3D Blu-ray player, cable or satellite system, or game console. The 3D scheme employed by this system utilizes the principle of binocular parallax.
SDC-10 In most cases, 3D images are produced horizontally and are meant to be displayed in the horizontal viewing plane. Since it is known that 3D viewing can cause certain problems with sensitive or young viewers (such as motion sickness), please do not hold the 3D glasses slanted relative to the video images. Please watch 3D images from a distance approximately three times the height of the screen. For example, for a projected image on a 120-inch diagonal screen, that screen is just under 5-feet tall.
SDC-10 1080p D-ILA 3D Front Projector User’s Manual ® The frame sequential method is a way of displaying left- and right-eye video images [sequentially]. The projector projects the video images used for the left- and right-eyes directly onto the screen. The video images for the left and right side are only visible with the respective eye, as the left and right sides of the 3D glasses are opened and/or shut rapidly by a liquid crystal shutter.
SDC-10 Replacing the Lamp When the lamp run time approaches 3,000 hours, a message is displayed on the screen and the lamp replacement is encouraged. • NEVER insert your hands into the ANY opening while AC power is connected! This could cause product failure plus severe personal injury, electric shock and even death. • Do not replace the lamp immediately after the projector has been used; allow a cooling period of 1 hour or more before lamp replacement.
SDC-10 1080p D-ILA 3D Front Projector User’s Manual ® 5 Remove the Power Plug from the Outlet Use only genuine replacement parts for the lamp unit. Also, never attempt to reuse an old lamp. This may cause a malfunction. • Do not touch the surface of a new lamp. This may shorten the lamp life and cause lamp blowout. Handle 6 Tighten the Screws of the New Lamp Unit • Tighten the screws with a screwdriver.
SDC-10 ON STAND BY Resetting Lamp Time After replacing a lamp unit, please reset the lamp time. Reset the lamp time from the menu screen. INPUT HDMI 1 HDMI 2 COMP. 3D FORMAT 3D SETTING ANAMO. LENS. CONTROL LENS MEMORY LENS AP. 1 Display the Setting Menu Picture Adjust HIDE LIGHT Picture Mode Film Color Profile Color Temp.
SDC-10 1080p D-ILA 3D Front Projector User’s Manual ® Reset the lamp time by remote control. ON STAND BY 1 Insert the Power Plug to the Power Outlet INPUT Red Lights 2 Operate the Remote Control with the Projector in the Standby Mode (the projector is powered, but is not turned on) • Press in the order as shown. HDMI 1 HDMI 2 COMP. 3D FORMAT 3D SETTING ANAMO. LENS. CONTROL LENS MEMORY LENS AP.
SDC-10 Filter Pull the AC power plug from the power outlet before cleaning. Cleaning and Replacing Filters Clean the filter regularly or air intake efficiency may deteriorate and malfunction may occur. 1 Remove the Filter MEMO If the filter is Damaged or Too Dirty to be Cleaned • Replace with a new filter. A dirty filter will not protect the internal parts of the unit and may cause shadows to appear on the video image. • To purchase a new filter contact your authorized Wolf Cinema dealer.
SDC-10 1080p D-ILA 3D Front Projector User’s Manual ® Troubleshooting Before Sending the Projector Back to Your Authorized Dealer for Repair, Please Check the Following • You do not need to worry about the following situations if there is no visual abnormality on-screen. • Part of the top surface or front of the unit runs hot. • A creaking sound is heard from the unit. • An operating sound is heard from the inside of the unit. • Color smears occur on some screens.
SDC-10 The Picture Cannot be Projected from HDMI Sources Will the picture flicker and become invisible with HDMI input? Please use a shorter HDMI cable. Reference page: 28 The Image Cannot be Seen from an HDMI Source Is the setup of “Control with HDMI” function “Off”? Set up the “Control with HDMI” function to “Off”. Reference page: 53 • Even if the “Control with HDMI” function is “On”, there are still some devices that cannot reveal images normally via HDMI.
SDC-10 1080p D-ILA 3D Front Projector User’s Manual ® Error Messages Message Cause (Details) No device is connected to the input terminals. The input terminal is connected but there is no signal. Input appropriate video signals from compatible sources. A video signal that cannot be used in this unit has been connected. Input video signals that can be used. *The names of input terminals such as COMP. will be displayed in yellow.
SDC-10 RS-232C Interface The projector may be remotely controlled when connected with an RS-232C cross cable (D-Sub9 pin) to a PC or system controller. The projector can also be connected to a computer network by connecting it with a LAN cable and sending the proper control commands. Contact your Wolf Cinema dealer for additional details. RS-232C Specifications Pin No.
SDC-10 1080p D-ILA 3D Front Projector User’s Manual ® Command Format The command between this unit and the computer consists of “Header”, “Unit ID”, “Command”, “Data” and “End”. • Header (1 byte), Unit ID (2 bytes), Command (2 bytes), Data (n bytes), End (1 byte). Header This hexadecimal code indicates the start of communication.
SDC-10 Reference command and data (hexadecimal code) Command Type 5057 Power supply 4950 Input Data Description During standby or power on 30: Standby mode 31: Power-on mode 32: During Cool Down mode 34: Warning mode During power on 32: COMP. 36: HDMI 1 37: HDMI 2 End This code indicates the end of communication. The hexadecimal code is fixed at “0A”. Remote Control Code • hexadecimal code is sent during communication.
SDC-10 1080p D-ILA 3D Front Projector User’s Manual ® RS-232C Communication Examples This section shows the communication examples of RS-232C. Operating Command Type Connection check Power (On) Power (Off) Input (COMP.
SDC-10 Copyright and Caution About Trademarks and Copyright • HDMI, HDMI logo and high definition multimedia interface are trademarks or registered trademarks of HDMI Licensing LCC. Caution D-ILA Device Characteristics Do not project still pictures or pictures that have still segments for a long period of time. The still parts of the picture may remain (“burn in”) onto the screen. Take special notice of images on the screens of video games and computer programs.
SDC-10 1080p D-ILA 3D Front Projector User’s Manual ® Specifications Product Name Wolf Cinema SDC-10, 3D D-ILA Home Cinema Projector Model Name SDC-10 Display Panel/Size D-ILA device * 2 *3 0.7” (1920 pixels x 1080 pixels) x 3 (total no. of pixels: approx. 6.22 million) Projection Lens 2.0 x power zoom lens (1.45:1 to 2.78:1) (zoom/focus: power) VariScope™ Three user-adjustable lens presets - 1.78:1, 1.85:1 and 2.
SDC-10 Operation Environment Temperature: 5ºC to 35ºC Humidity: 20% to 80% (no condensation) (storage temperature: -10 C to 60 C) Installation Height Recommended below 5000 ft (1524 m). (High altitude operating mode available) Dimensions (WxHxD) 19.5 x 8.8 x 22.5 in., 496 x 224 x 572 mm Weight 60 lbs., 28 kg. net / 75 lbs., 34 kg. shipping Accessories (Please see page 14 of this User’s Manual) Notes: * 2 D-ILA is the abbreviation for Direct-Drive Image Light Amplifier.
Wolf Cinema – The New Standard of Excellence Wol f C i n ema 2431 Fif t h S t . Be r k e le y . C A 94710 Te l: 510. 843.4500 . Fa x : 510. 843. 7120 © 2 011 W o l f C i n e m a www.wolfcinema.