
riser installation

Riser Installation
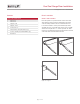
INSTALL CENTER SUPPORT
Place center support bracket on a protected work surface
then place the riser back panel on the center support and
install one #8 x
1
/2" screw in the lower hole. Refer to the
illustration below.
INSTALL BACK PANEL
Remove the protective material from the black tape on the
center support anges then carefully align the center
support hole with the center hole on the front panel. Angle
the center support slightly to ensure the tape doesn't adhere
before the support is properly aligned with the center hole.
Once aligned, press the tape to secure the bracket to the
front panel, then secure using #8 x
1
/2" screws. The number
of screws used is dependent on the height of the riser. Refer
to the illustration below.
wolfappliance.com 800.222.7820
INSTALL RISER
Remove the island trim from the range by extracting the
screws along the top and both sides. Place the new riser
on the range. With the riser properly positioned, insert two
screws through the back of the range and into the right, left
and center supports. For 48" (1219) wide risers insert two
screws into the right and center supports only.
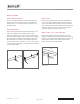
INSTALL SHELF – 20" (508) TALL RISER ONLY
Remove all remaining protective material from the riser.
Install two shoulder screws per side. For the 60" (1524) riser,
install one screw in the center. Align the keyhole slots on the
shelf with the shoulder screws and lower the shelf into
position. Refer to the illustration below.
page 2 of 2
823283 REV-A 10/2013
SHELF
SHOULDER
SCREWS
KEYHOLE
SLOTS
Attach shelf.
Back panel installation.
Center support.